The native Video SDK provides two methods of screen sharing on iOS and Android:
- Broadcasting the entire screen
- Sharing a single view with
appShareWithView(not yet supported)
Currently appShareWithView is not supported in the React Native SDK.
Android
Follow the instructions for enabling screen sharing on native Android apps to request permissions and create a service in the activity (copied below).
Add the following code to the dependencies section of your android/app/build.gradle file to add the Zoom Video SDK dependency:
dependencies {
    implementation "us.zoom.videosdk:zoomvideosdk-core:1.13.10"
    implementation "us.zoom.videosdk:zoomvideosdk-videoeffects:1.13.10"
    implementation "us.zoom.videosdk:zoomvideosdk-annotation:1.13.10"
    // ...
}
Add the FOREGROUND_SERVICE_MICROPHONE permission to the android/app/src/main/AndroidManifest.xml file:
<manifest xmlns:android="http://schemas.android.com/apk/res/android">
  <uses-permission android:name="android.permission.FOREGROUND_SERVICE_MICROPHONE"/>
<!-- ... -->
Add the following to android/app/src/main/java/com/anonymous/zoomexpo/MainActivity.kt file to request permissions and start the screen share:
import android.app.Activity;
import android.content.Intent;
import us.zoom.sdk.ZoomVideoSDK;
import us.zoom.sdk.ZoomVideoSDKShareHelper;
...
  override fun onActivityResult(requestCode: Int, resultCode: Int, data: Intent?) {
      super.onActivityResult(requestCode, resultCode, data)
      if (requestCode == 0 && resultCode == Activity.RESULT_OK) {
          val intent = Intent(this, NotificationService::class.java)
          val shareHelper = ZoomVideoSDK.getInstance().shareHelper
          if (Build.VERSION.SDK_INT >= Build.VERSION_CODES.O) {
              startForegroundService(intent)
          } else {
              startService(intent)
          }
          shareHelper.startShareScreen(data)
      }
  }
If you are running Android O or later, you must first implement a Service to be run as a foreground service before starting the screen share. Foreground services require a notification, which also requires a notification channel as of Android O.
Create a notification service to run as a foreground service before starting the screen share. Create a new file as android/app/src/main/java/com/anonymous/zoomexpo/NotificationService.java, here's what it should look like:
package com.anonymous.zoomexpo;

import android.app.NotificationChannel;
import android.app.NotificationManager;
import android.app.Service;
import android.content.Context;
import android.content.Intent;
import android.os.Build;
import android.os.IBinder;

import androidx.core.app.NotificationCompat;

import us.zoom.sdk.ZoomVideoSDK;

public class NotificationService extends Service {
  private final String CHANNEL_ID = "rn_zoom_video_sdk_notification_channel_id";
  private final int NOTIFICATION_ID = 9;

  @Override
  public void onCreate() {
    super.onCreate();
    NotificationCompat.Builder builder = new NotificationCompat.Builder(getApplicationContext(), CHANNEL_ID)
      .setAutoCancel(false)
      .setOngoing(true)
      .setContentText("RNZoomVideoSDK Screen Share");

    if (Build.VERSION.SDK_INT >= Build.VERSION_CODES.O) {
      NotificationManager manager = (NotificationManager) getSystemService(Context.NOTIFICATION_SERVICE);
      NotificationChannel channel = manager.getNotificationChannel(CHANNEL_ID);

      if (channel == null) {
        channel = new NotificationChannel(CHANNEL_ID, "RNZoomNotification", NotificationManager.IMPORTANCE_DEFAULT);
        if (channel.canShowBadge()) {
          channel.setShowBadge(false);
        }
      }
      if (manager != null) {
        manager.createNotificationChannel(channel);
      }
      startForeground(NOTIFICATION_ID, builder.build());
    }
  }

  @Override
  public int onStartCommand(Intent intent, int flags, int startId) {
    return super.onStartCommand(intent, flags, startId);
  }

  @Override
  public void onDestroy() {
    super.onDestroy();
    ZoomVideoSDK.getInstance().getShareHelper().stopShare();
    ZoomVideoSDK.getInstance().leaveSession(false);
  }

  @Override
  public IBinder onBind(Intent intent) {
    return null;
  }

  public void onTaskRemoved(Intent rootIntent) {
    NotificationManager manager = (NotificationManager) getSystemService(Context.NOTIFICATION_SERVICE);
    manager.cancel(NOTIFICATION_ID);
    stopSelf();
    ZoomVideoSDK.getInstance().getShareHelper().stopShare();
    ZoomVideoSDK.getInstance().leaveSession(false);
  }
}
iOS
Follow the instructions for enabling screen sharing on native iOS apps (copied below).
Prerequisites
- You have a good understanding of Broadcast Extensions , AppGroupIDs , and ReplayKit . Zoom uses these technologies and various Apple video frameworks to implement screen sharing. If you're unfamiliar with these topics, we encourage you to gain an understanding before you begin.
- You have integrated the
ZoomVideoSDK.xcframeworkinto your project and implemented a basic video session feature.
1. Create a new target
Use the Broadcast Upload Extension template to create a new target in your app. Click File->New->Target, select Broadcast Upload Extension in the iOS tab, and click Next. Set the target name as ScreenShare, select your desired language, and click Finish. If you are prompted to activate a scheme, click Activate.
After the target creation, Replaykit framework will be added automatically under Frameworks and Libraries option of the ScreenShare target. Ensure that the Do not Embed option is applied to this framework.
2. Configure target settings
The Video SDK does not support Bitcode. Therefore, you must disable bitcode for your targets.
Under Targets, navigate to ScreenShare -> Build Settings -> Build Options -> Setting and set the value of Enable Bitcode setting to No. Repeat this step for your main target if you haven't already done so.
The ZoomVideoSDKScreenShare framework utilizes C++ libraries. To make your project compatible with these libraries, make the following changes within your ScreenShare target:
- If you are using Objective-C, navigate to ScreenShare -> SampleHandler.m and rename it to SampleHandler.mm.
- If you are using Swift, navigate to the ScreenShare target -> Build Settings -> Other Linker Flags, and add the value "-lc++".
Add Background mode in the project target to enable screen share when minimizing the app. To do so, go to Project_Target -> Signing & Capabilities -> Background Modes -> and select Audio, AirPlay and Picture in Picture.
3. Import frameworks
Under Frameworks, Libraries, and Embedded Content, copy the CptShare.xcframework into your Xcode project folder and "Embed & Sign" it.
Import the ZoomVideoSDKScreenShare framework into the ScreenShare app extension target. You can do so by either dragging the framework into Xcode or by navigating to the Frameworks section of the ScreenShare target. If you are asked to specify the target, select the ScreenShare target (not the main target).
The ZoomVideoSDKScreenShare framework utilizes the following Apple video frameworks to improve the screen sharing experience.
- CoreGraphics.framework
- CoreVideo.framework
- CoreMedia.framework
- VideoToolbox.framework
Navigate to the Frameworks and Libraries option in the General tab of the ScreenShare target and click the "+" icon to search and include these frameworks.
4. Implement a bridging header
The ZoomVideoSDKScreenShare framework works by utilizing the callbacks within the SampleHandler. If you are using Swift in your project , you must implement a bridging header to expose the ZoomVideoSDKScreenShare framework to SampleHandler.swift.
If you are using Objective-C instead of Swift in your project, skip to the next step.
Create a temporary Objective-C file within your target by navigating to SampleHandler.swift in the project explorer, and clicking File -> New File -> Objective-C File. Give this file a name and click Next. Add this file to the ScreenShare target only and click Create.
Once Xcode prompts you to create an Objective-C bridging header, click Create Bridging Header. If you didn't see a prompt, you must create the bridging header manually within the ScreenShare target.
After completing these steps, in the ScreenShare target, you should see the bridging header file. The file name contains the product module name followed by -Bridging-Header.h.
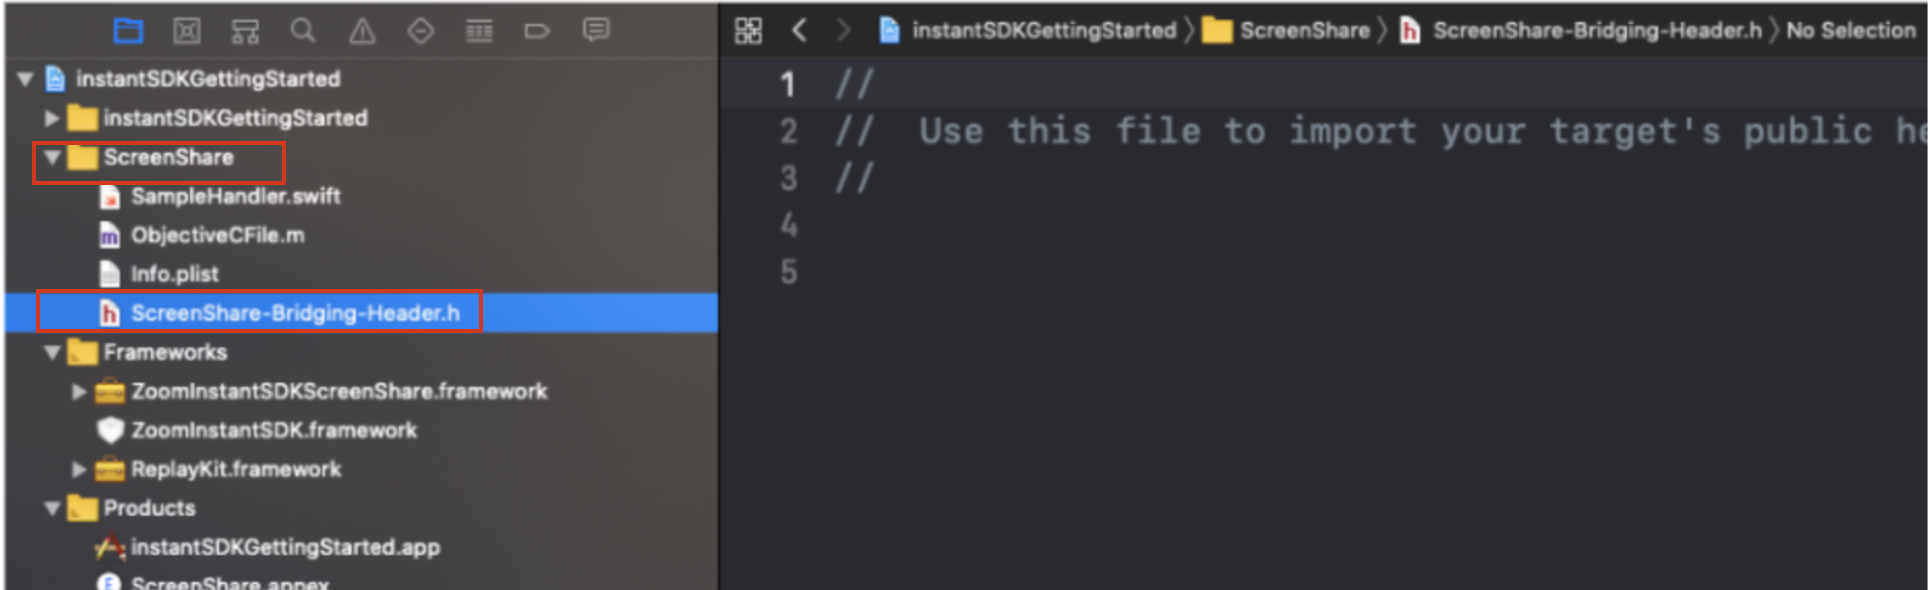
Import the ZoomVideoSDKScreenShareService framework by adding the following line of code in the bridging header file (ScreenShare-Bridging-Header.h):
#import <ZoomVideoSDKScreenShare/ZoomVideoSDKScreenShareService.h>
You may now delete the temporary Objective-C file(not the bridging header file) that you created earlier.
5. Set up SampleHandler
The SampleHandler class is where the code to handle different broadcasting events resides. To handle the events, you must:
-
Conform
SampleHandlertoZoomVideoSDKScreenShareServiceDelegateto establish communication betweenReplayKitand the Video SDK. -
Pass the
SampleHandlercallbacks into the VideoSDK. To do this, create aZoomVideoSDKScreenShareproperty, assign theSampleHandleras its delegate, and call the delegate functions from the relativeSampleHandlercallbacks.
SampleHandler.swift
import Foundation
import ReplayKit
class SampleHandler: RPBroadcastSampleHandler, ZoomVideoSDKScreenShareServiceDelegate {
    var screenShareService: ZoomVideoSDKScreenShareService?
    override init() {
        super.init()
        // Create an instance of ZoomVideoSDKScreenShareService to handle broadcast actions.
        let params = ZoomVideoSDKScreenShareServiceInitParams()
        // Provide your app group ID from your Apple Developer account.
        params.appGroupId = "your app group ID here"
        // Set this to true to enable sharing device audio during screenshare
        params.isWithDeviceAudio = true
        let service = ZoomVideoSDKScreenShareService(params: params)
        self.screenShareService = service
        screenShareService?.delegate = self
    }
    override func broadcastStarted(withSetupInfo setupInfo: [String : NSObject]?) {
        guard let setupInfo = setupInfo else { return }
        // Pass setup info to SDK.
        screenShareService?.broadcastStarted(withSetupInfo: setupInfo)
    }
    override func broadcastPaused() {
        // Notify SDK the broadcast was paused.
        screenShareService?.broadcastPaused()
    }
    override func broadcastResumed() {
        // Notify SDK the broadcast was resumed.
        screenShareService?.broadcastResumed()
    }
    override func broadcastFinished() {
        // Notify SDK the broadcast has finished.
        screenShareService?.broadcastFinished()
    }
    override func processSampleBuffer(_ sampleBuffer: CMSampleBuffer, with sampleBufferType: RPSampleBufferType) {
        // Pass sample bugger into SDK.
        screenShareService?.processSampleBuffer(sampleBuffer, with: sampleBufferType)
    }
    func zoomVideoSDKScreenShareServiceFinishBroadcastWithError(_ error: Error?) {
        guard let error = error else { return }
        // Terminate broadcast when notified of error from SDK.
        finishBroadcastWithError(error)
    }
}
SampleHandler.m
#import "SampleHandler.h"
#import <ZoomVideoSDKScreenShare/ZoomVideoSDKScreenShareService.h>
@interface SampleHandler () <ZoomVideoSDKScreenShareServiceDelegate>
@property (strong, nonatomic) ZoomVideoSDKScreenShareService * screenShareService;
@end
@implementation SampleHandler
- (instancetype)init
{
    self = [super init];
    if (self) {
        // Create an instance of ZoomVideoSDKScreenShareService to handle broadcast actions.
        ZoomVideoSDKScreenShareServiceInitParams *params = [[ZoomVideoSDKScreenShareServiceInitParams alloc] init];
        // Provide your app group id from your Apple Developer account.
        params.appGroupId = @"your app group ID here";
        // Set this to true to enable sharing device audio during screenshare
        params.isWithDeviceAudio = YES;
        ZoomVideoSDKScreenShareService * service = [[ZoomVideoSDKScreenShareService alloc]initWithParams:params];
        self.screenShareService = service;
        self.screenShareService.delegate = self;
    }
    return self;
}
- (void)dealloc
{
    self.screenShareService = nil;
}
- (void)broadcastStartedWithSetupInfo:(NSDictionary<NSString *,NSObject *> *)setupInfo {
    // User has requested to start the broadcast. Setup info from the UI extension can be supplied but optional.
    [self.screenShareService broadcastStartedWithSetupInfo:setupInfo];
}
- (void)broadcastPaused {
    [self.screenShareService broadcastPaused];
    // User has requested to pause the broadcast. Samples will stop being delivered.
}
- (void)broadcastResumed {
    [self.screenShareService broadcastResumed];
    // User has requested to resume the broadcast. Samples delivery will resume.
}
- (void)broadcastFinished {
    // User has requested to finish the broadcast.
    [self.screenShareService broadcastFinished];
}
- (void)processSampleBuffer:(CMSampleBufferRef)sampleBuffer withType:(RPSampleBufferType)sampleBufferType {
    [self.screenShareService processSampleBuffer:sampleBuffer withType:sampleBufferType];
}
- (void)ZoomVideoSDKScreenShareServiceFinishBroadcastWithError:(NSError *)error
{
    [self finishBroadcastWithError:error];
}
@end
6. Set up App Groups
Use App Groups to establish communication between your ScreenShare target, and your application's main target.
Enable App Groups by navigating to your application's main target -> Signing and Capabilities -> + Capability and selecting App Groups.
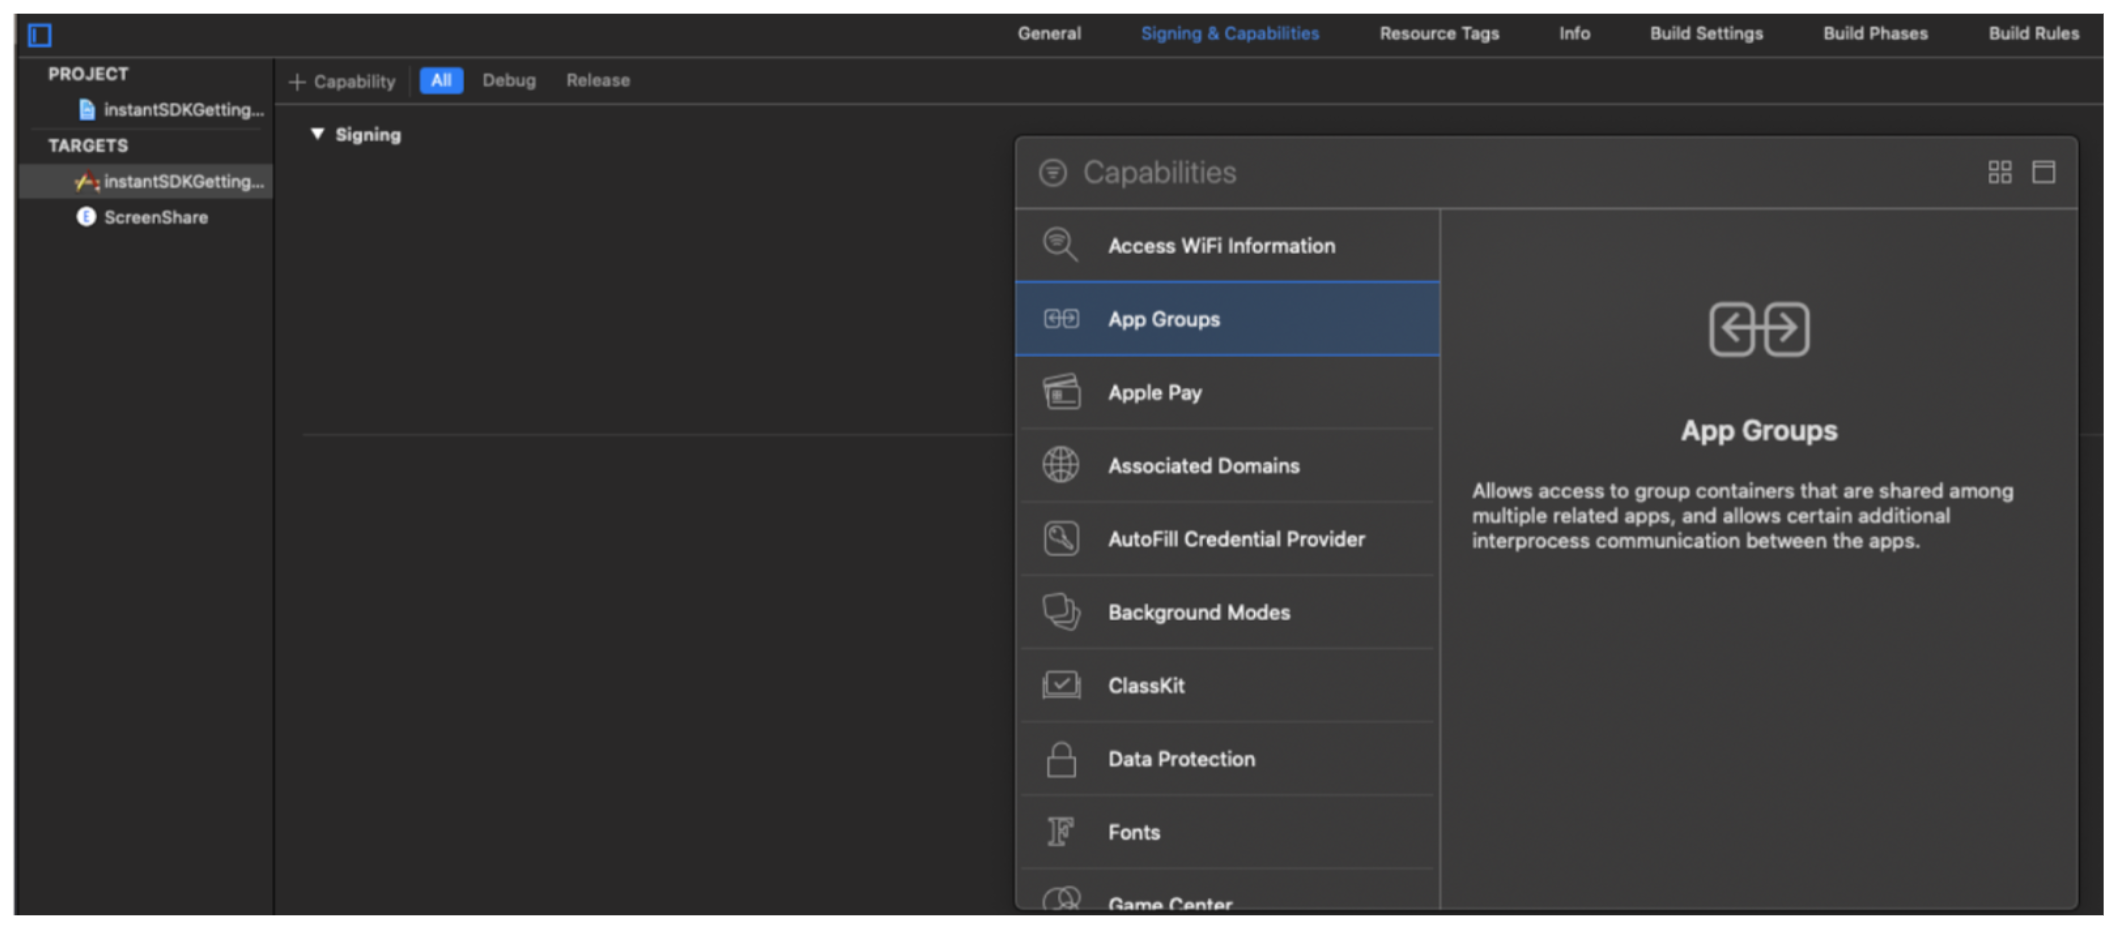
Click the "+" icon at the bottom of the App Groups section to create a new App Group in your main target and set its name. This name will serve as the App Group ID. Similar to Bundle IDs, these are in reverse domain order starting with "group.".
We recommend appending your Bundle ID to "group." to form the App Group ID as it is easy to keep track of. The following image shows an example of what an App Group ID could look like. You must create your own unique App Group ID.
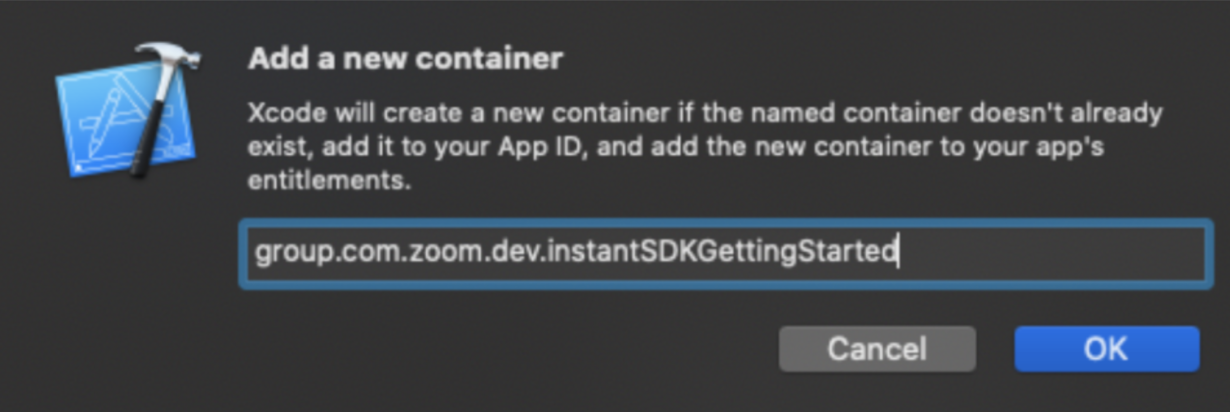
Next, enable this App Group by selecting the checkbox next to the App Group ID.

Repeat the above steps to enable the same App Group in your Screenshare extension target. Note that the same App Group ID must be used in both targets.
After completing these steps, navigate to the code where you initialized the Video SDK in your application and pass the App Group ID to your SDKInitContext object.
initParams.appGroupId = "Your AppGroupId."
initParams.appGroupId = @"Your AppGroupId.";
Make sure to set up the group ID correctly. You must update the group ID in the initialize field of your React Native app as well:
import { ZoomVideoSdkProvider } from '@zoom/react-native-videosdk';

<ZoomVideoSdkProvider
  config={{
    appGroupId: '{Your AppGroupId}',
    domain: 'zoom.us',
    enableLog: true,
}}>
  <MyApp />
</ZoomVideoSdkProvider>
iOS and Android
To screen share:
- Obtain an instance of the
ZoomVideoSDKShareHelperobject.
const zoom = useZoom();
const zoomHelper = zoom.shareHelper;
- Verify that no one else is currently sharing and that sharing is not locked:
const isOtherSharing = await zoomHelper.isOtherSharing();
const isShareLocked = await zoomHelper.isShareLocked();
if (isOtherSharing) {
  console.log("Other is sharing");
} else if (isShareLocked) {
  console.log("Share is locked by host");
}
- Call
shareScreen()to begin sharing:
zoomHelper.shareScreen();
Sample
See the example/src/screens/call-screen/call-screen.tsx file in the SDK directory for an example of this in the sample app. You can only test this feature on physical devices.