Zoom Apps for Personal Zoom Rooms
Personal Zoom Rooms are Zoom Room devices, including Zoom for Home, that are assigned to individual uses and support touch interactions. It is a new offering included with Zoom Meetings user subscriptions that allows anyone to deploy a personal collaboration device for video meetings, phone calls, interactive whiteboarding, and annotation. In short, it runs the Zoom Rooms software on dedicated hardware devices for a personal user. Use cases could be used in an executive office or work from home environment.
For more details, see Zoom for Home.
Special considerations for building Zoom apps for Zoom for Home
Note: Support for iOS to be available in future release.
- System Requirements:
- Must support Android 8.1 or higher.
- Must support Windows 10 or higher.
- Applications must support Zoom Apps SDK 0.12.0 or higher.
- Zoom does not permit browsers to open on Zoom for Home. OpenURL is not available or supported.
- For authentication, users must add apps using their Zoom Desktop Meeting Client to use on their Zoom for Home device.
- Applications that support Zoom for Home need to support touch interfaces.
- DTEN ME currently does not support copy & paste functionality.
Enable developer tools
By default, developer tools are disabled in the Zoom Client. To enable them, set webview.context.menu to true before launching the Zoom Client.
Note: You must restart the Zoom app.
On Windows:
Add the following to the zoom.us.ini file. This file is located in the %appdata%/Zoom/data directory.
[ZoomChat]
webview.context.menu=true
On Mac :
defaults write ZoomChat webview.context.menu true
Step 1: Create a general app
-
Use an account with developer permissions. Go to the Zoom App Marketplace, and sign-in.
-
In the lower-left navigation pane, click Developer.
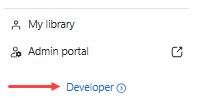
Developer link
The Marketplace only displays the Developer link when it detects that the user has the proper developer permissions. If you do not see it displayed, check with your admin that you have the correct permissions assigned.
-
On the Created apps page, click Develop and select Build an app.
-
On the app creation screen, select General app and click Create.
Step 2: Maintain basic information
On the Basic Info page, add or update information about the app such as the app's name, how the app is managed, app credentials, and OAuth information.
-
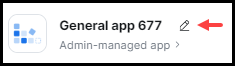
Update your app's name. By default, the build flow generates a generic name for your app. To change your app's name, select the edit icon (pencil) and update the name. To save your changes, click anywhere outside of the app name field.
-
In the Select how the app is managed section, select user-managed.
-
App Credentials - The build flow automatically generates app credentials (client ID & client secret) for your app. App credentials for development differ from app credentials for production.
- Use development credentials while you are building and testing your app.
- Use production credentials once you are ready to publish your app on the Marketplace.
-
In the OAuth Information section, set up OAuth for your app.
- OAuth redirect URL (required): Enter your development redirect URL or endpoint to set up OAuth between your app and Zoom.
- Use Strict Mode URL (optional): Allow only the redirects that exactly match the valid OAuth redirect URLs.
- Subdomain check (optional): Only allow the redirects that exactly match the subdomain of the valid OAuth redirect URLs.
- OAuth allow lists (required): Add any unique URLs that Zoom should allow as valid redirects for your OAuth flows. This additional security measure ensures that users are only redirected to the pre-approved endpoints you provided. Include either the complete URL (https://subdomain.domain.tld/path/to/oauth/callback) or the base URL without the path and/or query parameters (https://subdomain.domain.tld).
Step 3: Select Zoom products and features
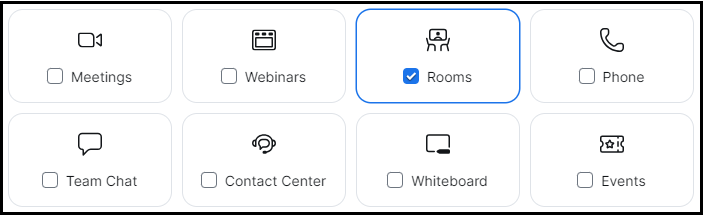
On the Features page, go to the Surface tab.
-
In the Select where to use your app section, select the Rooms.
-
In the Home URL and Domain Allow List fields provide a URL to your app's home page and add URLs you want the Zoom client to accept.
-
In the In-client app features section, select the Zoom features available to your app users in the Zoom client.
If your app needs to use the Zoom App SDK, enable Zoom App SDK and select Add APIs to add APIs and events.
-
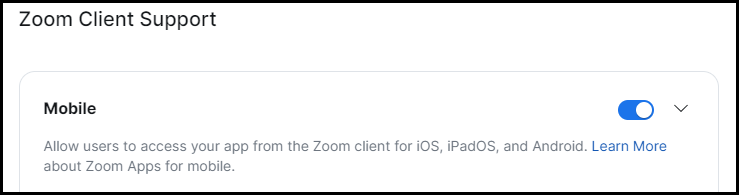
In the Zoom Client Support section:
-
Enable Mobile.
-
Select the In-app Purchase Restrictions.
-
Input the Apple Developer Program Team ID. (If needed.)
-
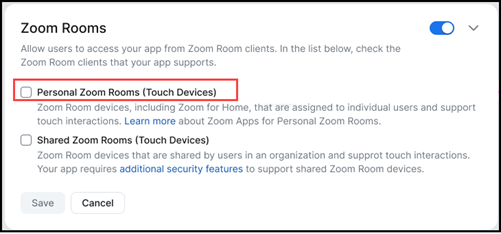
Enable Zoom Rooms and then select Personal Zoom Rooms (Touch Devices).
-
Step 4: Select scopes (API methods)
Scopes define the API endpoints and methods that your app is allowed to use in order to access specified resources for your users. This defines which information and capabilities are available to your user.
On the Scopes page, select the Zoom API methods your app is allowed to call.
-
Select Add Scopes.
-
Select the Zoom product and check the desired scopes, then select Done.
There are two scopes specific to Zoom Apps:
zoomapp:inmeetingto make the app available in Meetings.zoomapp:inwebinarto make the app availble in Webinars.
For more information about scopes, see OAuth scopes.
-
In the Scope Description field, explain how the requested scope is necessary for your app.
When you add a scope, you are actually submitting a request to the Zoom Security Review team to allow your app to access specific Zoom API endpoints. A key principle in Zoom security practice is minimal access. If the Zoom Security Review team determines the requested scope is not necessary for your app, they may reject the scope request.
Step 5: Test and preview your app
On the Local Test page, add and preview your app and share it with internal users.
To add the app for your own account, select Add App Now and then Allow.
To see a summary of your app's details and a preview of your app's listing page on the Zoom App Marketplace, select Preview Your App Listing Page.
For security reasons, we limit the sharing of beta apps. We don't allow beta apps to be published to the Zoom Marketplace, and we allow beta app access only to members of the developer's Zoom account.
To share your app with other users on your account, go to the Authorization URL section, and select Generate and then Copy.
Testing your application on Zoom for Home
You can test on one of the following Zoom for Home devices:
- DTEN ME with Orbit Account (recommended).
- Facebook Portal (recommended).
- To test applications for scalability, an Android Emulator or an Android Tablet.