Common reasons for app submission rejection
Test plan (insufficient information)
The test plan provides instructions for the Zoom review team on your app's use cases, testing process, and required login credentials. It includes step-by-step guidance on configuring and using each requested Zoom API scope. It is not a user manual for your entire service.
You can provide the test plan as a document (Google Drive, Confluence) or a demo video (Loom).
Include the following in your test plan:
- Login credentials for two different accounts (e.g., student/teacher or doctor/patient), if your integration requires a user account with specific data. If you have more users to test include additional login credentials as needed.
- Login credentials are not unnecessary if a free, self-service account can be created and used as expected.
- Login credentials for testing should not be confused with your Zoom account credentials.
- Step-by-step instructions for both users, covering app authorization, scopes, and all relevant functionality.
For more information see What is a test plan .
Key points for submission
- Provide a link to your test plan in the Release Notes section of the App Submission build flow screen. A test plan is required for each submission, including re-submissions.
- If applicable for your use case, provide login credentials for at least one test account in the Test account and credentials section of the App Submission build flow screen. If you have more test accounts, include them in the test plan.
- You don't need to request an authorization URL for the review process; it is only necessary for beta testing outside your account.
How the test plan fits into the review process
The test plan and test credentials allow you to guide our review team through the ideal user experience for your integration.
- We focus on how your integration uses the data accessed via Zoom APIs.
- A clear, step-by-step test plan helps us review your app efficiently, reducing the time spent on clarifications and enabling a shorter review cycle.
- Without a test plan, we lack your perspective and may need to request additional information, delaying the review process.
Tips for creating an effective test plan
-
Think like a first-time user
Write your test plan for someone who has never used your app. Ensure all necessary steps to test the requested API scopes are included.
-
Demo Video (optional)
- Record a walkthrough or demo video of your team following the test plan.
- Include a link to the video in the test plan if possible—it's highly helpful for our reviewers.
-
Provide appropriate test credentials
- If your integration requires a paid or subscriber-level account, supply credentials with the necessary access enabled.
- Pre-populate any required seed or example data to facilitate testing.
By submitting a thorough test plan, you help streamline the review process and ensure your app is reviewed more efficiently.
For more information, see Five often-asked questions about Zoom Marketplace app submissions.
Client ID (incorrect)
The build flow provides two client IDs for your app: production and development. It is important that you use the correct client ID when submitting your app for review.
- Production client ID: Use this for the initial review submission for new apps. First-time submissions are also called "Create" requests.
- Development client ID: Use this for submitting app updates. Reviewers use this ID to test updated scopes.
For more information, see the Zoom DevForum.
Link and Support URLs (domains not owned by your company)
This pertains to the URLs you provide on the Production > App Listing > Link and Support > Links section of the app build flow.
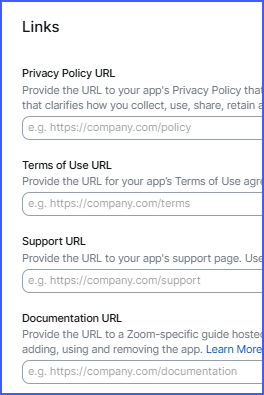
All app metadata and resource URLs—such as Terms of Use, Support URL, Privacy Policy, and Documentation—must be hosted on fully qualified domain names (FQDNs) owned by your company. Hosting these documents on third-party platforms like Google Drive or Dropbox is not permitted. However, you may host app metadata on platforms specifically designed for document hosting, such as Atlassian or Coda, if the URL includes a custom subdomain and branding that reflects your company.
User documentation (insufficient)
All apps must provide documentation to guide users on adding, using, and removing the app. In the Documentation URL field, enter the URL location of your user documentation.
Your documentation should include:
-
Adding the App (required)
Provide a step-by-step guide for adding your app, including a link to a troubleshooting guide.
-
Usage (required)
Explain how to use each feature or action with clear use-case descriptions. Include any prerequisites.
-
Removing the App (required)
Offer instructions to remove the app from a Zoom account, including:
- Potential implications of removal.
- How user data is handled after removal.
- Specific requirements for your app (if applicable).
Example (Replace "XYZ" with your app name):
- Log in to your Zoom account and navigate to the Zoom App Marketplace.
- Click Manage >> Added Apps or search for the "XYZ" app.
- Select the "XYZ" app.
- Click Remove.
-
Troubleshooting (optional but recommended)
Provide solutions to common issues, such as:
- Adding the app.
- Scheduling meetings.
- Accessing recordings.
-
FAQ (optional)
List frequently asked questions, such as:
- Questions about authorization.
- Activation emails.
- Unsubscribing from email updates.
-
Contact Support (optional)
Describe your support process, including:
- Support team hours.
- First response SLA (maximum wait time for a reply).
- Links to create support cases or contact support via email, Knowledge Base, forums, or phone.
App gallery (images and videos requirements)
Images:
Showcase your app's core features and functionality. Include 2 to 3 images that show what a user can expect with the integration.
Video (optional):
Provide a visual overview of app usage, user interface interactions, or promote your business and unique solution.
File requirements:
- Accepted formats:
JPG,GIF,JPEG,PNG,MP4 - Image resolution:
1200 x 780 px - Video: Upload up to 1 video, maximum size
40 MB
For more information, see Grow your app with Zoom.
App descriptions: short and long (insufficient)
Zoom provides two description fields for developers, each serving a specific purpose:
Short description
- Highlight your app's key features or use cases in 1–2 sentences (maximum 150 characters).
- This is the first information users see about your app, such as in App Marketplace search results.
- You can update the short description when submitting new versions or updates.
Long description
- Provide a detailed overview of your app as a service and your company as an organization.
- Explain why users should add your integration, the value it provides, and why it's the right solution.
- Include a concise paragraph followed by a short list of main features.
- If your app supports non-English languages, has regional requirements, or multiple listings, state this at the top of the long description in bold. Example: "This app is intended for a Japanese-speaking audience."
Note: Apps may be rejected if the long description lacks sufficient detail about features and functionality. You can also update the long description whenever your app is updated.
For more information, see Grow your app with Zoom.
Free account compliance
Zoom allows free accounts to develop and publish apps. However, to comply with U.S. Government regulations and ensure developers are not subject to active U.S. sanctions, free account developers must:
- Upgrade your account to Free with Credit Card See Updating your credit card for details.
Or
- Provide your developer information:
Submit details about the entity or individual submitting the app via:
- A form provided in your first rejection review notes, or
- Email to integration.testers@zoom.us.
By meeting these requirements, you can proceed with app development and publishing.
Support requirements for published apps (insufficient)
All published apps must provide a support URL with clear information on how users can access ongoing support. End users should have a reliable communication channel for assistance, and developers are expected to make commercially reasonable efforts to deliver prompt and comprehensive service.
Your support page should include:
- Support team's hours of operation.
- First Response SLA: The maximum time customers should wait for a response from your support team.
- Support phone number (if available).
- Links to:
- Create a support case.
- Email support.
- Knowledge base or forums.
- Live customer support channel (if available).
Providing this information ensures your app delivers a positive user experience and effectively supports our mutual customers.
Unused scopes
Scopes provide access to Zoom APIs. Ensure your app requests only the scopes required for its functionality. Developers are expected to enable scopes that align with the app's functional, logical, and business needs, and to remove unused or redundant scopes.
Developers must provide justification and detailed testing instructions for each requested scope. Without them, we deny the rest and request the removal of the scope.
For example, if your app requests the View and manage user meetings and View user meetings scopes, the latter is redundant. All view-related API calls can be handled with the View and manage user meetings scope.
For more details, see the Granular Scopes documentation.
Adding your app (selecting the wrong option)
This refers to the Adding your app step in the app build flow, where you choose how users will add your app.
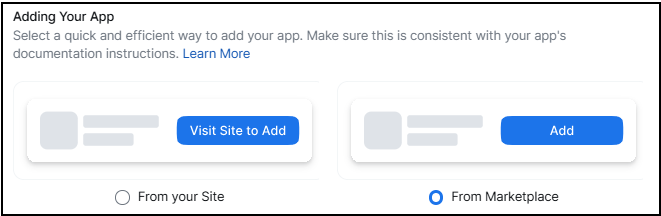
A common issue is choosing an option that doesn't align with your intended setup, often due to misunderstanding the available options.
The options are:
-
From the Marketplace
Display an Add button on your app listing page. Users will click Add, authorize the app, and then proceed to the redirect URL you specify.
-
From your site
Use this option if you want to restrict app authorization to users who have an account or device with your company. This is especially useful if your app requires users to log in via an account-specific or tenant-specific subdomain (for example, https://my-organization.example.com).
Provide the URL for your app's landing page. Users will click Visit Site to Add on your app listing page and be redirected to your landing page for authorization.
Note
For noAuth apps you must select From your site, which will redirect the user to your app's site for information about integration or onboarding.
Your landing page must:
- Allow logged-in users to authorize the integration.
- Let unauthenticated users authenticate and then authorize the integration.
- Provide unauthenticated users with product information and a path to become a customer.
For more information, see Controlling app access on the Marketplace. For information about unlisted apps see, Unlisted apps.
Best practices for SDK developers
- Create a landing page where users can onboard, purchase subscriptions, or acquire devices necessary to use Zoom features.
- Include a documentation page that lists the requirements (account, subscription, device, etc.) and explains how to authorize and use the app once those requirements are met.
- Use a deep-linked URL behind a paywall or login system to authenticate users before redirecting them to the appropriate landing page (e.g., https://example.com/integrations/zoom).
- If your app doesn't use OAuth authentication, provide a link on the landing page to documentation with explanations and instructions.
Unlisted apps (insufficient information)
A common mistake is assuming that an unlisted app does not require app listing information. However, unlisted apps still need metadata, such as images, descriptions, and categories, because this information appears on the active app notification (AAN) and users' added apps page. The app will fail the review process if the required metadata is missing.
Setting your app as unlisted keeps it private and off the marketplace, making it ideal for limiting access to a specific group, such as your company or select customers. Since unlisted apps don't appear in Marketplace search results, they should be distributed using an authorization URL. When selecting the Add your app option, we recommend using the From your site option for controlled distribution, directing users to a landing page where they can authorize the app.
For more information, see Key Concepts - Unlisted apps and App Discoverability and Activation.
Removing an app (incomplete implementation)
You have two options to remove (deauthorize) your app:
-
Option1: Use Zoom's standard removal process.
- Sign in to Zoom App Marketplace.
- In the top right corner, click Manage.
- On the left side of the page, click Added Apps.
- Find the app you want to remove and click Remove.
- In the Remove App window, select a reason for removal (optional).
- Click Remove to confirm.
For more information, see Adding and removing an app from the Zoom Marketplace.
-
Option2: Implement your own removal process.
If you implement a custom removal process, follow these two steps:
-
Handle Zoom's Deauthorization Event Notification
When a user removes (deauthorizes) a public app, Zoom sends a Deauthorization Event Notification as an HTTP POST request to the app's Deauthorization Notification Endpoint URL.
For more information, see Deauthorization.
-
Revoke the Access Token
To fully deauthorize the app, call the Revoke Access Token endpoint.
For more information, see Revoking an access token.
-