Connect
The Connect tab is available to create connectors that integrate third-party data into the Zoom platform.
Connectors are available for Zoom Contact Center, Zoom Workflow Automation, and Zoom Virtual Agent flows.
To use connectors, you must have general knowledge of APIs, including API authentication and authorization.
Get started
- To create a custom connector app, select Develop in the Marketplace and choose General App.
- In the build flow, find and select Connect under Features. You do not need to choose any Zoom scopes or add a redirect URL.
- Within the Connect tab, configure third-party APIs for the Zoom Connector module to bring third-party data into Zoom. You don't need to fill this out in any particular order.
- Define the API specification by importing a spec or adding endpoints manually.
- Add the Base URL and authentication.
- Test individual endpoints and parameters.
- Share the private connector app to add it to supported product workflows or publish it to Marketplace (publishing may not be available for all integrations).
Limitations
Currently, there are some limitations.
- Zoom only supports one upload version at a time in a connector. If you upload an API specification again, it will overwrite all existing definitions of third-party APIs. If you do this, you'll see a prompt to confirm this. Click Upload & overwrite to continue or Cancel to keep your previous information.
- We support up to 50 endpoints.
- Zoom only supports one base URL per connector. The base URL is applied to all endpoints defined within the connector. It must be an absolute URL.
- You can only publish Contact Center connector apps and must contact Support to request this capability. Contact Center apps must be Admin-managed apps.
- Connector apps support only outbound HTTP requests (for example, a GET or POST request to an API endpoint). They do not have the capability to receive inbound HTTP requests (for example, using webhooks).
- You must use
httpswhen making requests. If you usehttp, you'll receive a Request Timeout.
Define the API specification
Define the API specification by importing an API spec and editing the fields, or adding the API endpoints manually.
Import API spec
If you have an API spec, this is the ideal way to add endpoints as Zoom will parse the endpoints and parameters and add them for you. Upload a JSON, YAML/YML, or OpenAPI OES 3.0.0- or 3.1.0-formatted file.
You can upload an existing API specification. The API specs needs to follow the Open API Specification (OAS) standard for the upload to be successful. We support up to 150 endpoints. As a best practice, you may want to remove endpoints that you will not use before you upload the spec.
Once you've successfully uploaded the specification, Zoom automatically includes them in the Endpoints build flow. This is the easiest way to define third-party APIs in the build flow. If you don't have an API spec, you can add endpoints and parameters manually.
Base URL and authentication
Enter the base URL for the integration endpoints. For example, for this endpoint: https://api.example.com/v2/users, the base URL would be https://api.example.com/v2/.
Before the Zoom connector app can make calls to third-party APIs, you must define both the base URL and the authentication & authorization methods for Zoom to use to make those calls.
Authorization parameters
The authorization parameters are based on authentication type.
| Authentication Type | Parameters | Notes |
|---|---|---|
| API Key | Add the key name in the Key field. For example, key. Not your actual API Key. You'll add that in the Test endpoints section. | |
| Basic Auth | Enter the parameter values in the Test endpoints section. | |
| Bearer Token | Enter the parameter value in the Test endpoints section. | |
| JWT Bearer | ||
| OAuth2 Authorization code | See OAuth2. | |
| OAuth2 Passwordless Credentials | See OAuth2. | |
| OAuth2 Client Credentials | See OAuth2. |
OAuth2
The following fields are common to all OAuth2 authentication methods.
- Client ID
- Client Secret
- Access Token URL
- Scope (optional)
- Client Authentication
- Refresh Token URL (optional)
OAuth2 Authorization code
This method includes the following additional fields.
- Authorization URL
- Redirect URL
- Identity endpoint
- Endpoint path
- Parameter name (Identity name)
OAuth2 Passwordless Credentials
This method includes the following additional fields.
- User Name
- Password
Add endpoints manually
Once you upload your specification, Zoom automatically adds it to the endpoints build flow. This is the simplest way to define third-party APIs. If you don't have an API specification, you can manually add endpoints and parameters.
Follow these steps to add or edit endpoints.
- Click New endpoint to add or click an existing endpoint to edit.
- Method - The HTTP method for the endpoint. Choose GET, POST, PUT, PATCH, or DELETE.
- Endpoint display name - The name of the endpoint. Zoom workflows will display this as the name of the connector method.
- Short description - The description of the endpoint. Zoom workflows will display this as the description of the connector method.
- Endpoint path - The path of the API endpoints. Query parameters with values defined on the endpoint path level will be considered as default for the connector method.
- Path - Parameters excerpted from the endpoint path. To add or remove path parameters, edit the endpoint path directly. You can use the syntax
:parameterto set the parameter path in the endpoint path. For example, usehttps://api.com/users/:userIdfor the path to theuserIdparameter. You can update the display name or provide default values for path parameters. - Query - Query parameters for the endpoint. You can add new or remove existing query parameters. A query parameter with a default value will be considered as the default connector method. Query parameters may not always be present and are dependent on the method of the endpoint.
- Headers - Header parameters. Zoom always uses a standard header when making requests to third-party APIs. You can specify additional header parameters if they are required for a successful request.
- Body - Request body of the endpoint. You can define the parameters present in an API request. Body parameters may not always be present and depend on the method of the endpoint.
- Response - Response body of the endpoint after the API call is made successfully. Response parameters may not always be present and depend on the method of the endpoint. Click** Pull parameters** to pull and parse the Response parameters (See Test endpoints for details).
- Refresh the page to display a newly created endpoint in the list. Press the greater than icon (>) to edit an existing endpoint.
Test endpoints
Before you can test endpoints, set up your test connection.
- Under Test Connection, click Add connection.
- Enter a connection name.
- Add the base URL (it must be
https). - Add the authorization method, for example, if using API Key, for Key, use
key. - For Value, add your API Key.
- For Add To, choose how the API key should passed, for example, Query Params if it must be passed as a query parameter.
- Click Submit to add this test connection.
The wizard goes to the Endpoints tab. Open an endpoint and click Run test to run a test call for the individual endpoint. Or click Test all endpoints to test them all. All endpoint tests must display as passed in order to submit your connector app for review or use it internally.
Pull parameters
Once a test call is successfully, you can click Pull parameters to pull and parse parameters from responses of the API.
Link request parameter to values
When the API request parameter expects a value from a predefined list of values, this could cause the API request to fail. For example, when creating a Jira ticket using the Jira API, you must specify the project name, issue type, and other parameters. The project name must be an existing project within the Jira account. While this value is a string and can technically be anything (as defined by the API), if you provide a non-existing value, you'll receive an error in the API response.
The parameter link feature lets you define the relationship between a request parameter and a static or dynamic list of values. This way, when the connector calls the API, the values are limited to the ones you defined, and you can reduce the risk of API call failure for different use cases.
Dynamic list
Follow these steps to define the relationship between a request parameter and a dynamic list of response values from another API call.
-
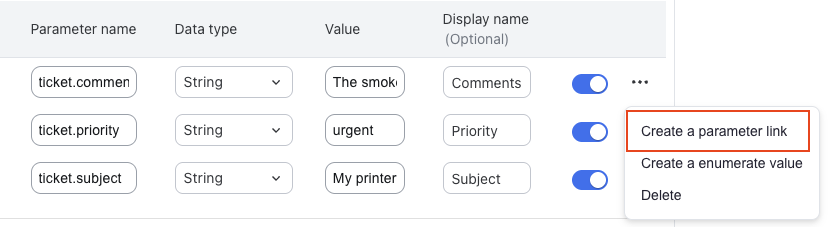
Click the more icon (the ellipsis '...') next to the parameter and select Create a parameter link.
-
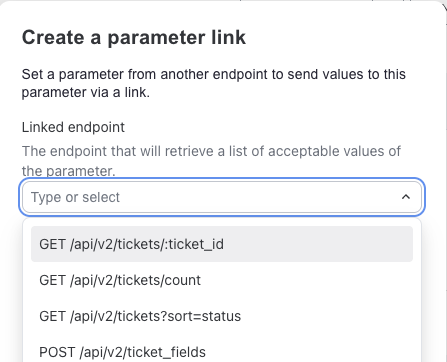
Select the linked endpoint that will retrieve a list of acceptable values for this parameter.
-
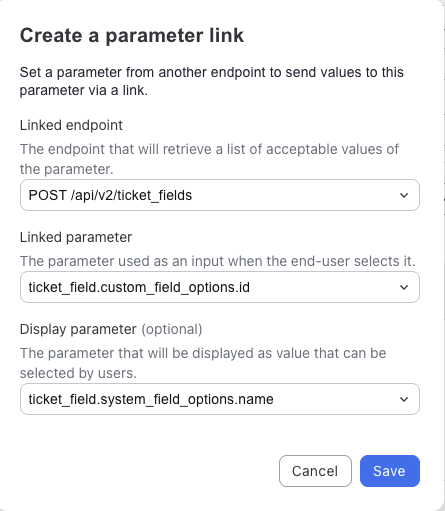
For the linked parameter, add the parameter to use as an input when the end-user selects it.
-
Optionally, if the request parameter expects an identifier but you must display a different one to the end-user, configure the display parameter.
-
Click Save to save changes.
Static list
Follow these steps to define the relationship between a request parameter and a static list of values.
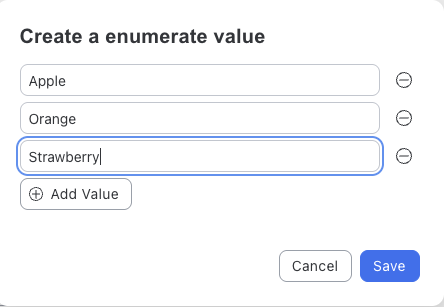
-
Click the more icon (the ellipsis
...) next to the parameter and select Create a enumerate value.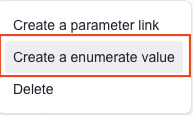
-
Define values that can be used for the request and click Save.
MCP server
Connecting a Model Context Protocol (MCP) server to your Zoom AI app lets your app interact with external data systems.
Add an MCP server
- To add an MCP server, go to the MCP tab, and click Add MCP server.
- Enter the required information for the remote MCP server, and click Check server. After the URL is saved, Zoom automatically performs server discovery.
-
If the MCP server supports dynamic client registration, developers can enable Use dynamic client registration, allowing Zoom to register a client automatically. The registered client details will appear in the Authentication tab.
-
If dynamic client registration is not supported, developers must manually obtain and configure the client information in the Authentication tab and assign the appropriate authentication method to the MCP server.
Incoming webhooks
The connector service not only supports polling third-party API endpoints, but can also host webhook URLs that enable third-party services to push data to Zoom through incoming webhooks.
You configure incoming webhooks to work with app triggers, which enables you to create event-driven workflows for your applications.
Incoming webhook types
The connector service supports these webhook types:
-
Single global URL - Zoom generates a single URL when a new incoming webhook entry is added. You can copy this URL to the third party system configuration and set up the webhook.
Availability
This webhook type is available only for Zoom-built and Zoom-managed connector apps. It is not available to customer developers or third-party developers.
-
Static webhook URLs - Zoom generates and displays a static URL when the user interacts with a configured trigger in the product. Developers can enable this option and configure a trigger during the app build process.
When an end user configures the trigger in the product—for example, by setting up a trigger step in Workflow or enabling new message notifications—Zoom generates a URL. The user must then copy and paste the URL into the third-party platform where the event originates.
-
RESThook - Zoom programmatically creates third party event subscriptions using the third party event subscription APIs when the user interacts with the configured trigger within the product. Webhook URL is not visible to the user. You should first configure both the subscribe endpoint and the unsubscribe endpoints in Endpoints. Then navigate to Incoming webhook. Choose the RESThook option, and select these two endpoints respectively.
Configure incoming webhook
On the Incoming Webhook tab, configure the following:
- Type - From the dropdown list, select Static webhook URL or RESThook.
- Webhook name - Name of the incoming webhook. The value is used when the you configure triggers
- Short description - Optional short description of the incoming webhook. This field allows you to give a bit more context to the incoming webhook.
- Authentication method - Developer defined signature for Zoom to authenticate incoming webhook events. The Zoom connector service will reject any incoming event that fails to verify against the signature.
- Key - The label of the parameter in the event header that Zoom connector service should use as a signature.
- Secret - The value of the signature that Zoom connector service should validate against.
- Prefix - Optional prefix of the key. For example, if the label is 'zoom_signature' and prefix is 'x-', Zoom connector service expects 'x-zoom_signature' as the signature to validate against the incoming webhook.
- Hash algorithm - Optional if the signature is hashed.
- Encoding - Optional if the signature is encoded.
- URL validation - Optional configuration. Enable this option if the event provider platform must validate that the Zoom connector service can receive webhook events. Zoom performs simple webhook URL validation by echoing the challenge response key and returning an HTTP 200 OK status.
- Challenge key - Label of the challenge parameter. If URL validation is enabled, Zoom looks for the challenge parameter using this challenge key.
- Challenge response - Zoom respond to the event provider with the challenge response and the HTTP 200 OK status.
Add connector app to a workflow
To use a connector app in your Zoom product, such as the Zoom Contact Center flow, go to the Local Test page on the Development tab for an account-level app and click Add App Now to add the app for yourself. Then use your account to add the app to the flow. See Customizing the Connector widget for details. Account-level Connector apps are not available to publish.
Publish Connector app
To list your app on Marketplace, submit it for Zoom to review and approval following the regular app submission and review process. Once Zoom approves your app, it'll be listed on the Zoom Marketplace where users can discover and install it. Click Add App Now on the Production tab in the Beta Test section to add the app for yourself. This is only available for user-level apps. Publishing may not be available for your Connector app.
Use connector app as an action
You can use a connector app as an action to use data within the Zoom app. See actions for details.