Add calling capabilities to your React app with Zoom Phone Smart Embed - Part 2
Welcome back! This is part 2 of the series on the step-by-step process of embedding and configuring Zoom Phone Smart Embed within a simple React application.
In Part 1 of this series, we created a SmartEmbed component for rendering the Zoom Phone widget, and we also established a smartEmbedService file that manages API communication with the Zoom Phone SDK.
In Part 2, we'll build upon that foundation by:
- Implementing Click-to-Call functionality
- Creating a modal component to track real time Zoom Phone events
- Introducing some UI enhancements
Let's get started
Open your zoom-phone-smart-embed project, and let's dive in!
Step 1: Implement Click-to-Call
Click-to-Call is a fundamental feature in any phone experience, as it reduces friction by enabling users to initiate calls without directly interacting with the Smart Embed widget UI. In this sample app, we have implemented a simple interface to dial numbers from our custom app.
Let's update our smartEmbedService.js file to send a postMessage to the Zoom Phone iframe. This is how Smart Embed communicates - by listening for specific messages types and data structures.
export const makeCall = (phoneNumber, callerId) => {
    const iframe = document.querySelector(
        "iframe#zoom-embeddable-phone-iframe",
    );
    if (iframe && iframe.contentWindow) {
        const message = {
            type: "zp-make-call",
            data: {
                number: phoneNumber,
                callerId: callerId, // The caller ID (optional)
                autoDial: true, // Whether to dial automatically, default is true
            },
        };
        iframe.contentWindow.postMessage(
            message,
            "https://applications.zoom.us",
        );
        console.log(`Making call to ${phoneNumber} with caller ID ${callerId}`);
    } else {
        console.error("Iframe or contentWindow not ready. Cannot make call.");
    }
};
We're using postMessage to send a zp-make-call event directly to the Smart Embed iframe. This tells Zoom Phone to initiate a call using the provided number and caller ID. You can customize this later to pull numbers from contacts, CRM records, etc.
Step 2: Create the ClickToCall component
Now that we have a function to initiate calls, we need a UI component that collects input and triggers that function. Create a ClickToCall component which gives your users an input to dial numbers without needing to navigate through the Smart Embed widget interface.
import React, { useState } from "react";
import { makeCall } from "../services/smartEmbedService";
const ClickToCall = () => {
    const [phoneNumber, setPhoneNumber] = useState("");
    const handleCall = () => {
        if (phoneNumber.trim()) {
            makeCall(phoneNumber);
        }
    };
    return (
        <input
            type="text"
            placeholder="Enter phone number"
            value={phoneNumber}
            onChange={(e) => setPhoneNumber(e.target.value)}
        />
    );
};
export default ClickToCall;
Here's what's happening:
- We're using React state to track the entered phone number.
- When the user clicks "Call," we call
makeCall()and pass the number along. - At this point, you can trigger real calls from your own app UI.
Step 3: Add real-time event tracking
The Zoom Phone Smart Embed widget sends out postMessage events when important call actions occur - like incoming calls, call connected, call ended, and voicemail received.
Let's create an EventLog.jsx file where we are going to listen for these events, filter through them and display each as a modal pop-up in our application.
import React, { useState, useEffect } from "react";
import EventModal from "./EventModalComponent";  // Import the EventModal component
import { isValidEventType } from "../utils/eventUtils";  // Import the utility function
const EventLog = () => {
  const [logs, setLogs] = useState([]);
  useEffect(() => {
    const handleEvent = (event) => {
      const eventType = event.data?.type;
      // Use the utility function to filter event types
      if (isValidEventType(eventType)) {
        setLogs((prevLogs) => [
          ...prevLogs,
          {
            eventType,
            data: event.data,
            id: Date.now(), // Add a unique id for each log
          },
        ]);
      } else {
        console.log(eventType);
      }
    };
    window.addEventListener("message", handleEvent);
    return () => window.removeEventListener("message", handleEvent);
  }, []);
  // Function to close modal by removing log from state
  const closeModal = (id) => {
    setLogs((logs) => logs.filter((log) => log.id !== id));
  };
  return (
      {logs.map((log, index) => (
        <EventModal key={log.id} log={log} index={index} onClose={closeModal} />
      ))}
  );
};
export default EventLog;
Step 4 : Create the EventModal component
Now let's create a modal component to display the event details. Each modal will show information for a single event. You can later expand this to include recording links, voicemails, timestamps, or integrate with a notes system.
import React from "react";
const EventModal = ({ log, index, onClose }) => {
    return (
        <div className="event-log-content">
            <h3>Zoom Phone Event</h3>
            <ul>
                <li>
                    <strong>Event:</strong> {log.eventType}
                </li>
                <li>
                    <strong>Call ID:</strong> {log.data?.data?.callId || "N/A"}
                </li>
                <li>
                    <strong>Direction:</strong>{" "}
                    {log.data?.data?.direction || "N/A"}
                </li>
                <li>
                    <strong>Caller:</strong>{" "}
                    {log.data?.data?.caller?.name || "Unknown"}
                </li>
            </ul>
        </div>
    );
};
export default EventModal;
Step 5: Create eventUtils to filter incoming events
Now in your src directory, create a new folder called utils and create a file eventUtils within it. In this file, you will add the events that you want to listen to, which helps keep our EventLog component clean and makes it easier to manage the types of events we want to track.
export const isValidEventType = (eventType) => {
    const validEventTypes = [
        "zp-call-ringing-event",
        "zp-call-connected-event",
        "zp-call-ended-event",
        "zp-call-log-completed-event",
        "zp-call-recording-completed-event",
        "zp-call-voicemail-received-event",
        "zp-sms-log-event",
        "zp-save-log-event",
    ];
    return validEventTypes.includes(eventType);
};
Step 6: Add UI styling
Add this into your App.css to make the interface clean and user-friendly. Feel free to customize the styling to match your application's design.
#root {
    max-width: 1280px;
    margin: 0 auto;
    padding: 2rem;
    text-align: center;
}
.App h2,
.event-log-content h3 {
    text-align: center;
    color: #333;
    font-family: "Helvetica Neue", Arial, sans-serif;
    margin-bottom: 40px;
}
.App h2 {
    font-size: 2rem;
}
.event-log-content h3 {
    font-size: 1.2rem;
    margin-bottom: 15px;
}
.event-log-modal {
    position: fixed;
    top: 10px;
    left: 10px;
    padding: 20px;
    width: 320px;
    background: #fff;
    border: 1px solid #e0e0e0;
    border-radius: 8px;
    box-shadow: 0 4px 10px rgba(0, 0, 0, 0.1);
    z-index: 1000;
    font-family: "Helvetica Neue", Arial, sans-serif;
}
.event-log-content button,
.click-to-call button {
    background-color: #007bff;
    color: #fff;
    border: none;
    border-radius: 4px;
    font-size: 14px;
    padding: 8px 16px;
    transition:
        background-color 0.3s ease,
        transform 0.2s ease;
}
.event-log-content button {
    margin-top: 15px;
    border-radius: 6px;
    padding: 8px 18px;
}
.event-log-content ul {
    list-style: none;
    padding: 0;
    font-size: 13px;
}
.event-log-content ul li {
    margin-bottom: 10px;
    color: #666;
    line-height: 1.5;
}
.event-log-content ul li strong {
    color: #333;
    font-weight: bold;
}
.click-to-call {
    display: flex;
    flex-direction: column;
    align-items: center;
    gap: 10px;
    margin-top: 30px;
}
.click-to-call input {
    width: 200px;
    padding: 8px;
    font-size: 14px;
    border-radius: 4px;
    border: 1px solid #ccc;
    margin-bottom: 10px;
}
Step 7: Run your app
Start your app by running the following command:
npm start
Remeber to run an ngrok tunnel to expose your local server to the internet and keep the Zoom client running in the background.
ngrok http 3000
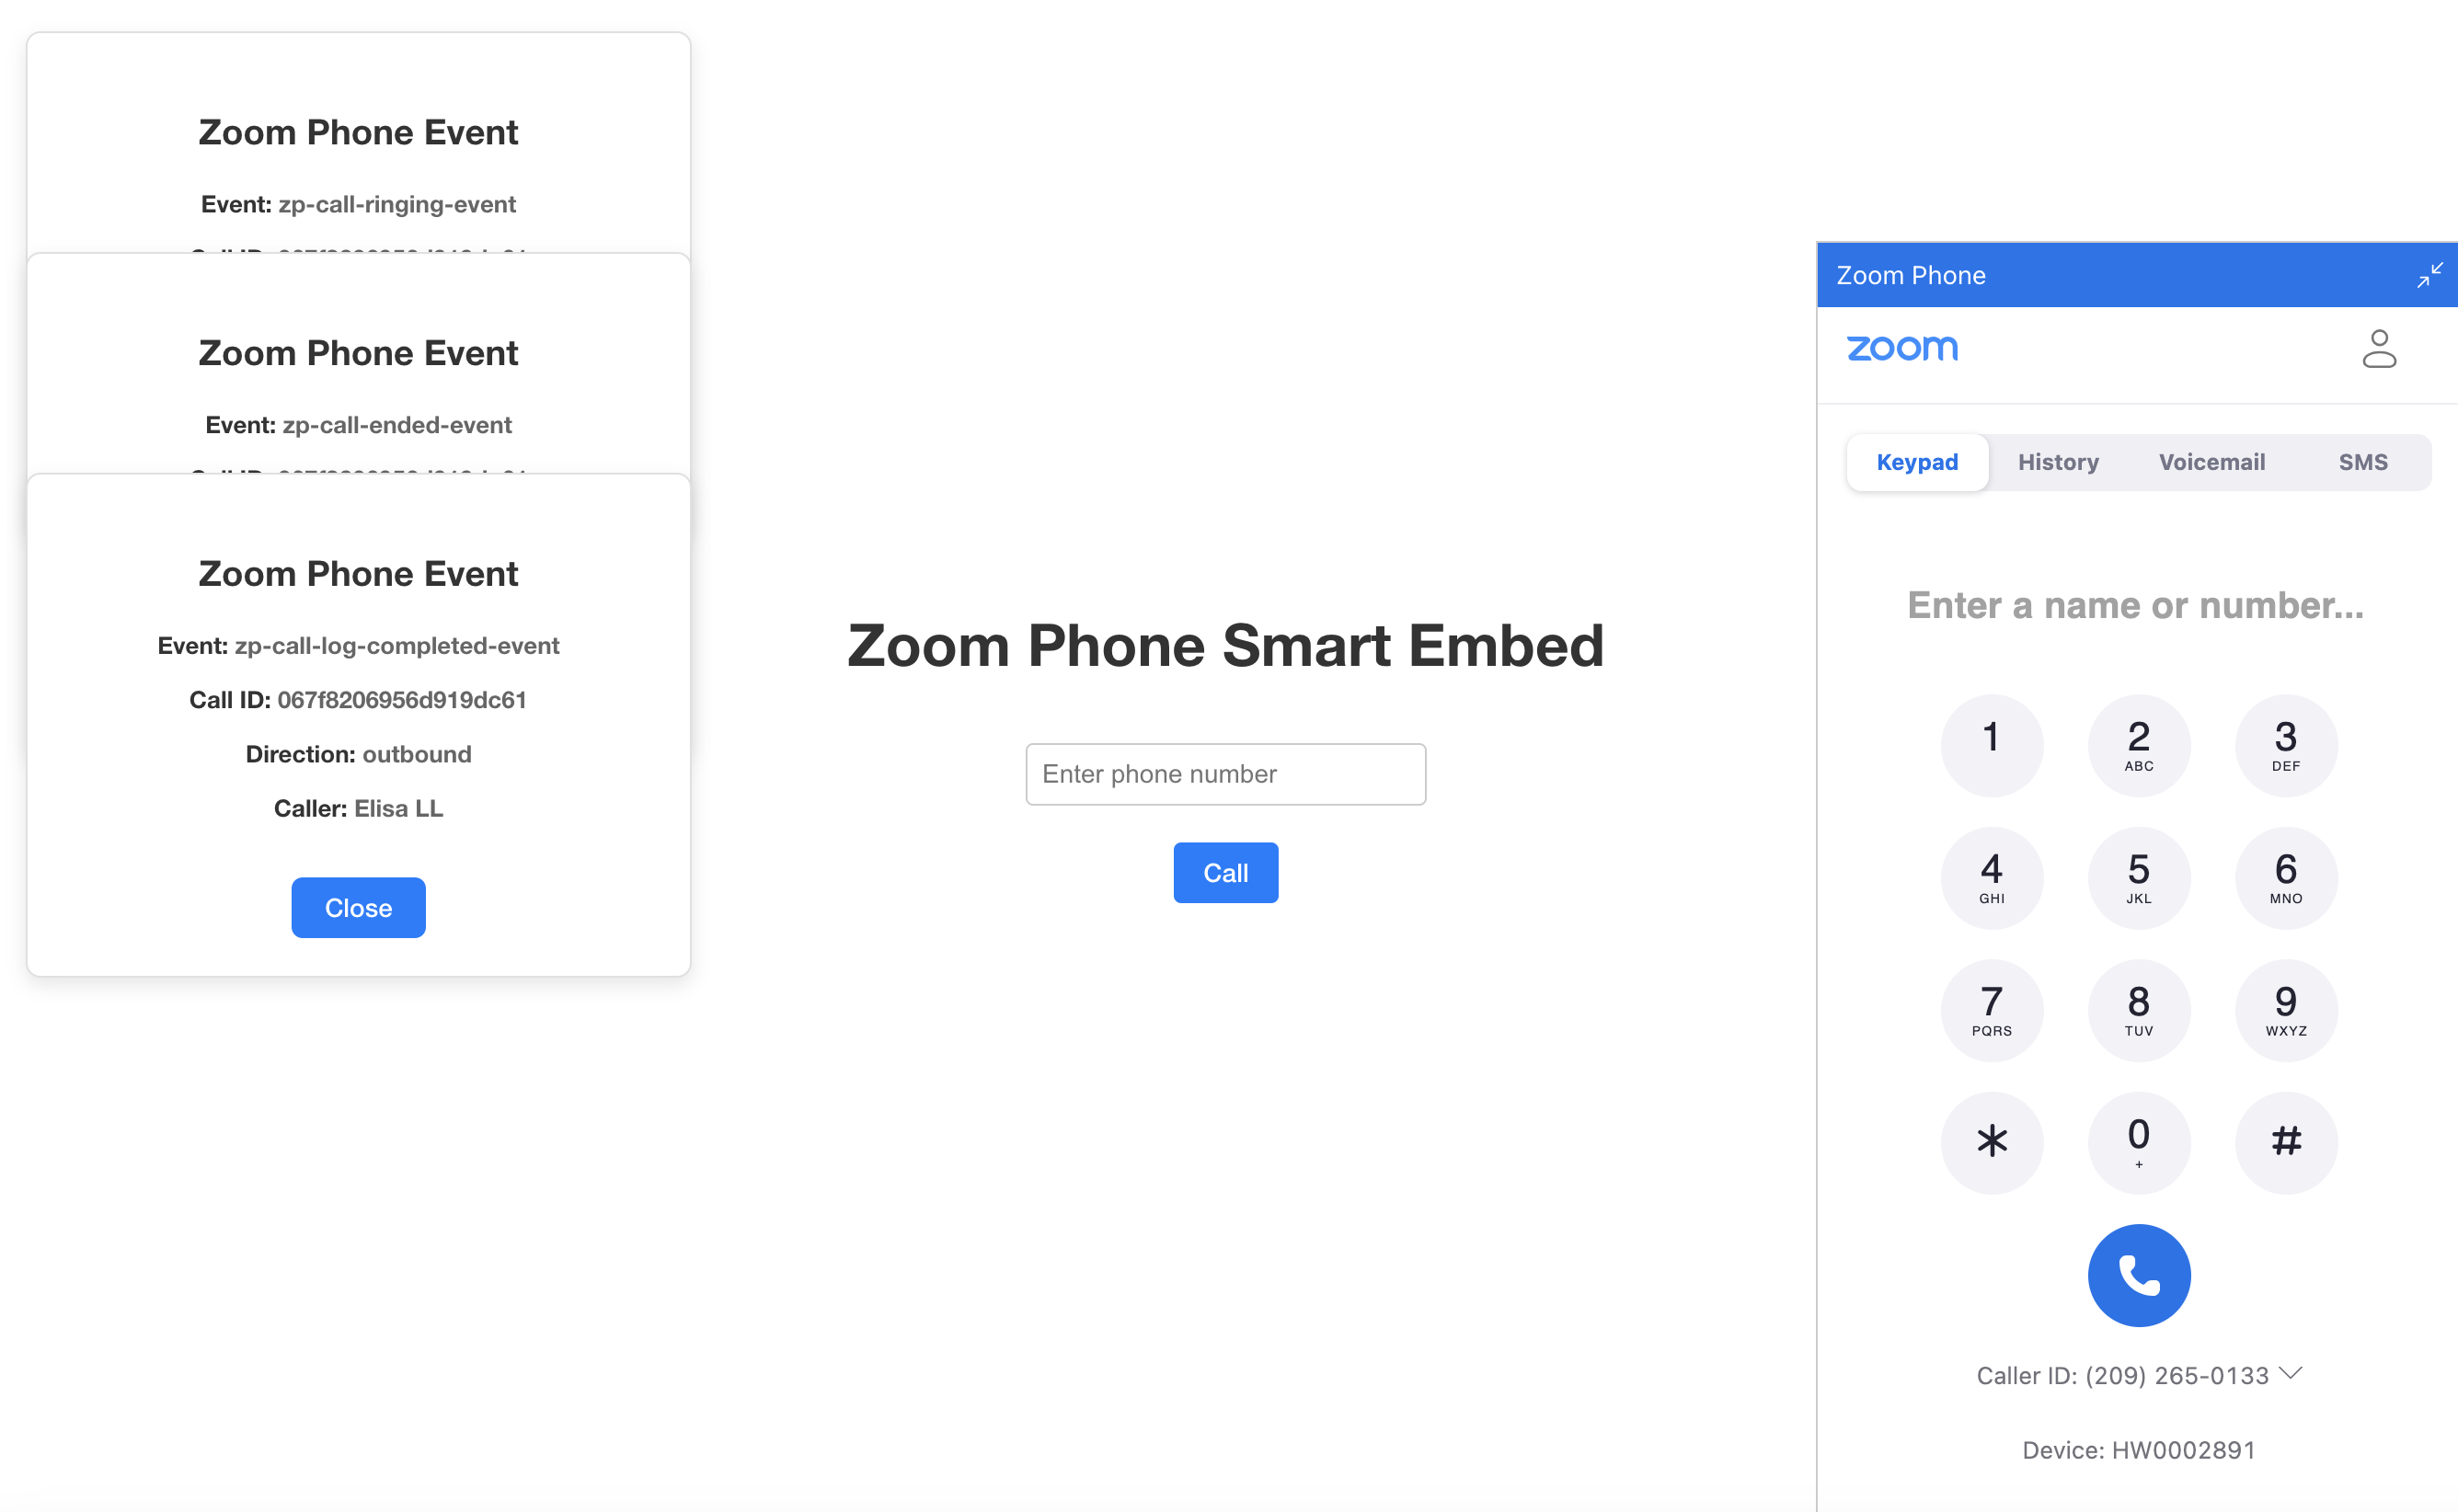
Visit your https ngrok URL where you will find the final look of your app.
Try entering a number and clicking "Call." If everything is working, you'll see call events pop up as they happen in real time!
What's next
The possibilities are endless, and you can creatively enhance this app by:
- Managing call logs and track notes
- Creating a simple CRM-style view for ongoing sessions
- Implementing persistence through local storage or a backend
- Powering your integration with Zoom Phone APIs