Screen sharing
Enhance the collaborative experience of a meeting with the screen sharing feature provided by the Zoom Meeting SDK for iOS. This feature gives end users the ability to share their content on an iPhone or iPad.
Before proceeding with this tutorial, ensure that you meet the following prerequisites:
-
You have a good understanding of Broadcast Extensions, AppGroupIDs, and ReplayKit. Zoom uses these technologies and various Apple video frameworks to implement screen sharing. If you're unfamiliar with these topics, we highly encourage you to gain an understanding before you begin.
-
You have imported the MobileRTC.framework into your project and it is embedded and signed.
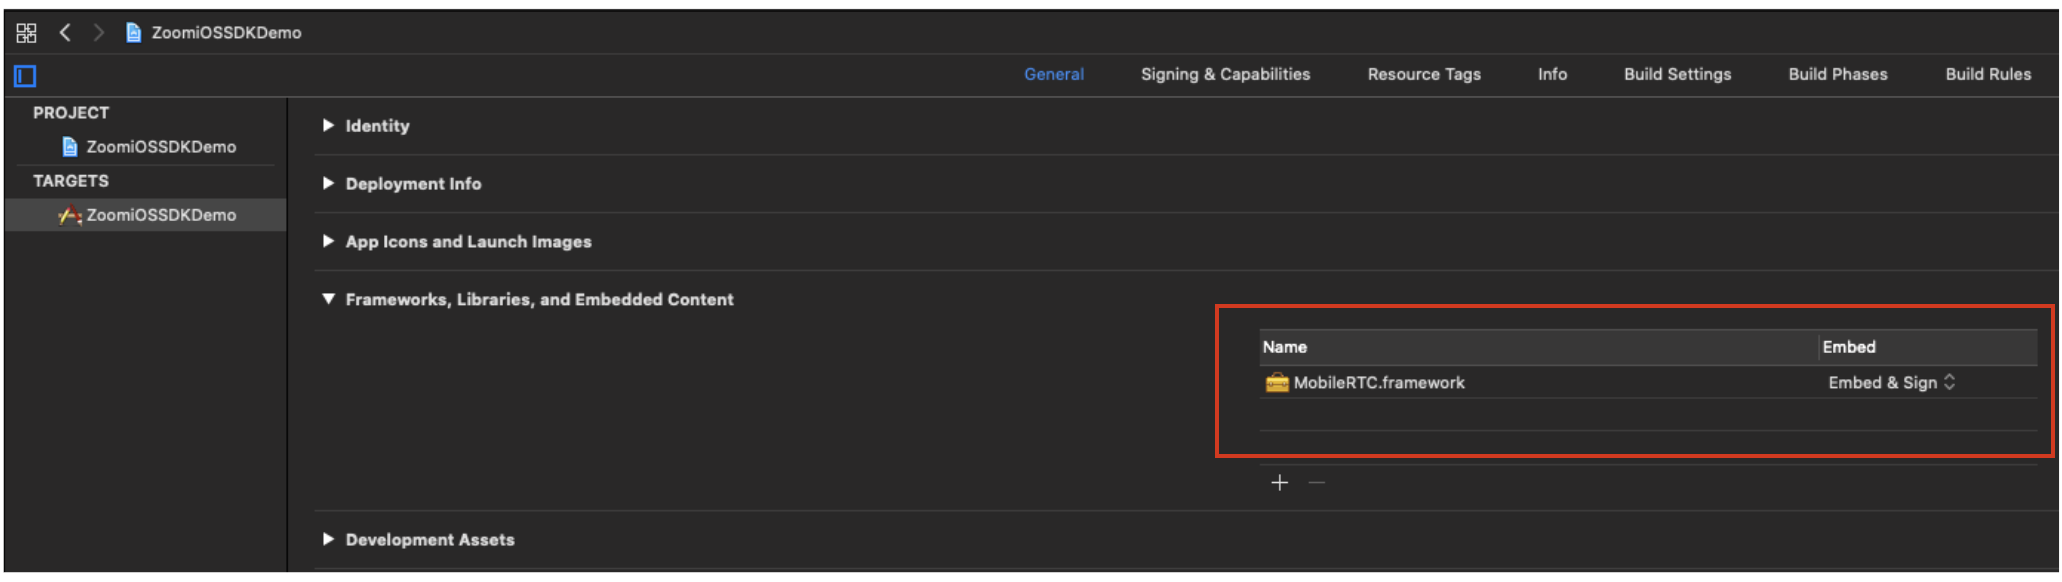
- You have implemented a meeting feature in your app using the Meeting SDK for iOS. The screen share feature that you'll learn about in this tutorial will be applied in the meetings that run in your app. If you haven't already implemented a meeting feature, refer to the build an app tutorial to learn how to do that.
In this tutorial, you'll learn about these screen sharing options that are supported by the Meeting SDK for iOS:
Screen sharing options
There are two different approaches for screen sharing with the Zoom Meeting SDK for iOS.
-
Share the entire screen
This approach utilizes broadcasting with ReplayKit and other Apple video frameworks to share a user's full device screen in a meeting.
-
Share a specific view
This approach utilizes Zoom's
MobileRTframework to share a singleUIViewin a meeting.
These two approaches have important distinctions to consider.
Types of screen sharing
| Broadcast with ReplayKit | Share a single UIView using MobileRTCMeetingService |
|---|---|
| The entire screen is shared in the meeting. | Only a single UIView is shared in the meeting. |
| Broadcasting happens at the operating system level, not application level. | UIView sharing happens at the application level, not at the operating system level. |
| Use an application extension. The application extension, not the application itself, controls the sharing. Use App Group IDs to leverage communication between the application and application extension. | This method does not require an application extension. |
| This method of sharing is highly optimized—it is a native operating system level implementation provided by Apple. | This method has optimization limitations. |
| It is not encouraged to use this method for complex views. | |
| With this method, you can share the screen of an app that uses default Zoom Meeting UI or your own custom Meeting UI. | You can only implement screen share with this method if your app has enabled the custom Meeting UI. |
Screen broadcast with ReplayKit
To implement the screen share feature with this method, use Apple's broadcast upload
extension to create a new target and import an additional Zoom framework MobileRTCScreenShare.framework
into the new target. Unlike MobileRTC.framework, the MobileRTCScreenShare.framework should
not be imported in the main target. Find this framework in the SDK folder that you previously downloaded.
Note: Annotations are not supported in screen sharing from iOS when using the broadcast method using ReplayKit.
Create a new target
Before importing the MobileRTCScreenShare.framework, use the
Broadcast Upload Extension template to create a new target in your
app. This extension retrieves the recorded media samples in real
time, encodes the sample, generates a video stream, and uploads the stream
to the broadcast service.
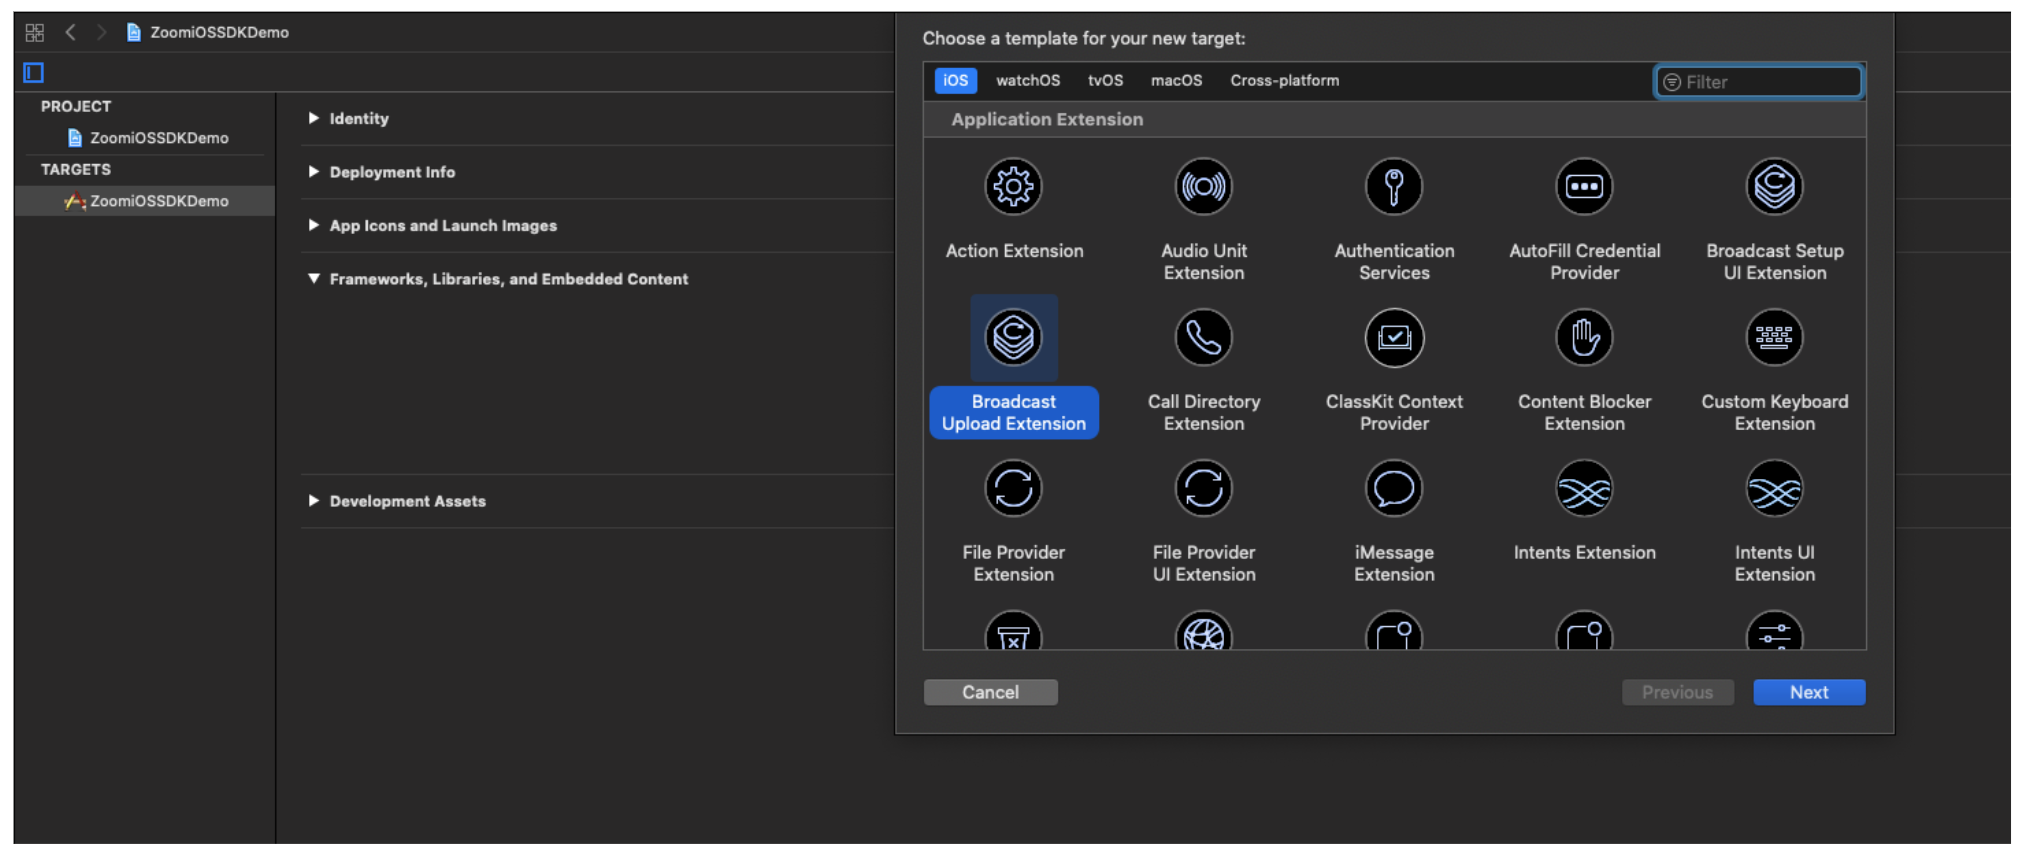
To use this extension, select File>New>Target, select Broadcast Upload Extension in the iOS tab, and select next.
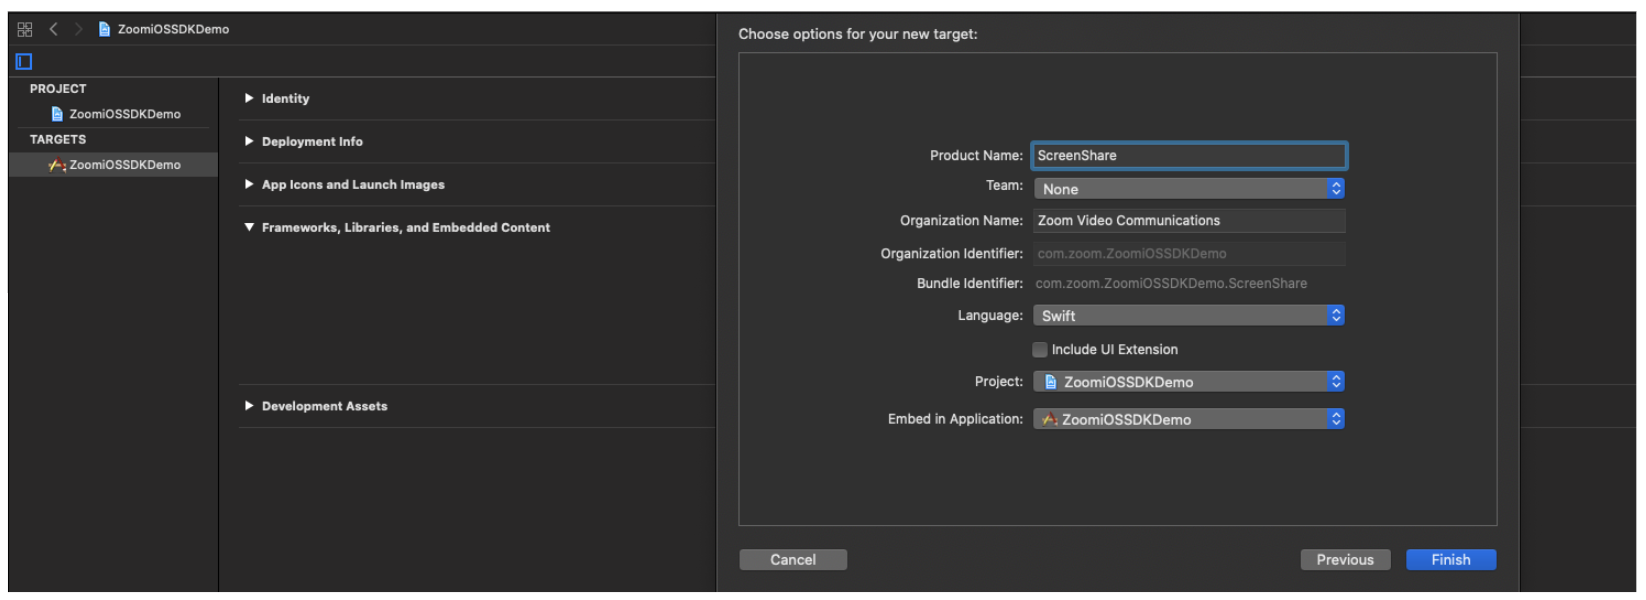
Name the target ScreenShare, choose your desired language, and select Finish.
If prompted to activate the scheme, select Activate.
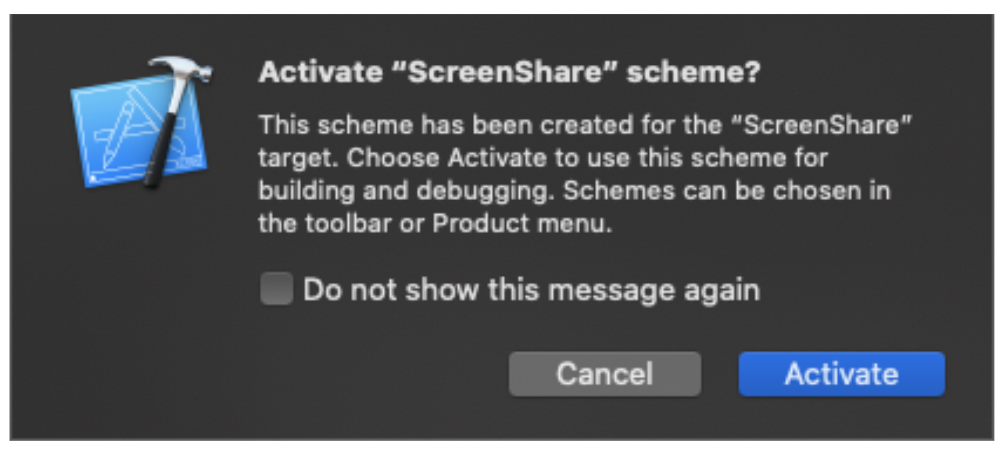
After activating the scheme, a new target named ScreenShare containing the Broadcast Extension will be created for you. Notice that ReplayKit was automatically added to the extension.
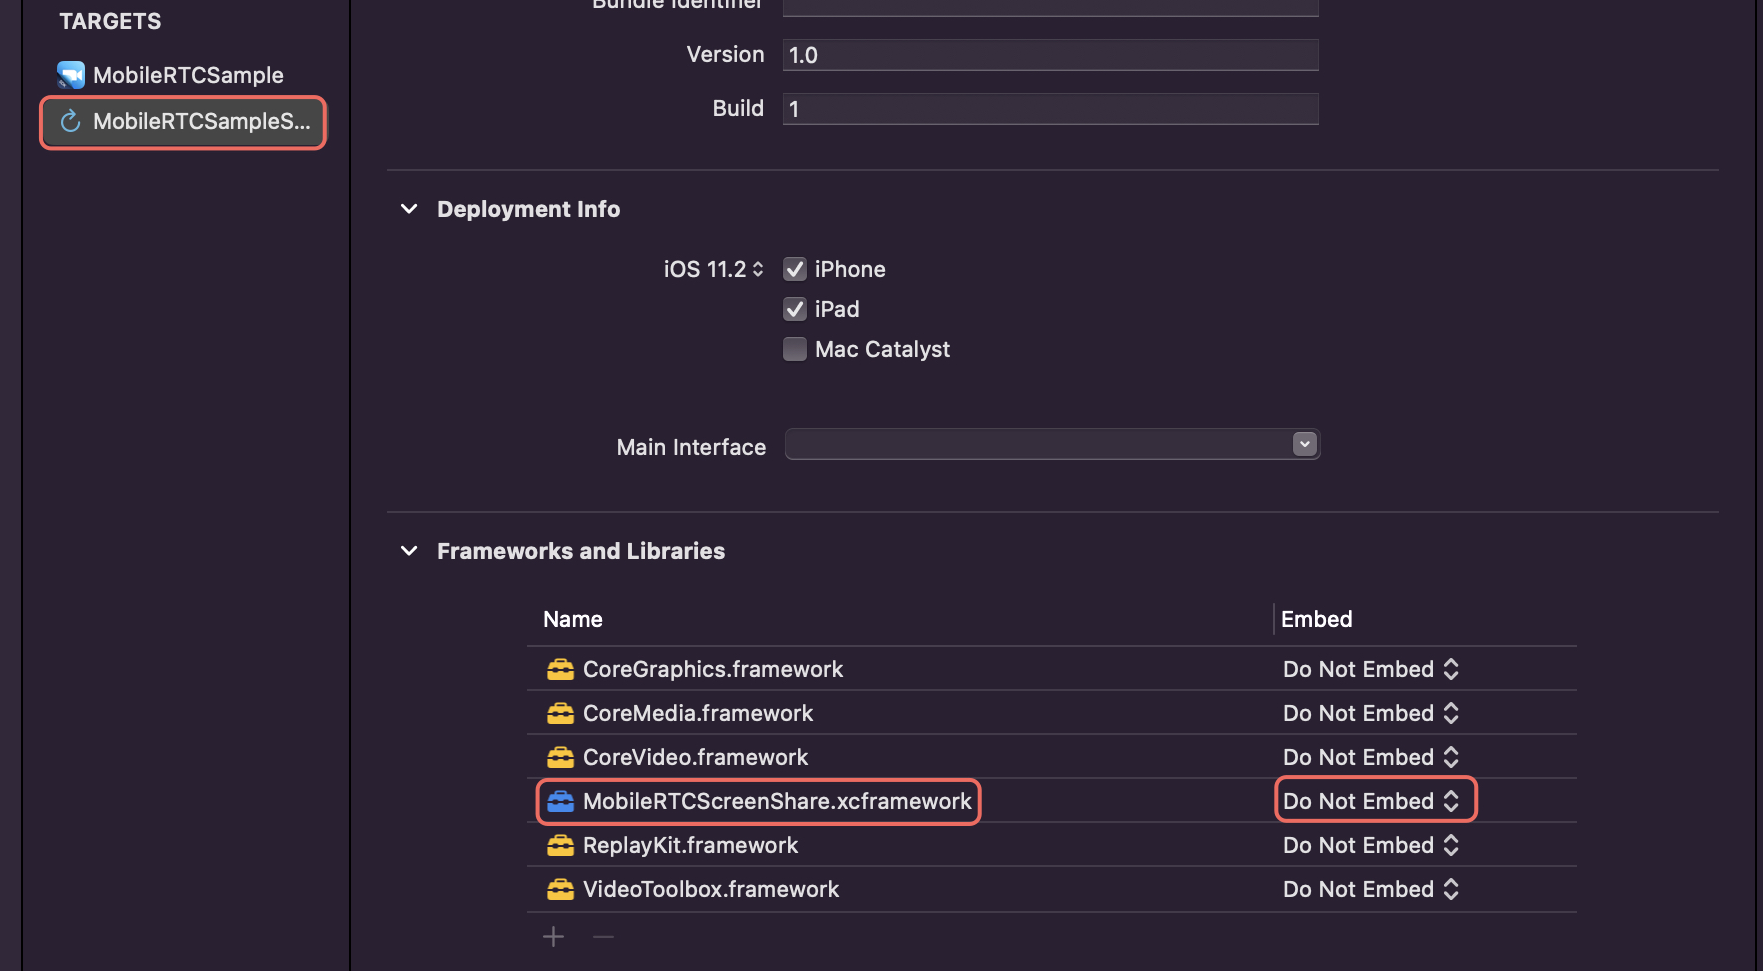
Next, in the ScreenShare target, apply the Do not Embed option to MobileRTCScreenShare.framework.
In the ScreenShare folder, you should see a SampleHandler file.
If you are using Swift for your project, the file created is named
SampleHandler.swift. We do not need to rename this file.
Alternatively, if you are using Objective-C, the file created is
named SampleHandler.m.
The MobileRTCScreenShareService.framework expects a
SampleHandler with the extension of mm. If your
SampleHandler is named SampleHandler.m, rename it to
SampleHandler.mm.
Disable bitcode
The Meeting SDK does not support bitcode, but Xcode enables bitcode by default so you need to disable it for all targets. Under Targets, navigate to ScreenShare > Build Settings > Build Options > Setting and set the value of Enable Bitcode as No.
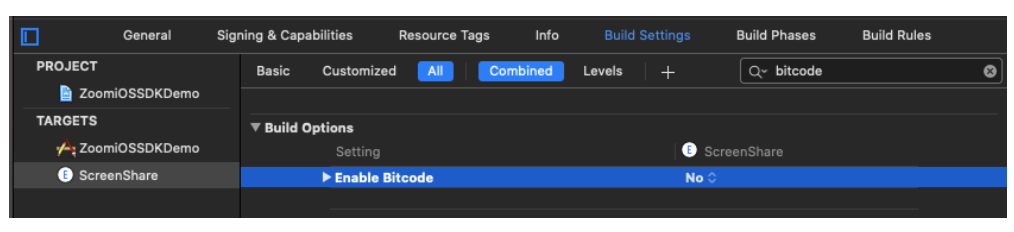
Repeat this step for your main target if you haven't already done so.
Note: Ensure that your target's deployment version is less than or equal to your device's OS version for both the main target and the ScreenShare target.
Import the MobileRTCScreenShare.framework
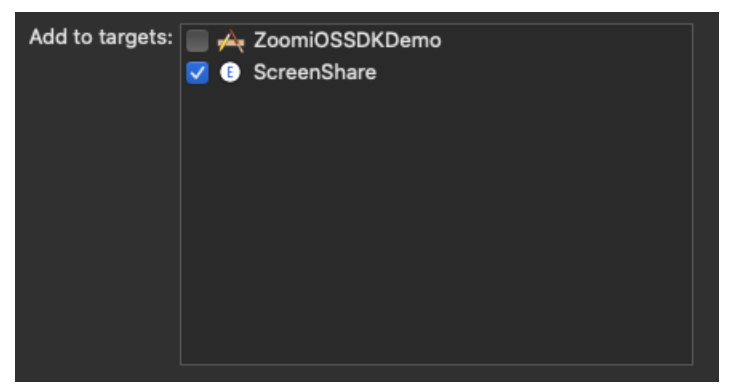
After completing the steps listed above, let's import the MobileRTCScreenShare.framework into the ScreenShare app extension target(not the main application target).
You can do so by either dragging the framework into Xcode or by
navigating to the Frameworks section of the ScreenShare target
and adding the MobileRTCScreenShare.framework. During the import
process, if you are asked to specify a target, select the
ScreenShare target and not the main target.
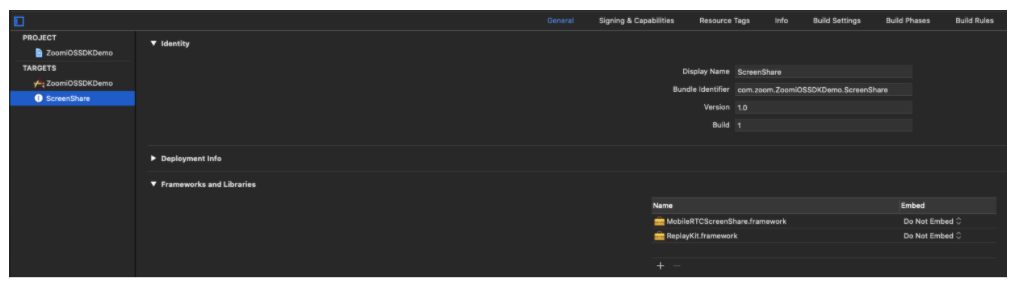
After importing the framework, the General tab of the ScreenShare extension should look similar to this:
The MobileRTCScreenShare framework uses Apple video frameworks to
improve screen sharing experience. Thus, we will also need to link the
following frameworks to the ScreenShare target:
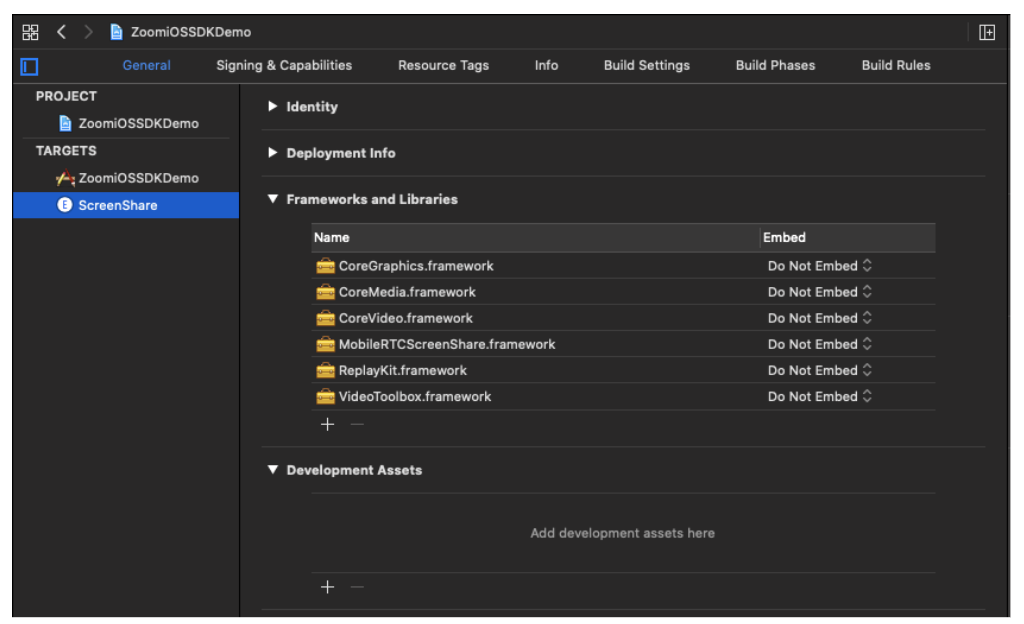
CoreGraphics.frameworkCoreVideo.frameworkCoreMedia.frameworkVideoToolbox.framework
These frameworks will be linked to and not embedded in the ScreenShare
target. Since these frameworks are provided by Apple and included in
iOS, we do not need to import it from an external resource. To include
these frameworks, navigate to the Frameworks and Libraries section in the General tab of the ScreenShare target and
click the + sign to include these frameworks. The Framework
and Libraries section must already include the MobileRTCScreenShare
framework and ReplayKit framework.
It is crucial to add these frameworks to the correct target. After adding these frameworks, the General tab of the ScreenShare target should look like this:
Note: In certain versions of Xcode, you may have to navigate to Build Phases > Link Binary with Libraries to import these frameworks.
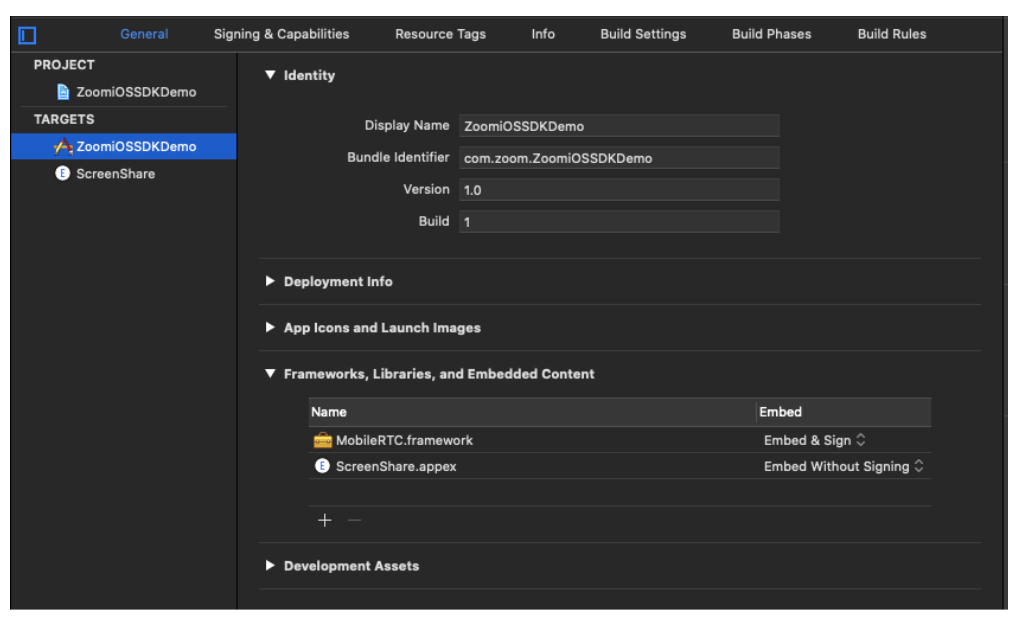
The General tab of the main target should not contain these targets and should look similar to this:
The MobileRTCScreenShare.framework works by utilizing the callbacks
within the SampleHandler. For ReplayKit to be able to
communicate with Meeting SDK, you must conform
SamplerHandler to MobileRTCScreenShareServiceDelegate.
Implement a bridging header
If you are using Swift in your project, implement a
bridging header to expose MobileRTCScreenShare.framework to
SampleHandler.swift.
If you are using Objective-C, skip this section and move to the Set
up SampleHandler
section.
There are different ways to create a bridging header. One way is to create a temporary Objective-C file within your target. When an Objective-C file is created in a Swift target, Xcode will automatically offer to create a bridging header for you. This temporary Objective-C file will not be used for anything else, and can be deleted once Xcode has created your bridging header. Let's use this approach to create our bridging header.
Navigate to SampleHandler.swift in the project explorer, select
File > New File and select Objective-C File.
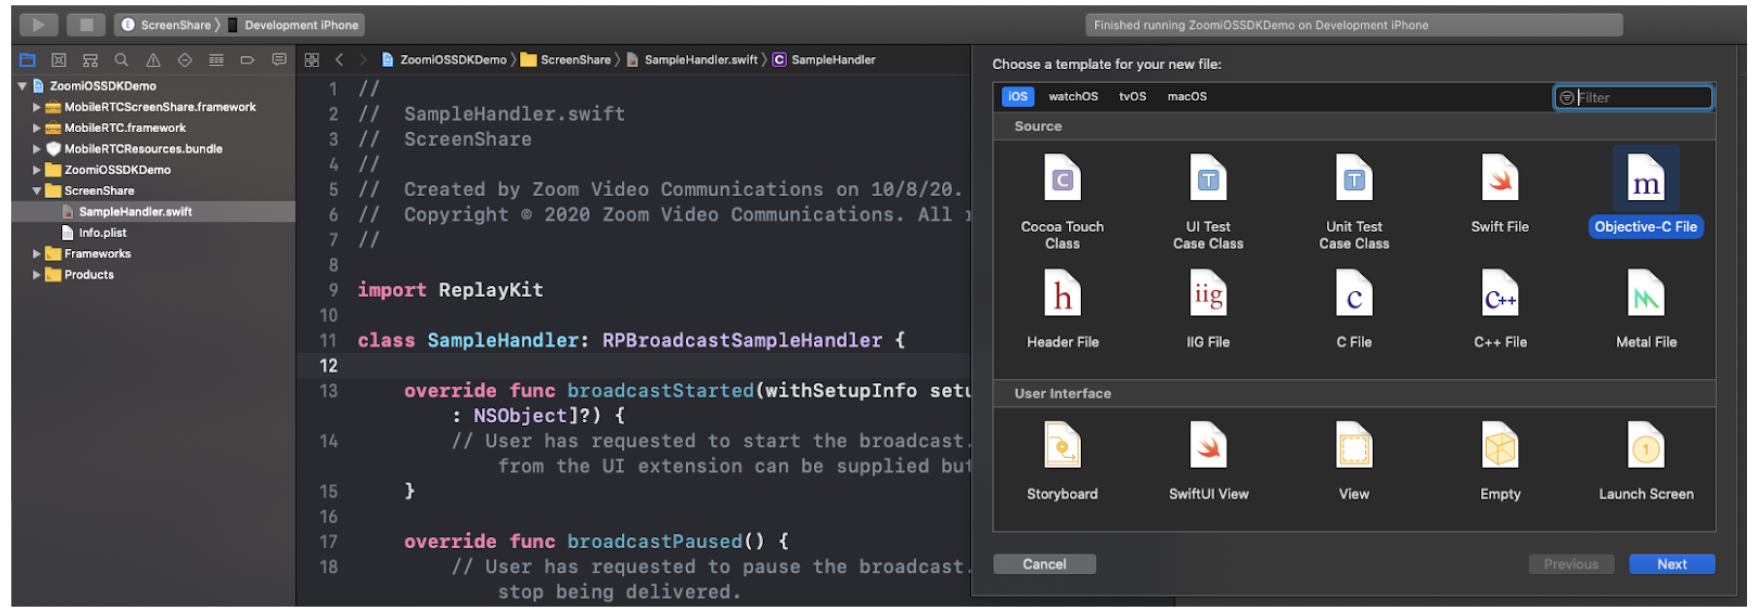
Note: This file itself is not the bridging header, this is a temporary Objective-C file that is created to expose this target to Objective-C. We will discard this file when we are done creating a bridging header.
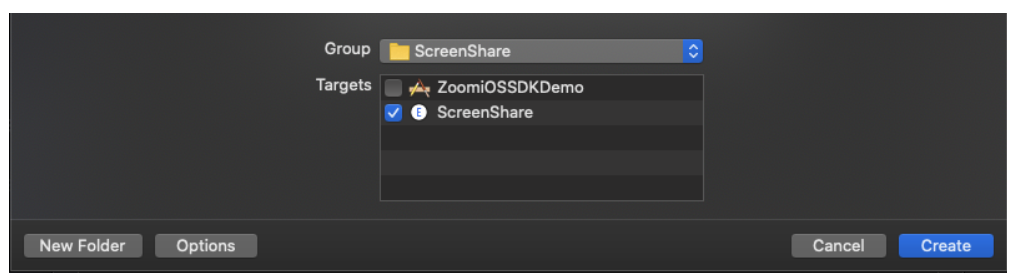
Give this file a name of your choice and select Next.
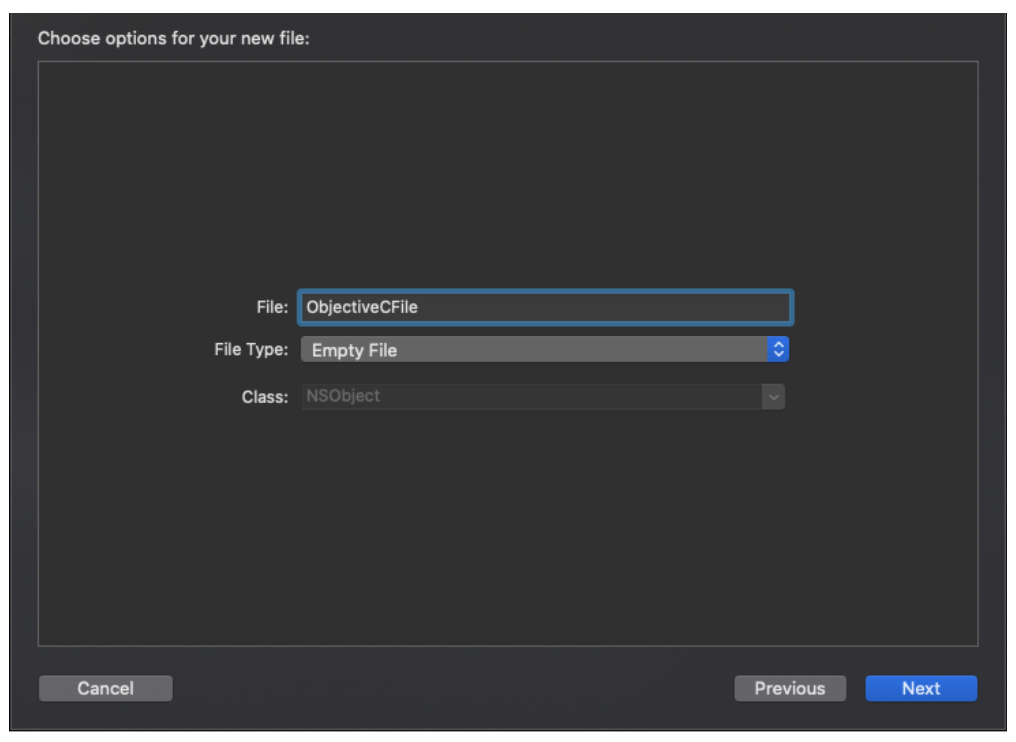
Add this file to only the ScreenShare target and select Create.
Xcode will now prompt you to create an Objective-C bridging header. Click Create Bridging Header.
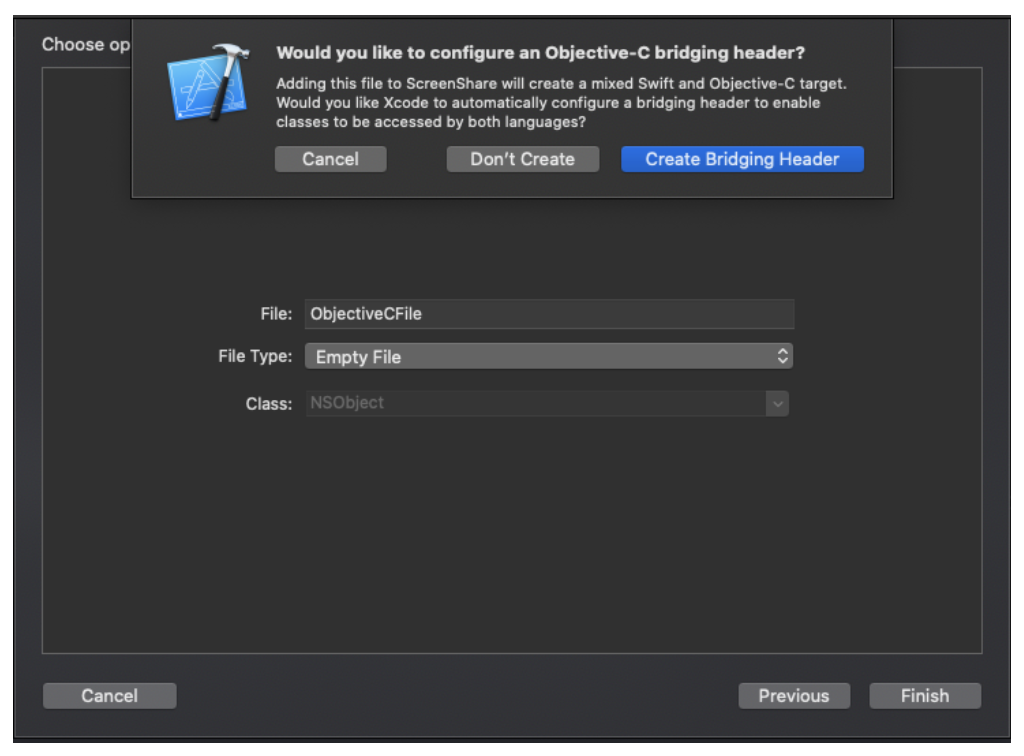
If you didn't see any prompt, you must create the bridging header manually within the ScreenShare target. For more information on manually creating the bridging header, read Apple's guide on importing Objective-C into Swift.
After completing these steps, you should see the bridging header in your ScreenShare target.
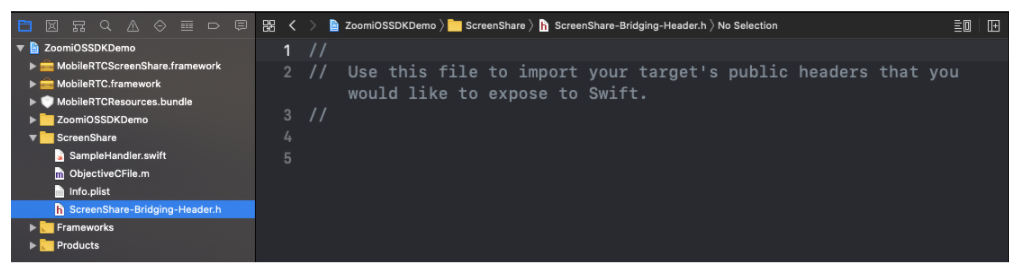
You may now delete the temporary Objective-C file that you created earlier.
Within the bridging header, add the following line of code:
#import <MobileRTCScreenShare/MobileRTCScreenShareService.h>
The Swift files in your ScreenShare target should now be equipped with MobileRTCScreenShareService.framework. You do not need to include any import statements within your Swift files for MobileRTCScreenShareService.framework to be accessible.
If you run into issues using or creating the bridging header make sure:
-
The bridging header is targeted at your screen share target, and not another target.
-
The bridging header must be named in a specific way: product module name followed by "-Bridging-Header. h".
Set up SampleHandler
We will use the SampleHandler file that was auto created in the Screen broadcast with ReplayKit step to handle different events that occur during the broadcast.
The Zoom Meeting SDK provides two delegates to handle screen sharing events:
-
MobileRTCScreenShareServiceDelegate is a delegate within MobileRTCScreenShareService.framework and is used for passing ReplayKit events to the SDK.
-
MobileRTCShareServiceDelegate is a delegate within MobileRTC.framework that provides callbacks related to sharing events that occur in your application.
In this step, we will use the MobileRTCScreenShareServiceDelegate to handle the ReplayKit events. To do so, we must first conform SampleHandler to MobileRTCScreenShareServiceDelegate by adding the following lines of code in the SampleHandler file.
SampleHandler.m
        {`
#import "SampleHandler.h"
#import
@interface SampleHandler ()
`}
SampleHandler.swift
        {`
import ReplayKit
class SampleHandler: RPBroadcastSampleHandler, MobileRTCScreenShareServiceDelegate {}
`}
Next, let's pass the SampleHandler callbacks into the Meeting
SDK. To do this, create a MobileRTCScreenShareService property,
assign the SampleHandler as its delegate, and call the delegate
functions from the relative SampleHandler callbacks.
SampleHandler.m
        {`
#import "SampleHandler.h"
#import
@interface SampleHandler ()
@property (strong, nonatomic) MobileRTCScreenShareService * screenShareService;
@end
@implementation SampleHandler
- (instancetype)init
{
  self = [super init];
  if (self)
  {
    MobileRTCScreenShareService * service = [[MobileRTCScreenShareService alloc]init];
    self.screenShareService = service;
    self.screenShareService.delegate = self;
  }
  return self;
}
- (void)dealloc
{
  self.screenShareService = nil;
}
- (void)broadcastStartedWithSetupInfo:(NSDictionary *)setupInfo {
  // User has requested to start the broadcast. Setup info from the UI extension can be supplied but optional.
  [self.screenShareService broadcastStartedWithSetupInfo:setupInfo];
}
- (void)broadcastPaused {
  [self.screenShareService broadcastPaused];
  // User has requested to pause the broadcast. Samples will stop being delivered.
}
- (void)broadcastResumed {
  [self.screenShareService broadcastResumed];
  // User has requested to resume the broadcast. Samples delivery will resume.
}
- (void)broadcastFinished {
  // User has requested to end the broadcast.
  [self.screenShareService broadcastFinished];
}
- (void)processSampleBuffer:(CMSampleBufferRef)sampleBuffer withType:(RPSampleBufferType)sampleBufferType {
  [self.screenShareService processSampleBuffer:sampleBuffer withType:sampleBufferType];
}
- (void)MobileRTCScreenShareServiceFinishBroadcastWithError:(NSError *)error
{
  [self finishBroadcastWithError:error];
}
@end
`}
SampleHandler.swift
        {`
import ReplayKit
class SampleHandler: RPBroadcastSampleHandler, MobileRTCScreenShareServiceDelegate {
    var screenShareService: MobileRTCScreenShareService?
    override init() {
        super.init()
        screenShareService = MobileRTCScreenShareService()
        screenShareService?.delegate = self
    }
    override func broadcastStarted(withSetupInfo setupInfo: [String : NSObject]?) {
        // User has requested to start the broadcast. Setup info from the UI extension can be supplied but optional.
        screenShareService?.broadcastStarted(withSetupInfo: setupInfo)
    }
    override func broadcastPaused() {
        // User has requested to pause the broadcast. Samples will stop being delivered.
        screenShareService?.broadcastPaused()
    }
    override func broadcastResumed() {
        // User has requested to resume the broadcast. Samples delivery will resume.
        screenShareService?.broadcastResumed()
    }
    override func broadcastFinished() {
        // User has requested to finish the broadcast.
        screenShareService?.broadcastFinished()
    }
    override func processSampleBuffer(_ sampleBuffer: CMSampleBuffer, with sampleBufferType: RPSampleBufferType) {
        screenShareService?.processSampleBuffer(sampleBuffer, with: sampleBufferType)
    }
    func mobileRTCScreenShareServiceFinishBroadcastWithError(_ error: Error!) {
        finishBroadcastWithError(error)
    }
}
`}
Set up App Groups
The Meeting SDK uses App Groups to communicate between your ScreenSharing extension, and your application.
To enable App Groups, navigate to your main target, click on the Code Sign and Capabilities tab, click the + Capability button and select App Groups.
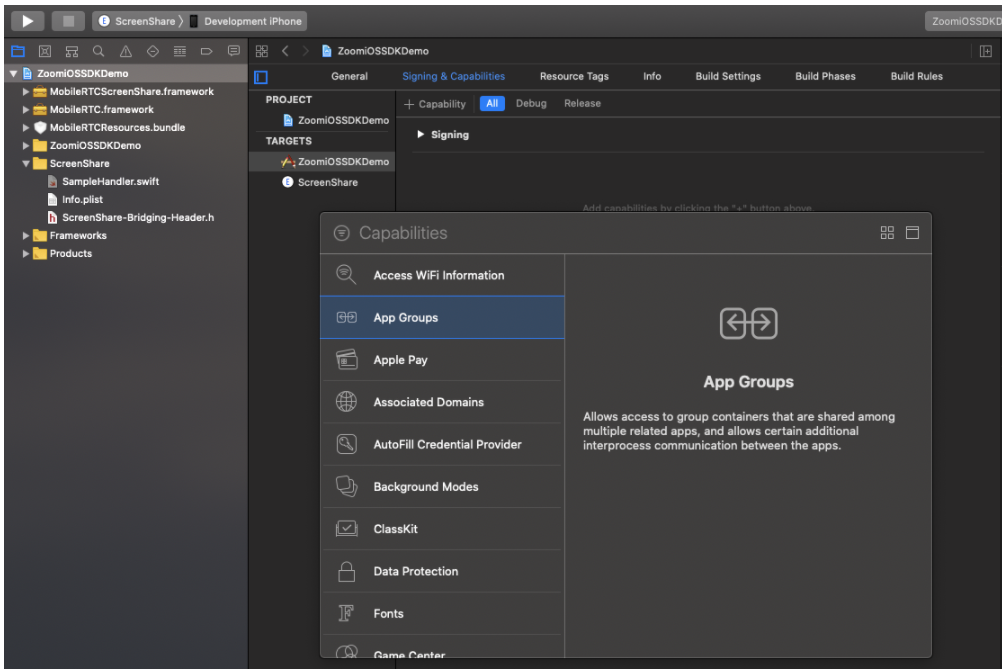
Click the + button under the App Groups checkbox section to create a new App Group.
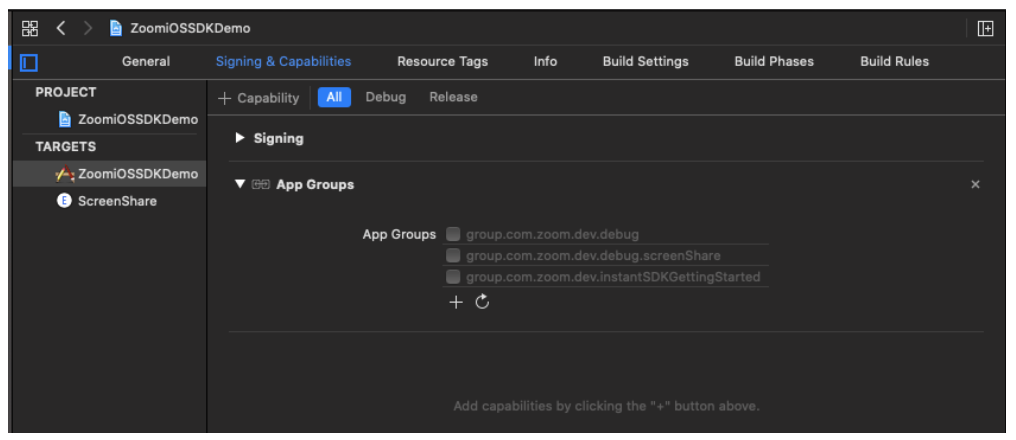
You must now provide an App Group ID for this App Group. Similar to
Bundle IDs, these are in reverse domain order starting with _group._.
You will need this ID later, and the ID must remain consistent
everywhere it is used. To easily track the ID, we recommend appending
your Bundle ID to the group. prefix.
Note: The App Group ID(
group.com.zoom.ZoomiOSSDKDemo) shown in the example below will not work for your project. Apple will reject your build if you attempt to use this App Group ID. You must use your own App Group ID.
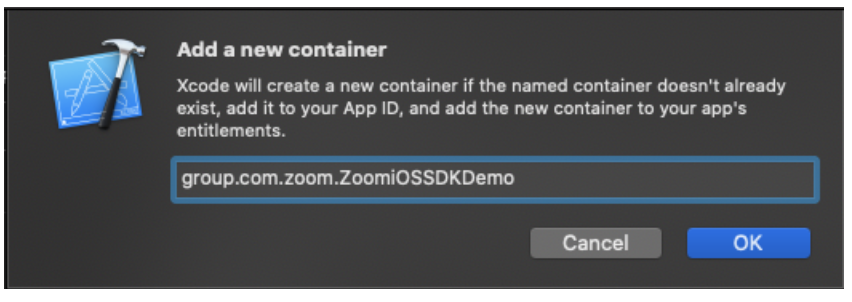
Next, select the App Group ID to enable this App Group.

If you run into code signing errors while enabling App Groups and creating an ID, you can resolve these errors by troubleshooting your provisioning profile settings.
Next, repeat the above steps to add the same App Group and capability to the ScreenShare target. The same App Group ID must be used in both targets.

Wherever the Zoom Meeting SDK is initialized in your application, pass the App Group ID that you created earlier to your MobileRTCSDKInitContext.
        {`
// Sets the App Group ID. Before passing the App Group ID, ensure that the ID has the "group." prefix in it.
context.appGroupId = @"Your AppGroupId";
`}
        {`
// Sets the App Group ID. Before passing the App Group ID, ensure that the ID has the "group." prefix in it.
context.appGroupId = "Your App Group ID"
`}
Next, pass the same App Group ID into the MobileRTCScreenShareService within your SampleHandler. This can be placed inside the init method where the other screenShareService properties are set.
        {`
self.screenShareService.appGroup = @"Your AppGroupId";
`}
        {`
screenShareService?.appGroup = "Your AppGroupId"
`}
The MobileRTCScreenShare framework utilizes C++ libraries, so we will need to update our project to be able to use these libraries.
If you are using Swift for your ScreenShare target, navigate to the ScreenShare target > Build Settings > Other Linker Flags, and add the value -lc++.

If you are using Objective-C for your project, ensure that you have
changed the file name for your SampleHandler from
SampleHandler.m to SampleHandler.mm.
At this point, you should be able to run the extension and see the screen sharing feature functioning well. Select the ScreenShare scheme at the top left of Xcode and click the Run button to test the screen sharing target.

If prompted to choose an app to run, select your main target application and click Run.
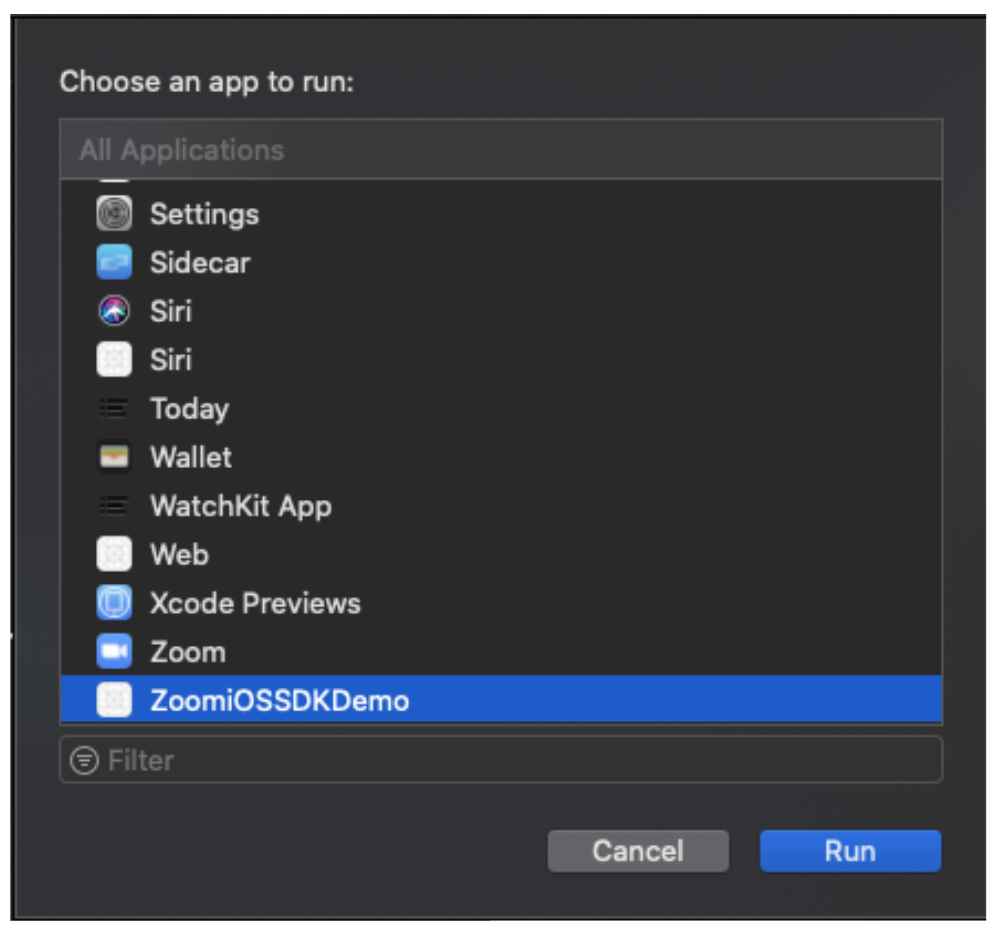
Xcode will display this prompt every time you run the ScreenShare scheme. If you would like to set your main target as the default app to run, click the ScreenShare scheme, click Edit Scheme and set your application in the Executable field. By default, you can either debug your ScreenShare extension or your main application, if you would like to debug both, select Debug executable.
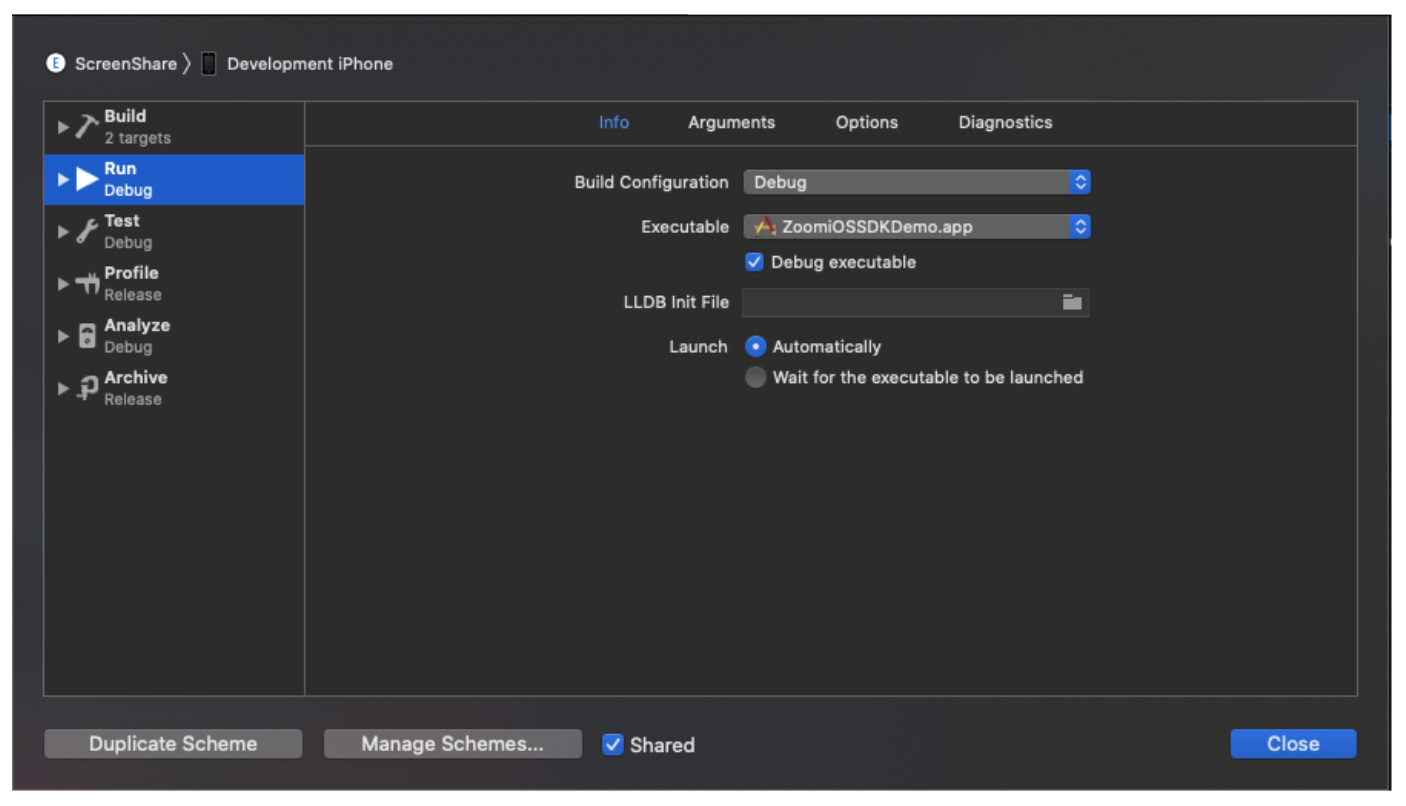
After running the application, begin a broadcast by long-pressing the Screen Recording button in the Control Center on your iOS device. Select the application extension and click Start Broadcast.
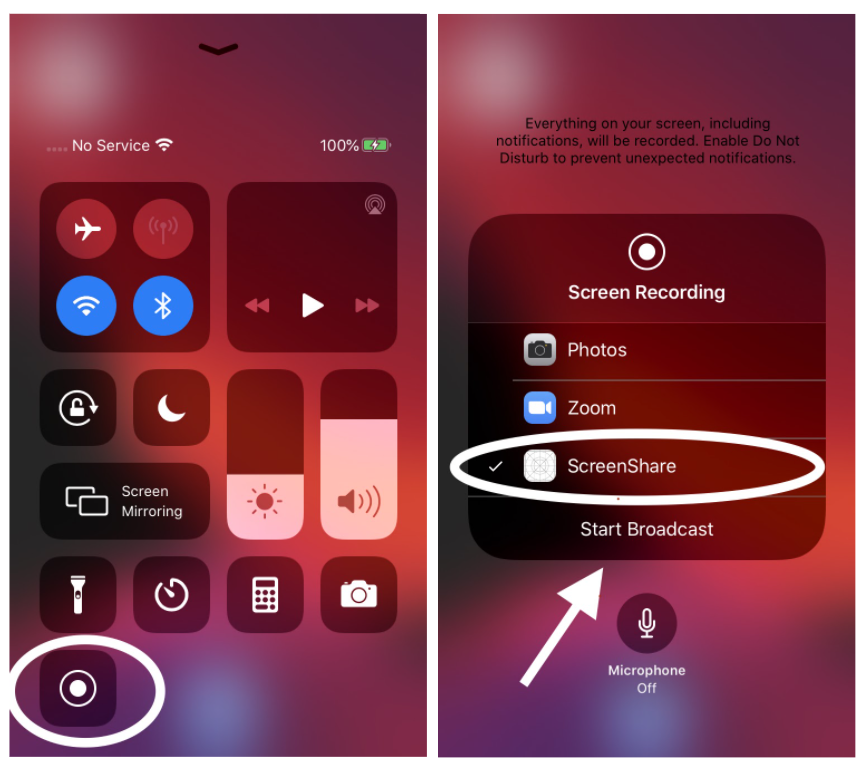
You should now see that your device's screen is being shared by the application.
You must enable the
Audio,AirPlay, andPicturein Picture background execution mode if you want your screen share to continue while your app runs in the background. Otherwise, your share will freeze to other meeting participants and then resume once you navigate back to your app.
Important Considerations
If you set a breakpoint in SampleHandler's init or BroadcastStarted method, it should get hit after a short delay after starting the broadcast. If a breakpoint is hit, the extension is working properly. Sometimes when hitting a breakpoint in an app extension, the extension will behave strangely or terminate, that should stop when the breakpoint is removed.
If you do not see your application extension within the broadcast menu on your device:
-
Ensure that the App Group ID is both valid and consistent in both targets' capabilities sections.
-
Ensure that the App Group ID is set in both the SDKInitContext and MobileRTCScreenShareService.
-
Ensure that the deployment target is less than or equal to the device's OS version.
If the deployment target of the ScreenShare extension is greater than the device's OS version, the application extension will fail silently.
If you do broadcast to your application successfully, but the breakpoints within your SampleHandler do not get hit, try running the ScreenShare scheme and not your main application scheme. If breakpoints are still not triggering, ensure that your App Group ID is valid and consistent. If the issue still persists, troubleshoot your scheme settings.
After you start broadcasting your screen during a meeting that has enabled screen sharing, and the default meeting UI is being used, the screen will look similar to the following:
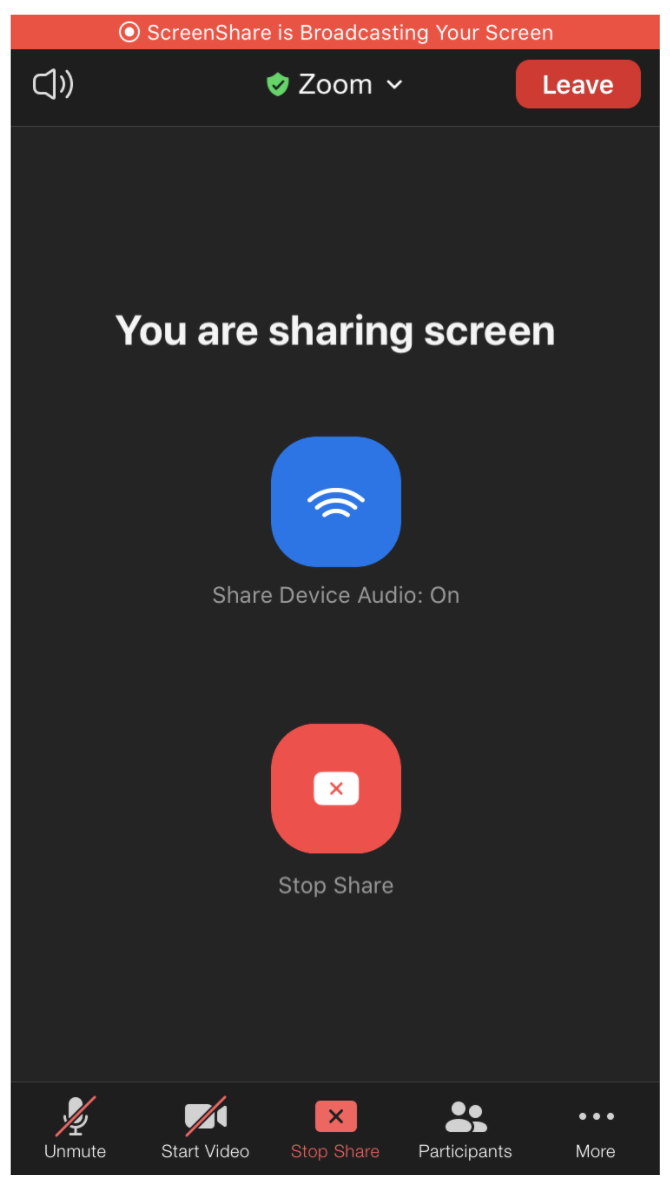
Note that because the broadcast is controlled by the user at the OS level, the user can begin a broadcast outside of a Zoom meeting. The broadcast will not be shared anywhere in this case. This also means the broadcast may be terminated by the user at any time
Once the broadcast of the screen starts in your application during a meeting, you can utilize onSinkMeetingActiveShare callback function of the MobileRTCShareServiceDelegate to monitor screen share events. This function is called when a user starts or stops the broadcast in a meeting. Note: This delegate is located within MobileRTC.framework not MobileRTCScreenShare.framework, so this delegate should be implemented within your main target.
The userID of the user who is sharing the screen is provided as a parameter in the callback. If the value of the userID in the callback is 0, it indicates that the user has stopped sharing the screen.
        {`
- (void)onSinkMeetingActiveShare:(NSUInteger)userID {
  if (userID == 0) {
    NSLog(@"Sharing has stopped.");
  } else {
    NSLog(@"User with ID: %lu has begun sharing.", (unsigned long)userID);
  }
}
`}
        {`
func onSinkMeetingActiveShare(_ userID: UInt) {
  if (userID == 0) {
    print("Sharing has stopped.")
  } else {
    print("User with ID: \(userID) has begun sharing.")
  }
}
`}
Share Single UIView
In the Screen Broadcast with ReplayKit section, we went over how a device screen can be shared during a meeting from your app. In this section, you will learn how to share a single UIView in a meeting. There are some network limitations with this method, but if the UIView is not complex, it can be used to share your view.
To use this method, the enableCustomMeetingUI property in the
MobileRTCMeetingSettings must be set to true. If it is set to
false, this sharing method will be disabled.
Once you have a UIView you would like to share, you can use the startAppShare function provided by MobileRTCMeetingService to start sharing it with the meeting.
        {`
MobileRTCMeetingService *ms = [[MobileRTC sharedRTC] getMeetingService];
if (ms) {
 // Alert the SDK that the user has started sharing. If [ms startAppShare] returns "true", appSharewithView can be called to share the view.
  if ([ms startAppShare]) {
    [ms appShareWithView:shareView];
  }
}
`}
        {`
if let meetingService = MobileRTC.shared().getMeetingService() {
  // Alert the SDK that the user has started sharing. If startAppShare() returns "true", appShare(withView: shareView) can be called to share the view.
  if meetingService.startAppShare() {
    meetingService.appShare(withView: shareView)
  }
}
`}
To stop sharing the view, use the stopAppShare function provided by the MobileRTCMeetingService.
        {`
MobileRTCMeetingService *ms = [[MobileRTC sharedRTC] getMeetingService];
if (ms) {
  [ms stopAppShare];
}
`}
        {`
if let meetingService = MobileRTC.shared().getMeetingService() {
  meetingService.stopAppShare()
}
`}
Once the UIView has begun sharing in the meeting, use the onSinkMeetingActiveShare method of MobileRTCShareServiceDelegate to listen to callbacks related to sharing.
        {`
- (void)onSinkMeetingActiveShare:(NSUInteger)userID {
  if (userID == 0) {
    NSLog(@"Sharing has stopped.");
  } else {
    NSLog(@"User with ID: %lu has begun sharing.", (unsigned long)userID);
  }
}
`}
        {`
func onSinkMeetingActiveShare(_ userID: UInt) {
  if (userID == 0) {
    print("Sharing has stopped.")
  } else {
    print("User with ID: \(userID) has begun sharing.")
  }
}
`}
The view that is being shared will only be displayed after you use the showActiveShare method to update your MobileRTCActiveShareView. MobileRTCActiveShareView inherits from MobileRTCVideoView, so it needs to be added to your Custom Meeting UI just like any other MobileRTCVideoView. Monitor the result of onSinkMeetingActiveShare callback and update your MobileRTCActiveShareView as needed.
        {`
[yourMobileRTCActiveShareView showActiveShareWithUserID:userID];
`}
        {`
yourMobileRTCActiveShareView.showActiveShare(withUserID: userID)
`}
Summary
To summarize, use the MobileRTCMeetingService in the following flow to start and stop a local screen share.
-
Call the startAppShare method along with appShareWithView to start screen sharing.
-
The SDK will notify your app using the onSinkMeetingActiveShare callback which includes the user ID of the user who started the screen share.
-
Pass the User ID received from onSinkMeetingActiveShare callback to the showActiveShareWithUserID method to start rendering the share content.
-
Call the stopAppShare method to stop screen sharing.
-
Once the sharing stops, your app will be notified of this event via the onSinkMeetingActiveShare callback where the value of userID will be
0.
After implementing these steps, your app will be equipped with screen sharing functionality.