Create Contact Center apps
Prerequisites
-
You have read Key Concepts.
-
You have a Zoom account.
-
Zoom Apps SDK 0.16.27 or higher.
-
Zoom Desktop client 6.0.0 or later.
-
To support Zoom Contact Center engagement switching, an app backend is recommended to store engagement state.
-
You are either the Zoom account owner, account admin, or have been assigned the Zoom for developers role.
To enable the Zoom for developers role, log into the Zoom web portal as admin and go to User Management > Roles > Role Settings > Advanced features, and select the View and Edit checkboxes for Zoom for developers.

For more information, see Using role management.
App creation process
- Log into the Zoom Marketplace and select to build a general (OAuth) app.
- Enter or update basic app information such as the app name, access type, and OAuth.
- Select the Zoom products and features that the app works with.
- Select the Zoom API methods (scopes) the app uses to interact with the Zoom platform.
- Preview your app and test it with internal users.
Step 1: Build an OAuth app
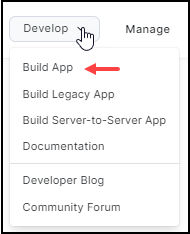
-
Log onto the Zoom App Marketplace.
-
Click Develop > Build App.
Step 2: Maintain basic information
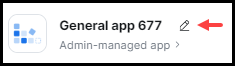
On the Basic Info page, add or update information about the app such as the app's name, how the app is managed, app credentials, and OAuth information.
-
Update your app's name. By default, the build flow generates a generic name for your app. To change your app's name, select the edit icon (pencil) and update the name. To save your changes, click anywhere outside of the app name field.
-
In the Select how the app is managed section, select user-managed.
-
App Credentials - The build flow automatically generates app credentials (client ID & client secret) for your app. App credentials for development differ from app credentials for production.
- Use development credentials while you are building and testing your app.
- Use production credentials once you are ready to publish your app on the Marketplace.
-
In the OAuth Information section, set up OAuth for your app.
- OAuth redirect URL (required): Enter your development redirect URL or endpoint to set up OAuth between your app and Zoom.
- Use Strict Mode URL (optional): Allow only the redirects that exactly match the valid OAuth redirect URLs.
- Subdomain check (optional): Only allow the redirects that exactly match the subdomain of the valid OAuth redirect URLs.
- OAuth allow lists (required): Add any unique URLs that Zoom should allow as valid redirects for your OAuth flows. This additional security measure ensures that users are only redirected to the pre-approved endpoints you provided. Include either the complete URL (https://subdomain.domain.tld/path/to/oauth/callback) or the base URL without the path and/or query parameters (https://subdomain.domain.tld).
Step 3: Select Zoom products and features
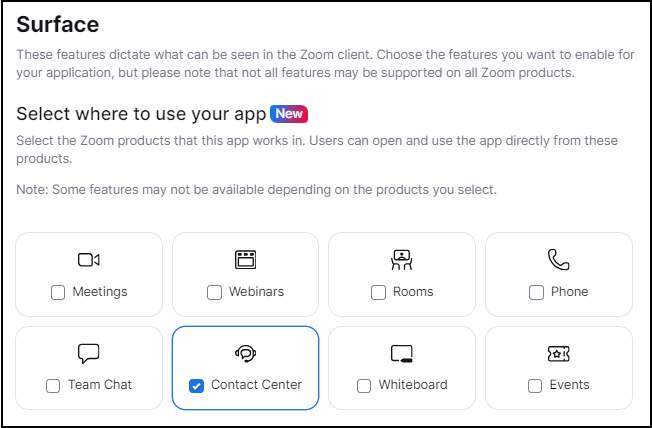
On the Features page, go to the Surface tab.
-
In the Select where to use your app section, select Contact Center.
-
Enter the Home URL domain for your product. When a Zoom user opens your Zoom app inside the Zoom client, this is the URL that will be loaded. Review the home template variables available for your home URL.
You must have the required OWASP response headers in your Home URL.
-
In the Domain Allow List field, provide a list of URLs/hosts that your app uses to send requests. This should include URLs that your front-end application uses to load resources as well as backend API hosts that your web app uses to send requests.
-
In the In-client App Features section, select the Zoom features available to your app users in the Zoom client. To build Contact Center apps, it is mandatory to use Zoom App SDK; enable Zoom App SDK and select + Add APIs to add APIs and events.
These are the Zoom App SDK APIs and events are commonly used with Contact Center apps. You can add additional Zoom App SDK scopes and features, such as calling Zoom Marketplace OpenAPIs and received Marketplace Webhooks. The additional features will vary depending on your app requirements.
Contact Center specific Zoom Apps SDK APIs:
Contact Center specific Zoom Apps SDK Events:
We recommend you review the Zoom Apps SDK reference for any other APIs and events that you may need to include in your app, such as:
-
No selection is required in the Zoom Client Support section. By default, Contact Center apps are supported on the Zoom desktop client.
Step 4: Select scopes (optional)
Only include scopes if you plan to access Zoom Marketplace public APIs. Scopes define the API endpoints and methods that your app is allowed to use in order to access specified resources on behalf your users.
On the Scopes page, select the Zoom API methods your app is allowed to call.
-
Select Add Scopes.
-
Select the Zoom product and check the desired scopes, then select Done.
-
In the Scope Description field, explain how the requested scope is necessary for your app.
When you add a scope, you are actually submitting a request to the Zoom Security Review team to allow your app to access specific Zoom API endpoints. A key principle in Zoom security practice is minimal access. If the Zoom Security Review team determines the requested scope is not necessary for your app, they may reject the scope request.
Step 5: Upload your app logo
When users access your app inside the Zoom desktop client, they see your app's icon as the visual indicator. Therefore, it is important that you upload an icon for your app.
Note: This step is performed within the Production tab of your app, but the icon is also shared to the development version of your app. Therefore, even if you are testing with the development version of your app, you should still complete this step.
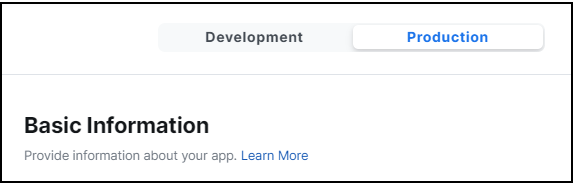
- Select the Production tab at the top of app screen.
- Select App Listing on the left navigation pane.
- On the App Information tab, follow the instructions to upload your logo.
Step 6: Test and preview your app
On the Local Test page, add and preview your app and share it with internal users.
To add the app for your own account, select Add App Now and then Allow.
To see a summary of your app's details and a preview of your app's listing page on the Zoom App Marketplace, select Preview Your App Listing Page.
For security reasons, we limit the sharing of beta apps. We don't allow beta apps to be published to the Zoom Marketplace, and we allow beta app access only to members of the developer's Zoom account.
To share your app with other users on your account, go to the Authorization URL section, and select Generate and then Copy.
Step 7: Prepare your app for production
If you intend to list your Zoom App publicly on the Zoom Marketplace for all customers to see and add, then you need to prepare your app for production and submit your app to Zoom for review.
If you are developing an internal-only app, that will only be used by users on your own Zoom account (for example, a home grown web app) then you do not need to submit your app to the Zoom Marketplace. This step is not required for internal-only apps.
Step 8: Publish your app
For information on how to publish your app, see Publish your app.