Using webhooks
Instead of making repeated calls to pull data frequently from the Zoom API, you can use webhooks for Zoom to send events to your server. Zoom sends webhook events as HTTP POST requests with a JSON body to your app's specified endpoint.
For an introduction and explanation of webhooks, see Zoom Platform 101: Zoom Webhooks.
Now available
Zoom Rivet, Zoom's API library that handles webhooks for you.
Workplace
Business services
- Contact Center
- Events
- Revenue Accelerator
- Number Management
- Node
- Quality Management
- Healthcare
- Video Management
- Commerce
Accounts
Build platform
Marketplace
Configure webhooks via build flow
You configure webhooks by subscribing to specific events in the app build flow.
For instructions to configure your webhook subscriptions using Zoom APIs, see Configure webhooks via Zoom API.
-
Go to your app's Access page.
- Login to the Zoom App Marketplace and click Manage.
- On the Created Apps page, open your app, and go to the Features → Access.
-
Under the General Features section, enable Event Subscriptions and Add New Event Subscription.
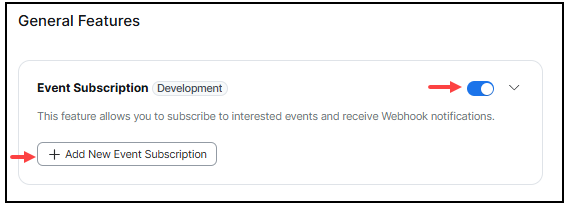
NOTE: You can subscribe to as many events as needed for each event subscription, up to a maximum of 20 event subscriptions per app. Event subscriptions can also have duplicate events. For example, one event subscription could have Meetings and User Events, and a second event subscription can have Meetings and Recordings events.
-
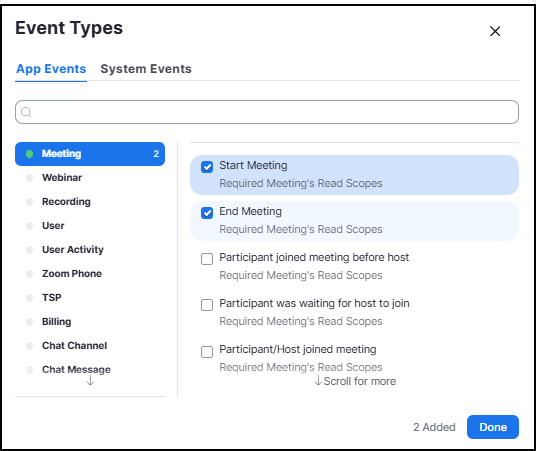
On the Event Types screen, select the specific events and then Done.
-
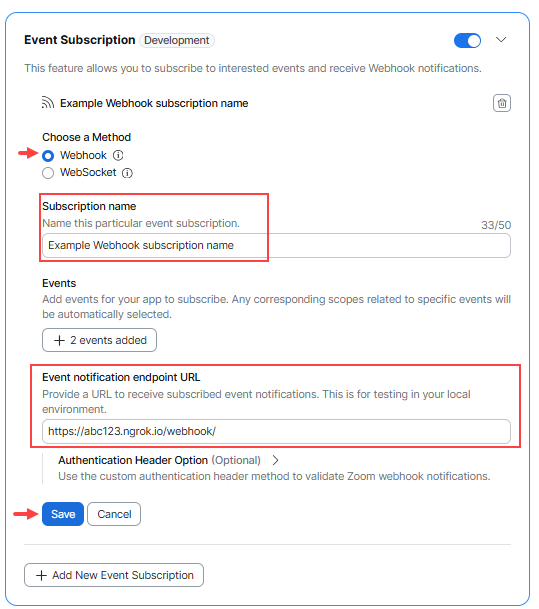
Set your Event notification endpoint URL for each event subscription in your app and Save. Be sure that it satisfies the webhook endpoint requirements.
Updating subscriptions after an app is published
After you publish an app, you must resubmit it for review if you update its subscriptions. The Marketplace won’t show the updated subscriptions until the review is complete. For more information, see Updating apps.
Event notification receiver
When you add an event subscription in the Marketplace UI, you can choose which users' events the subscription captures:
- All users in your account - the subscription captures all users' events. For example, events from you and other users within your account.
- All users in master account and subaccounts - the subscription captures all users' events in this account and all users' events in the subaccounts for this account.
- Only for users who have added this app - the subscription captures only user events for whoever installed the app.
These options are available only for webhook subscriptions created using the Marketplace UI. Subscriptions created using the event subscription API aren’t bound by these options. For example, you can use the webhook subscription API to choose which users or group's events to listen to directly.
Webhook endpoint URL requirements
To receive webhooks in development and production environments, the Event notification endpoint URL that you specify for each event subscription must:
- Be a publicly accessible
httpsendpoint url that supports TLSv1.2+ with a valid certificate chain issued by a Certificate Authority (CA). - Be a fully qualified domain name (FQDN).
- Be able to accept HTTP POST requests containing JSON payloads.
- Be able to respond with a
200or204HTTP Status Code.
Webhook structure
Webhooks events are POST requests sent to your endpoint URL and contain request headers and a request body of the event type, event timestamp, and event details within the payload object.
Example request headers
{
    "host": "example.com",
    "user-agent": "Zoom Marketplace/1.0a",
    "content-length": "110",
    "authorization": "Wk9PTV9BVVRIT1JJWkFUSU9O",
    "content-type": "application/json; charset=utf-8",
    "traceparent": "Wk9PTV9UUkFDRVBBUkVOVA",
    "x-forwarded-for": "{X_FORWARDED_FOR}",
    "x-forwarded-host": "example.com",
    "x-forwarded-proto": "https",
    "x-zm-request-timestamp": "1739923528",
    "x-zm-signature": "v0=WF9aT09NX1NJR05BVFVSRQ",
    "x-zm-request-id": "6009d653_d487_445d_8406_42b654974899",
    "accept-encoding": "gzip"
}
Example request body
{
    "event": "meeting.started",
    "event_ts": 1626230691572,
    "payload": {
        "account_id": "Wk9PTV9BQ0NPVU5UX0lE",
        "object": {
            "id": "1234567890",
            "uuid": "Wk9PTV9NRUVUSU5HX0lE",
            "host_id": "Wk9PTV9VU0VSX0lE",
            "topic": "My Meeting",
            "type": 8,
            "start_time": "2021-07-13T21:44:51Z",
            "timezone": "America/Los_Angeles",
            "duration": 60
        }
    }
}
Zoom IP addresses
We strongly recommend that you Verify webhook events instead of creating an allow list of Zoom IP addresses because Zoom may update the IP ranges used at any time.
Verify webhook events
Zoom offers two ways to verify the authenticity of a webhook, to ensure developers that the request came from Zoom:
Verify with Zoom's header
Zoom includes a webhook secret token on the Add Feature page for your app. Zoom uses the value of the secret token to hash the webhook data, which it sends in the x-zm-signature webhook request header.
To verify that Zoom sent a webhook request, use the webhook secret token and the webhook request body to create a signature to compare with the x-zm-signature header value sent by Zoom.
Example request headers
{
    "host": "example.com",
    "user-agent": "Zoom Marketplace/1.0a",
    "content-length": "110",
    "authorization": "Wk9PTV9BVVRIT1JJWkFUSU9O",
    "content-type": "application/json; charset=utf-8",
    "traceparent": "Wk9PTV9UUkFDRVBBUkVOVA",
    "x-forwarded-for": "{X_FORWARDED_FOR}",
    "x-forwarded-host": "example.com",
    "x-forwarded-proto": "https",
    "x-zm-request-timestamp": "1739923528",
    "x-zm-signature": "v0=WF9aT09NX1NJR05BVFVSRQ",
    "accept-encoding": "gzip"
}
Create your signature string to compare with the Zoom webhook x-zm-signature header value:
-
Receive the webhook request.
The webhook request body includes the following properties:
Key Value Type Value Description eventstring The type of the webhook event payloadobject Contains the event webhook details event_tsnumber The timestamp of the webhook event. Example request body:
{ "event": "session.started", "payload": { "account_id": "{ACCOUNT_ID}", "object": { "start_time": "2022-07-27T16:56:34Z", "id": "{SESSION_ID}" } }, "event_ts": 1658940994914 } -
Construct the message.
After receiving a webhook request, construct the message string with
"v0", the webhook request headerx-zm-request-timestampvalue, and the webhook request body. Separate each section with a colon:. For example:v0:{WEBHOOK_REQUEST_HEADER_X-ZM-REQUEST-TIMESTAMP_VALUE}:{WEBHOOK_REQUEST_BODY}Example string with printed values:
v0:1658940994:{"event":"session.started","payload":{"account_id":"{ACCOUNT_ID}","object":{"start_time":"2022-07-27T16:56:34Z","id":"{SESSION_ID}"}},"event_ts":1658940994914} -
Hash the message.
Once you have constructed the message string, create a HMAC SHA-256 hash. Set your webhook's secret token as the secret/salt, and the
messageyou constructed as the string to hash. Output inhexformat. -
Create the signature.
Then, create the signature by prepending
v0=to the hashed message. For example:v0={HASHED_MESSAGE}Example string with printed values:
v0=a05d830fa017433bc47887f835a00b9ff33d3882f22f63a2986a8es270341 -
Compare the signature.
Compare the
signatureyou created with the Zoom webhook request headerx-zm-signaturevalue. If it matches, the webhook request came from Zoom.
Example in Node.js
const crypto = require("crypto");
const message = `v0:${request.headers["x-zm-request-timestamp"]}:${JSON.stringify(request.body)}`;
const hashForVerify = crypto
    .createHmac("sha256", ZOOM_WEBHOOK_SECRET_TOKEN)
    .update(message)
    .digest("hex");
const signature = `v0=${hashForVerify}`;
if (request.headers["x-zm-signature"] === signature) {
    // Webhook request came from Zoom
} else {
    // Webhook request did not come from Zoom
}
See the Zoom webhook sample for an example implementation.
Learn more about HMAC Auth for webhooks.
Verify with your own header
Zoom offers the following options to verify webhooks with your own header:
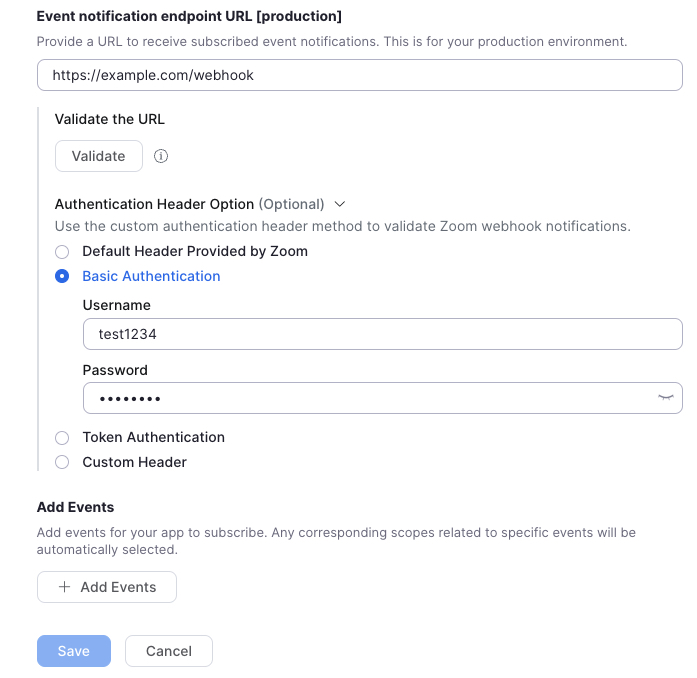
Basic authentication
-
Choose Basic Authentication. Specify a username and password.
-
When a webhook is triggered, Zoom makes a POST request with the following request headers, including the
authorizationvalue being your username and password, base64encoded with a colon:in between:{ "host": "example.com", "user-agent": "Zoom Marketplace/1.0a", "content-length": "320", "authorization": "Basic Q2xpZW50SUQ6Q2xpZW50U2VjcmV0", "clientid": "{CLIENT_ID}", "content-type": "application/json; charset-utf-8", "x-forwarded-for": "{X_FORWARDED_FOR}", "x-forwarded-proto": "https", "x-zm-request-timestamp": "1674780079", "x-zm-signature": "v0={HASHED_WEBHOOK_SECRET_TOKEN}", "x-zm-trackingid": "{X_ZM_TRACKINGID}", "accept-encoding": "gzip" }
Learn more about Basic Auth for webhooks.
Token authentication (OAuth)
-
Choose the "Token Authentication" option. Specify an OAuth token endpoint, and your OAuth server's Client ID and Client Secret.
https://example.com/oauth/token?grant_type=client_credentials
-
When a webhook is triggered, Zoom makes a POST request to retrieve an access_token from your OAuth server, with the following request headers, including the
authorizationvalue being your Client ID and Client Secret, base64encoded, with a colon:in between:{ "host": "example.com", "user-agent": "Zoom Marketplace/1.0a", "content-length": "0", "authorization": "Basic Q2xpZW50SUQ6Q2xpZW50U2VjcmV0", "content-type": "application/x-www-form-urlencoded", "x-forwarded-for": "{X_FORWARDED_FOR}", "x-forwarded-proto": "https", "accept-encoding": "gzip" } -
After you validate the authorization header, respond to the request with a
200status code and the following JSON. expires_in must be equal to or greater than 3599.{ "access_token": "{ACCESS_TOKEN}", "token_type": "bearer", "expires_in": "3599" } -
Zoom sends the webhook request to your server with the authorization bearer header set to the value of your access_token:
{
    "host": "example.com",
    "user-agent": "Zoom Marketplace/1.0a",
    "content-length": "110",
    "authorization": "Bearer {ACCESS_TOKEN}",
    "content-type": "application/json; charset=utf-8",
    "x-forwarded-for": "{X_FORWARDED_FOR}",
    "x-forwarded-proto": "https",
    "x-zm-request-timestamp": "1674847087",
    "x-zm-signature": "v0={HASHED_WEBHOOK_SECRET_TOKEN}",
    "accept-encoding": "gzip"
}
Learn more about OAuth for webhooks.
Custom header
-
Choose Custom Header. Specify a key and value.
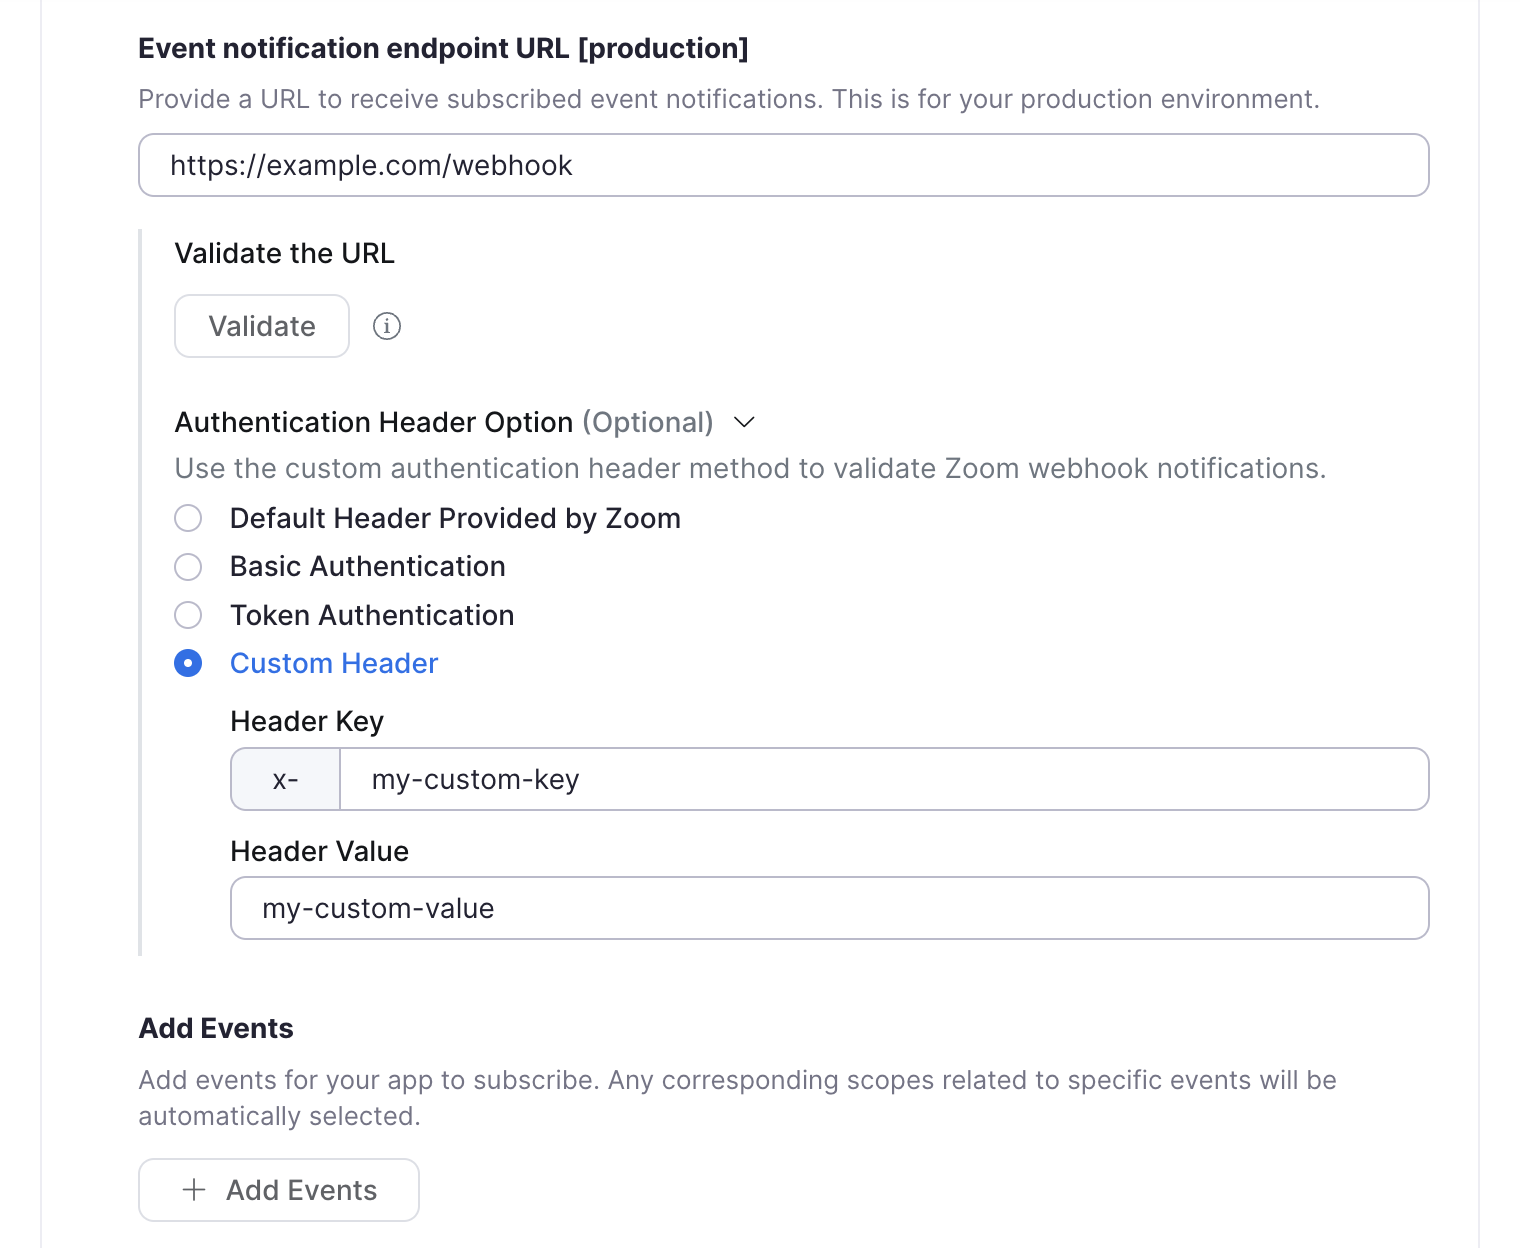
-
When an event triggers a webhook, Zoom makes a POST request with the following request headers, including your custom header property (in this example
x-my-custom-key):{ "host": "example.com", "user-agent": "Zoom Marketplace/1.0a", "content-length": "110", "content-type": "application/json; charset=utf-8", "x-forwarded-for": "{X_FORWARDED_FOR}", "x-forwarded-proto": "https", "x-my-custom-key": "my-custom-value", "x-zm-request-timestamp": "1674847087", "x-zm-signature": "v0={HASHED_WEBHOOK_SECRET_TOKEN}", "accept-encoding": "gzip" }Removing the x- Prefix in custom header keys
If you want to remove the
x-prefix in the custom header key, please reach out to Zoom Support or post on our Developer Forum.
Learn more about One Time Verification for webhooks.
Validate your webhook endpoint
Zoom requires that you manually trigger webhook validation when you add a new webhook or make changes to an existing one. Subsequently, Zoom automatically revalidates webhooks every 72 hours.
Zoom uses a challenge-response check (CRC) for webhook validation. When a CRC occurs, Zoom makes a POST request to your endpoint with a challenge request body. After your endpoint receives the request, your app needs to respond with the challenge response within 3 seconds.
To trigger the initial CRC validation, click Validate under the Event Notification Endpoint URL on the Feature page for your app. See Revalidation for revalidation details.
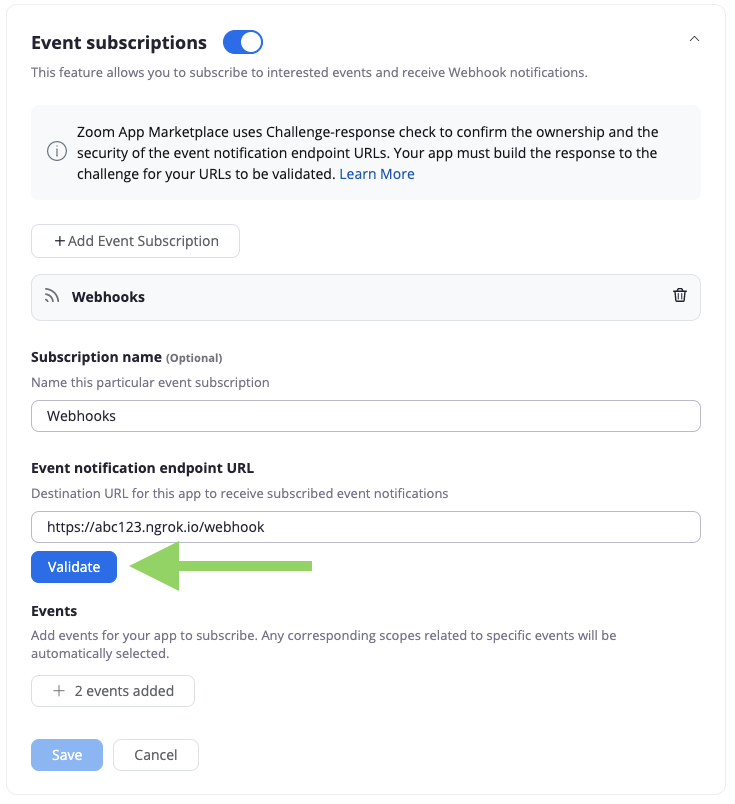
You won't be able to save your changes until after Zoom validates your endpoint.
Implement the challenge-response check flow
-
Receive the challenge (webhook request body).
The webhook request body includes the following properties:
Key Value Type Value Description eventstring The type of the webhook event, which will be "endpoint.url_validation"payloadobject Contains a property with the plainTokenvalue, the string to hash.event_tsnumber The timestamp of the webhook event. Example request headers:
{
    "host": "example.com",
    "user-agent": "Zoom Marketplace/1.0a",
    "content-length": "110",
    "authorization": "Wk9PTV9BVVRIT1JJWkFUSU9O",
    "content-type": "application/json; charset=utf-8",
    "traceparent": "Wk9PTV9UUkFDRVBBUkVOVA",
    "x-forwarded-for": "{X_FORWARDED_FOR}",
    "x-forwarded-host": "example.com",
    "x-forwarded-proto": "https",
    "x-zm-request-timestamp": "1739923528",
    "x-zm-signature": "v0=WF9aT09NX1NJR05BVFVSRQ",
    "accept-encoding": "gzip"
}
Example request body:
{ "payload": { "plainToken": "qgg8vlvZRS6UYooatFL8Aw" }, "event_ts": 1654503849680, "event": "endpoint.url_validation" } -
Hash the plainToken.
Once you receive the request body, create a HMAC SHA-256 hash. Set your webhook's secret token as the secret (salt), and the
plainTokenvalue as the string to hash. Output inhexformat. -
Create the response JSON object.
Create a JSON object with a key of
"plainToken"with a value of theplainTokenfrom the request body, and a key of"encryptedToken"with a value of the hashedplainToken. For example:{ "plainToken": "qgg8vlvZRS6UYooatFL8Aw", "encryptedToken": "23a89b634c017e5364a1c8d9c8ea909b60dd5599e2bb04bb1558d9c3a121faa5" } -
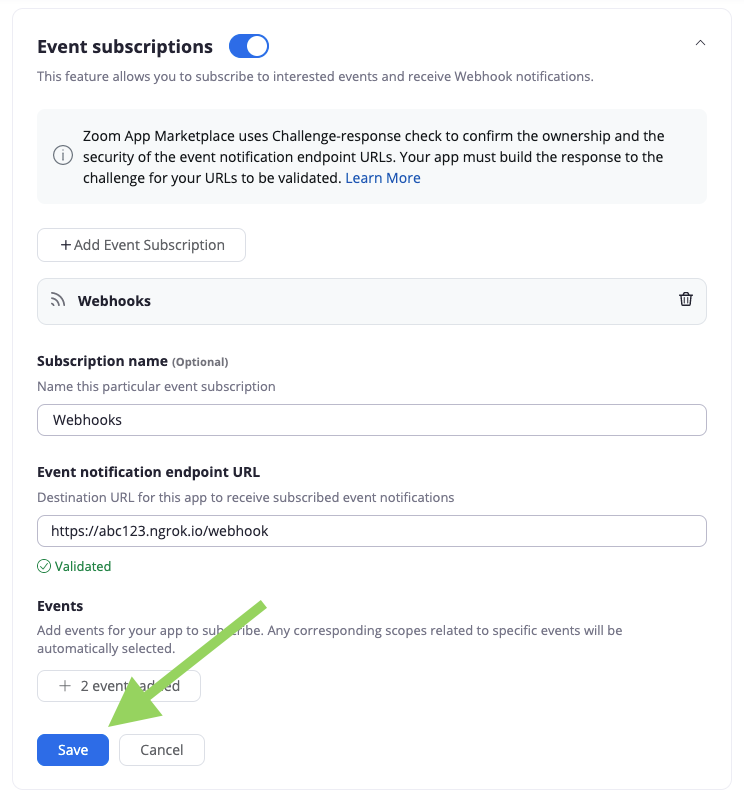
Respond with the response JSON object.
Respond with the response JSON within 3 seconds with a
200or204HTTP response code.When Zoom successfully validates the challenge response from your webhook endpoint URL, you'll see a validated message under the Event Notification Endpoint URL. If validation fails, you'll see a failed to validate message. Once you successfully complete validation, click Save.
Example in Node.js
const crypto = require("crypto");
// Webhook request event type is a challenge-response check
if (request.body.event === "endpoint.url_validation") {
    const hashForValidate = crypto
        .createHmac("sha256", ZOOM_WEBHOOK_SECRET_TOKEN)
        .update(request.body.payload.plainToken)
        .digest("hex");
    response.status(200);
    response.json({
        plainToken: request.body.payload.plainToken,
        encryptedToken: hashForValidate,
    });
}
See the Zoom webhook sample for an example implementation.
Revalidation
Your production and development webhook URLs will be revalidated periodically every 72 hours. Zoom will send notification emails to the account owner associated with your apps if the URL fails the revalidation, following this schedule:
- First notification email after a total of 2 consecutive failed revalidations.
- Second notification email after a total of 4 consecutive failed revalidations.
If the revalidation check fails 6 times in a row, Zoom will stop sending webhook events and disable the event subscription. To fix the issue to receive webhook events again, go to your apps webhook endpoint URL configuration, reenable webhooks, update your endpoint URL if needed, click validate to revalidate your endpoint URL, and finally, click save.
If you are still having trouble, see the Zoom webhook sample for an example implementation or review the webhook endpoint URL requirements.
Configure webhooks via Zoom API
For existing apps, you can use the Zoom API to create and manage event subscriptions. This allows you to programmatically:
- Subscribe users or accounts to specific webhook events based on their preference, actions or regions.
- Change which events you are subscribed to without manually reconfiguring the app in the build flow.
- Easily manage webhook subscriptions per customer when building multi-tenant applications.
Note
You can't use the API method to modify event subscriptions created through the build flow.
The following is an example of creating an event subscription via API for a general app type. You can use the same general steps for other subscription management actions:
-
Create an Event Subscription
POST https://api.zoom.us/v2/marketplace/app/event_subscription -
Subscribe to an Event Subscription
PATCH https://api.zoom.us/v2/marketplace/app/event_subscription/{eventSubscriptionId} -
Unsubscribe from an Event Subscription
DELETE https://api.zoom.us/v2/marketplace/app/event_subscription -
Delete an Event Subscription
DELETE https://api.zoom.us/v2/marketplace/app/event_subscription/{eventSubscriptionId} -
Get User or Account Event Subscriptions
GET https://api.zoom.us/v2/marketplace/app/event_subscription
Prerequisite:
- You have an existing app.
- In your app, you have already selected the scopes required by your event subscriptions. See Scopes.
Step 1: Request an access token
Request an access token to call APIs for your own Zoom account by sending a POST request to https://zoom.us/oauth/token.
Include a basic authorization header. The basic authorization header is your Client ID and Client Secret with a colon : in between, Base64 Encoded.
-- request POST https://zoom.us/oauth/token?grant_type=client_credentials
-- header "Authorization": "Basic <YOUR_BASE64_ENCODED_CREDENTIALS>"
Note
Webhook subscriptions are app-owned resources; you need to use the grant type appropriate to the app type to obtain the access token.
- For General OAuth apps, use the client credentials grant type.
- For Server-to-Server OAuth apps, use the account credentials grant type.
This returns an access_token with the required scopes to manage webhook subscriptions. Use this token as a bearer token in the authorization header of subsequent API calls.
{
    "access_token": "eyJzyNzA2ZDlkMzk0MDgzTk0MzAzMjUsImlzcy...A",
    "token_type": "bearer",
    "expires_in": 3600,
    "scope": "marketplace:delete:event_subscription marketplace:read:list_event_subscriptions marketplace:update:client_secret marketplace:update:event_subscription marketplace:write:event_subscription marketplace:write:websocket_connection",
    "api_url": "https://api.zoom.us"
}
Step 2: Create an event subscription
Use the POST method for the event_subscription endpoint.
POST https://api.zoom.us/v2/marketplace/app/event_subscription
Include the authorization in the request header.
{ "Authorization": "Bearer <access_token>" }
Example request body
{
    "events": ["meeting.created"],
    "event_subscription_name": "Example Event Subscription",
    "event_webhook_url": "https://www.example.com",
    "user_ids": ["_8KG7DeoRU2xIsDSY9ed2Q,90KG7DeoRU2xIsDSY9edwe"],
    "subscription_scope": "user",
    "account_id": "pvg3UAgpRlyTDW-9sIpKcw"
}
On successful creation, Zoom provides an event_subscription_id.
{
    "event_subscription_id": "0ZAaJY4dQ52BbwI9PArBLQ"
}
With this event_subscription_id you can then subscribe to, unsubscribe from, or delete event subscriptions.
For more information, see the Developer blog.
Scopes
Scopes control your app's access to the Zoom platform including the event information requested by your subscriptions.
Zoom has automatically applied the scopes for event subscriptions to your app: (such as creating, updating, or deleting subscriptions). For any other events you want your app to receive, you must add the respective scopes to your app via the app build flow.
For example:
- To subscribe to the
meeting.participant_joinedevent, your app must request themeeting:read:participantormeeting:read:participant:admin. - To receive
recording.completed, you'll needcloud_recording:read:recordingorcloud_recording:read:recording:admin.
If you haven't added the appropriate scopes to the app, on using the event subscription endpoints you will receive an error. "The event is not allowed for the app."
For more information, see Selecting scope.
Notification delivery
Your webhook endpoint URL should respond with either a 200 or a 204 HTTP status code within three seconds after receiving a webhook request in order for Zoom to consider the notification was successfully delivered.
Unsuccessful delivery
Zoom attempts to deliver the webhook three times for response codes >=500 or codes in -1, -2, -3, -4, -5, -7, -8, -10, -13, -14, -15. (See Enum Descriptions below.)
- The first attempt is sent 5 minutes after the initial delivery attempt.
- A second attempt is sent 20 minutes after the first attempt.
- A third attempt is sent 60 minutes after the second attempt.
Zoom considers response codes >=200 or < 300 as successfully delivered after any retry attempt.
If Zoom does not receive a response code >=200 or < 300 after three attempts, then Zoom will send no further webhooks for that event.
Zoom does not retry redirect codes >=300 and < 400.
Zoom does not retry client error codes >=400 and < 500, such as unauthenticated, resource not found, rate limiting, etc., because retrying would still fail or further increase the server load.
Enum Descriptions
ReadTimeOut(-1)Socket time out.ConnectionRefused(-2)Connection refused.Fallback(-3)Hystrix fallback on error.Resilience4jTimeout(-4)Resilience time out.AsyncError(-5)Failed to execute job via async mode.RemoteError(-7)Remote error.Delegate(-8)Delegate tasks to a separate server for processing if in delegate white list.NeedInstantRetry(-10)Retry webhook invoke instantly when connection lease request times out.DNSResolveTimeout(-13)Zoom DNS resolve timeout exception.CanNotGetAccessToken(-14)Delay retry error code if developer enabled Oauth client credential header in the subscription, but Zoom cannot get access_token from tokenUrl by clientId & clientSecret.CanNotGetCustomHeaderSettingInNoCacheTopic(-15)Delay retry error code if developer enabled custom header in the subscription, but Zoom cannot get custom header setting when handling msg from no cache topic.
Troubleshooting missing webhook events
If you have successfully validated your webhook endpoint, but you are not receiving certain events you have selected, toggle the webhook feature on and off and try again.
Use Get webhook logs to get a list of webhooks sent to an app.
Delivery latency
The event_ts response is included in the payload of all event notifications. This represents the timestamp for when the associated event occurred.
You can determine the latency in webhook delivery by calculating the difference between the delivery timestamp and the value of the event_ts.