Build an AI-Powered Zoom Team Chatbot with Snowflake Cortex Agents (Node.js)
If you followed Dash's earlier post, you already know how easy it is to set up Snowflake Cortex Agents within Zoom Team Chat. Now it's your turn.
In this guide, you'll build a Zoom Teams Chat app that answers natural language questions with real-time insights from Snowflake Cortex — powered by Node.js.
Fast to build, flexible to customize, and surprisingly fun to deploy.
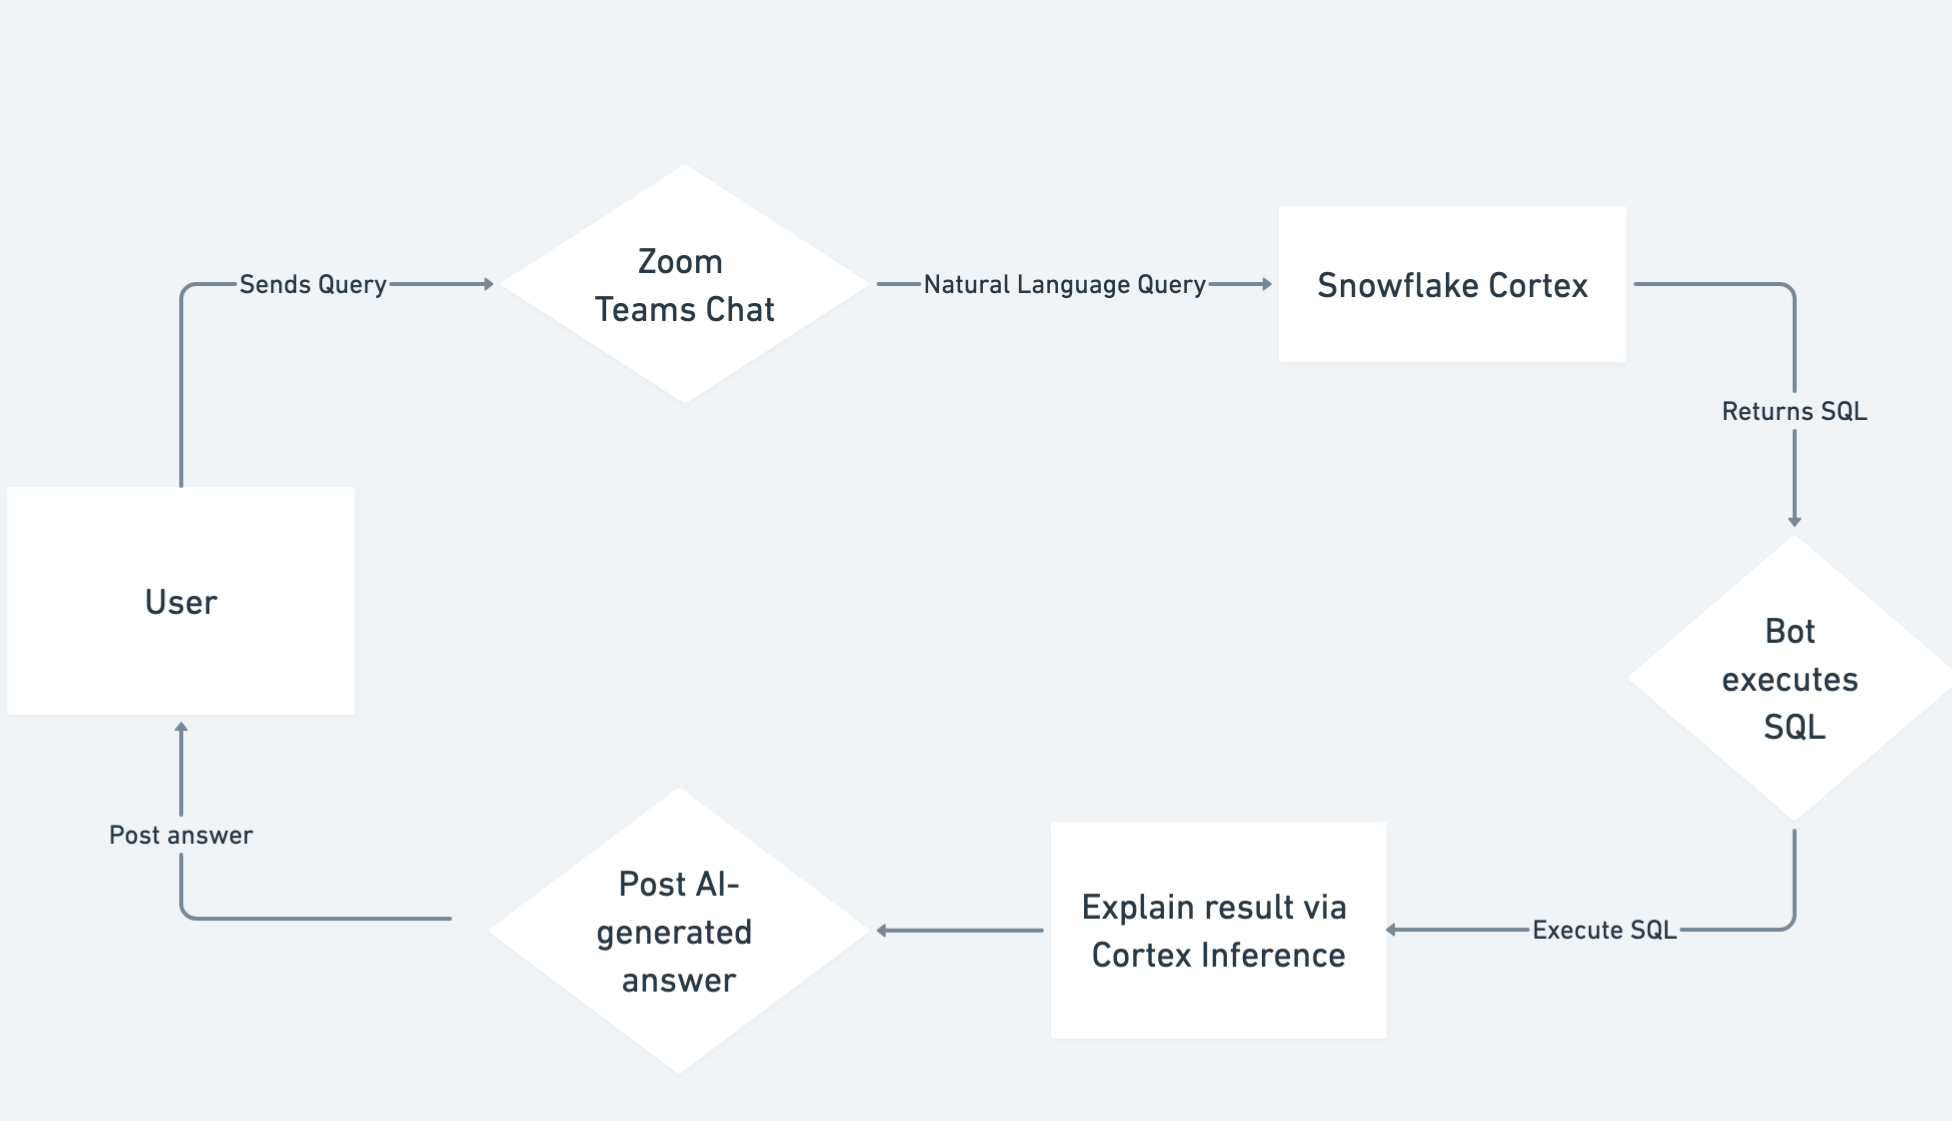
What You'll Build
- A Zoom Team Chat bot that listens for messages from users
- It forwards natural language queries to Snowflake Cortex
- If Cortex returns SQL, the bot will execute the SQL
- The SQL result will be explained back in natural language via Cortex Inference
- It posts the final AI-generated answer right back into Zoom Chat
Prerequisites
Make sure you have:
- A Zoom Account (Basic or better)
- Zoom Desktop Client (Mac/Windows)
- Snowflake Account (Cortex Agents enabled)
- Node.js and npm installed
- ngrok installed
- A generated RSA private key (.p8 file) and public key set up in Snowflake
Configure Your Environment
Before running your bot, you need to set up your environment variables.
Create a .env file in your project root. This file holds your credentials like Zoom keys, Snowflake API endpoints, and your private RSA key path. It keeps sensitive information separate from your code.
ZOOM_ACCOUNT_ID="your-account-id"
ZOOM_CLIENT_ID="your-client-id"
ZOOM_CLIENT_SECRET="your-client-secret"
ZOOM_REDIRECT_URI="https://your-ngrok-url.ngrok.io"
ZOOM_BOT_JID="your-bot-jid"
SNOWFLAKE_ACCOUNT="your-snowflake-account"
SNOWFLAKE_AGENT_ENDPOINT="https://your-org-your-account.snowflakecomputing.com/api/v2/cortex/agent:run"
SNOWFLAKE_INFERENCE_ENDPOINT="https://your-org-your-account.snowflakecomputing.com/api/v2/cortex/inference:complete"
SUPPORT_SEMANTIC_MODEL="@dash_db.dash_schema.semantic_models/support_tickets_semantic_model.yaml"
SUPPLY_CHAIN_SEMANTIC_MODEL="@dash_db.dash_schema.semantic_models/supply_chain_semantic_model.yaml"
VEHICLE_SEARCH_SERVICE="dash_db.dash_schema.vehicles_info"
RSA_PRIVATE_KEY_PATH="rsa_key.p8"
Zoom Team Chatbot Configuration
For detailed instructions on setting up your Zoom Team Chatbot, refer to the official Zoom documentation.
- Log into the Zoom App Marketplace and select to build a General (OAuth) app
- Name your app something cool like "Znowflake Chatbot"
- Set the Redirect URL to your ngrok forwarding URL
- Under Select features, choose Team Chat:
- Set your Bot Endpoint URL (your ngrok URL + /botendpoint)
- Copy your Bot JID, you'll need it later
- Make sure the following scope is selected:
- imchat:bot
- Save and continue
- Go to the Local Test page on the Zoom App Marketplace
- Select Add App Now and then Allow to add the app to your Zoom account
- You should now see your chatbot inside Zoom Team Chat
Set Up Snowflake
For a comprehensive guide on setting up Snowflake for this integration, visit the Snowflake Quickstart.
Before your chatbot can query Snowflake Cortex, you need to set up your data and services inside Snowflake.
Step 1: Clone the Setup Files
Clone the GitHub repo containing Snowflake setup SQL scripts and sample semantic models.
git clone https://github.com/zoom/zoom-teams-chat-snowflake-sample.git
Note: If you are looking for the Python version, please visit Snowflake Labs GitHub Repository
Step 2: Create Database, Tables, and Stages
- Open Snowsight (your Snowflake UI)
- Create a new SQL Worksheet
- Run setup.sql (provided in the repo)
- This will:
- Create the SUPPORT_TICKETS and SUPPLY_CHAIN tables with demo data
- Create internal stages to store semantic model YAMLs and PDFs
Step 3: Upload Semantic Models
- In Snowsight, go to Data → Stages
- Upload the semantic model YAML files to the DASH_SEMANTIC_MODELS stage
Step 4: Upload PDF Documents
- Upload the sample PDF files to the DASH_PDFS stage
- These documents will be searchable using Cortex Search
Step 5: Set Up Cortex Search Service
- In a new Worksheet, run cortex_search_service.sql
- This will create a Cortex Search service tied to your uploaded PDFs
Step 6: Set Up Key-Pair Authentication
- Generate an RSA private key (rsa_key.p8) if you haven't already
- Upload the matching public key to your Snowflake user profile
- Make sure your .env correctly points to your private key path
Build the Node.js App
Setup and Initialization
require("dotenv").config();
const express = require("express");
const axios = require("axios");
const fs = require("fs");
const jwt = require("jsonwebtoken");
const app = express();
app.use(express.json());
Endpoint to Receive Messages
app.post("/botendpoint", async (req, res) => {
    const userMessage = req.body.payload.cmd;
    const toJid = req.body.payload.toJid;
    const finalAnswer = await queryCortexWithFallback(userMessage);
    await sendZoomMessage(toJid, finalAnswer);
    res.status(200).send("OK");
});
Create Snowflake JWT Token
function createSnowflakeJwt() {
    const privateKey = fs.readFileSync(process.env.RSA_PRIVATE_KEY_PATH);
    const payload = {
        iss: `${process.env.SNOWFLAKE_ACCOUNT}/${process.env.SNOWFLAKE_ACCOUNT}`,
        sub: process.env.SNOWFLAKE_ACCOUNT,
        aud: "snowflake",
        iat: Math.floor(Date.now() / 1000),
        exp: Math.floor(Date.now() / 1000) + 3600,
    };
    return jwt.sign(payload, privateKey, { algorithm: "RS256" });
}
Query Cortex and Handle Fallback Logic
async function queryCortexWithFallback(prompt) {
    const token = createSnowflakeJwt();
    const agentResponse = await axios.post(
        process.env.SNOWFLAKE_AGENT_ENDPOINT,
        {
            prompt,
            tools: [
                {
                    type: "cortex_analyst_text_to_sql",
                    semantic_model: process.env.SUPPORT_SEMANTIC_MODEL,
                },
                {
                    type: "cortex_search",
                    search_service: process.env.VEHICLE_SEARCH_SERVICE,
                },
            ],
        },
        { headers: { Authorization: `Bearer ${token}` } },
    );
    const firstChoice = agentResponse.data.choices[0]?.message?.content;
    const sql = agentResponse.data.choices[0]?.message?.tool_use?.sql;
    if (sql) {
        const dataResponse = await axios.post(
            `https://${process.env.SNOWFLAKE_ACCOUNT}.snowflakecomputing.com/queries/v1/query-request`,
            {
                sqlText: sql,
            },
            { headers: { Authorization: `Bearer ${token}` } },
        );
        const dataframe = dataResponse.data.data;
        const inferenceResponse = await axios.post(
            process.env.SNOWFLAKE_INFERENCE_ENDPOINT,
            {
                prompt: `Explain this data in plain English: ${JSON.stringify(dataframe)}`,
            },
            { headers: { Authorization: `Bearer ${token}` } },
        );
        return (
            inferenceResponse.data.choices[0]?.message?.content ||
            "No explanation found."
        );
    }
    return firstChoice || "No response found.";
}
Send a Message Back to Zoom Chat
async function sendZoomMessage(toJid, message) {
    const base64Credentials = Buffer.from(
        `${process.env.ZOOM_CLIENT_ID}:${process.env.ZOOM_CLIENT_SECRET}`,
    ).toString("base64");
    const tokenResponse = await axios.post(
        "https://zoom.us/oauth/token?grant_type=client_credentials",
        {},
        {
            headers: {
                Authorization: `Basic ${base64Credentials}`,
            },
        },
    );
    const accessToken = tokenResponse.data.access_token;
    await axios.post(
        "https://api.zoom.us/v2/im/chat/messages",
        {
            robot_jid: process.env.ZOOM_BOT_JID,
            to_jid: toJid,
            account_id: process.env.ZOOM_ACCOUNT_ID,
            content: {
                body: [{ type: "message", text: message }],
            },
        },
        { headers: { Authorization: `Bearer ${accessToken}` } },
    );
}
Start the Express Server
const PORT = process.env.PORT || 5000;
app.listen(PORT, () => console.log(`Server running on ${PORT}`));
Run It
- Start ngrok:
ngrok http 5000
- Fire up your Node app:
node index.js
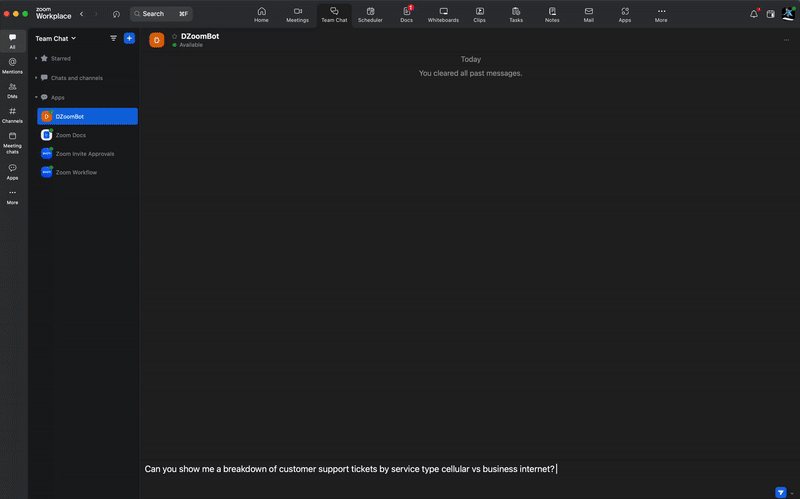
Try It Out
Send a message inside Zoom Team Chat:
- "Show me a breakdown of support tickets by category"
- "What are the payment terms for Snowtires?"
You should get fast, structured or unstructured, AI-generated responses directly in Zoom Team Chat.
Happy Coding!