Get started with Zoom Android Video SDK
Introduction
Zoom Video SDK for Android allows you to build custom video meeting applications that fit your brand and allow access to powerful data sources like raw video and audio data. In this blog post, we'll cover how to deploy your own so that you can have more control in enabling highly-interactive, user experiences powered by Zoom's video conferencing technology.
We'll cover:
- SDK contents
- Prerequisites
- JWT authentication
- Project structure
- Init SDK & Join/Leave Session
- Video, Audio, & Screen-Share functionality
SDK contents
There are three .aar files packaged in the Android SDK downloaded from Zoom marketplace.
- mobilertc.aar : Consists of Zoom UI components
- video-effects.aar: Used when you implement Virtual Background feature
- zm-annoter.aar: Used when you use annotation service
In our project, I will be using "java" as the primary language of coding. We shall be demonstrating the basic abilities like audio, video and screenshare and hence I will be importing only the mobilertc.aar package as a module in main project. Additionally, please find Zoom Video SDK Android documentation here.
Prerequisites
To build the app, you must have:
- Zoom Video SDK package for Android downloaded from marketplace
- Android Studio
- SDK Key and secret values
- A physical Android device with Android API Level 21+
- Experience building Android apps
Note: This tutorial is built on top of v1.8.5 in Java.
JWT Authentication
JWT authorisation is used in the SDK. The payload information is provided here.
To begin with, let's construct the JWT token using a web app and invoke the HTTP POST request in our Android application. It is advisable to host the JWT token server in your own web server due to security reasons. The web app code looks like below.
app.post('/', (req, res) => {
  const iat = Math.round(new Date().getTime() / 1000) - 30;
  const exp = iat + 60 * 60 * 2
  const oHeader = { alg: 'HS256', typ: 'JWT' }
  const oPayload = {
    app_key: process.env.ZOOM_VIDEO_SDK_KEY,
    tpc: req.body.sessionName,
    role_type: req.body.role,
    user_identity: req.body.userIdentity,
    session_key: req.body.sessionKey,
    geo_regions: req.body.geoRegions,
    cloud_recording_option: req.body.cloudRecordingOption,
    cloud_recording_election: req.body.cloudRecordingElection,
    version: 1,
    iat: iat,
    exp: exp
  }
  const sHeader = JSON.stringify(oHeader)
  const sPayload = JSON.stringify(oPayload)
  const signature = KJUR.jws.JWS.sign('HS256', sHeader, sPayload, process.env.ZOOM_VIDEO_SDK_SECRET)
  res.json({
    signature: signature
  })
})
The complete web app code is located here: https://github.com/ajitha-zoom/videosdk-demo-endpoint
Let us now invoke the HTTP POST api from our Android application using following the payload. The response shall have the JWT signature:
    private String JSON_PAYLOAD = "{\"sessionName\":\"" + SAMPLE_SESSION_NAME +
            "\",\"role\":" + SAMPLE_ROLE +
            ",\"userIdentity\":\"" + SAMPLE_USER_IDENTITY +
            "\",\"sessionKey\":\"" + SAMPLE_SESSION_PWD +
            "\",\"geoRegions\":\"US,AU,CA,IN,CN,BR,MX,HK,SG,JP,DE,NL\"," +
            "\"cloudRecordingOption\":1,\"cloudRecordingElection\":0}";
The response shall be parsed as shown below to retrieve the JWT signature:
JSONObject jsonObject = null;
try {
    jsonObject = new JSONObject(result);
} catch (JSONException e) {
    throw new RuntimeException(e);
}]
// Retrieve the "signature" parameter
String signature = jsonObject.optString("signature");
jsa.onPostExecution(signature);
Project structure
To create a new project,
- Open Android studio
- File -> New -> New Project -> Choose "No Activity"
- Choose Language as "java" and Build configuration as "Groovy DSL" and press "finish"
- Create a new folder "mobilertc" and place the mobilertc.aar package inside the folder. Also copy the following contents inside mobilertc/build.gradle
configurations.create("default")
artifacts.add("default", file('mobilertc.aar'))
dependencies.add("default","androidx.security:security-crypto:1.1.0-alpha03")
dependencies.add("default","com.google.crypto.tink:tink-android:1.5.0")
dependencies.add("default","androidx.appcompat:appcompat:1.3.0")
Once done, the project structure shall look like below:
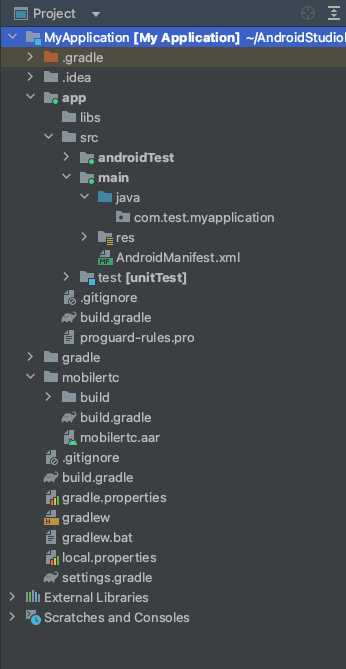
Include the mobilertc package in settings.gradle and build.gradle inside your application folder.
- settings.gradle
include ':mobilertc'
- build.gradle
implementation project(':mobilertc')
Since we created project with "No Activity", the source folder shall be empty. Right on the package folder inside "java" and create a empty activity "MainActivity", select "java" as language and set it as a launcher activity for the project.
For building our project, I have used four activity screens.
- MainActivity : Launcher activity showing a "join" button
- JoinSessionActivity: To enter "session" details and join
- IntegrationActivity: To help in navigation in and out of application during the screen-share
- MeetingActivity: The in-meeting screen
I have also created a service called "NotificationService" which is our foreground service created during call.
We need to add the necessary permissions required for the project in the AndroidManifest.xml file. The manifest file shall look like the one shown here: https://github.com/ajitha-zoom/video-sdk-android/blob/main/app/src/main/AndroidManifest.xml
Init SDK & join/leave session
In order to initialise SDK, we need to use the intialize method with the InitParams:
ZoomVideoSDKInitParams params = new ZoomVideoSDKInitParams();
params.domain = "zoom.us";
params.enableLog = true;
params.videoRawDataMemoryMode = ZoomVideoSDKRawDataMemoryMode.ZoomVideoSDKRawDataMemoryModeHeap;
params.audioRawDataMemoryMode = ZoomVideoSDKRawDataMemoryMode.ZoomVideoSDKRawDataMemoryModeHeap;
params.shareRawDataMemoryMode = ZoomVideoSDKRawDataMemoryMode.ZoomVideoSDKRawDataMemoryModeHeap;
int ret = ZoomVideoSDK.getInstance().initialize(this.getApplicationContext(), params);
The initialisation can be verified using the return code:
if (ret != ZoomVideoSDKErrors.Errors_Success) {
    //Failure
} else {
    //Success
}
Once you initialise the SDK correctly, you will be able to call the SDK functions. Android application requires end user to accept all the necessary permission so we need to allow the end user to accept all permissions before attempting to join a session. The same shall be done using the ActivityCompat.requestPermissions() method.
To join a session, we need to supply the session context with audio option, video option and JWT token. I have initialised the sessionContext as shown below:
ZoomVideoSDKSessionContext sessionContext=new ZoomVideoSDKSessionContext();
/* ------------ SET AUDIO OPTIONS ------------ */
ZoomVideoSDKAudioOption audioOption=new ZoomVideoSDKAudioOption();
audioOption.connect=true;
audioOption.mute=false;
audioOption.isMyVoiceInMix=true;
sessionContext.audioOption=audioOption;
/* ------------ SET VIDEO OPTIONS ------------ */
ZoomVideoSDKVideoOption videoOption=new ZoomVideoSDKVideoOption();
videoOption.localVideoOn=true;
sessionContext.videoOption=videoOption;
/* ------------ VALIDATE INPUTS ------------ */
userName = nameEdit.getText().toString();
if (TextUtils.isEmpty(userName)) {
    userName = Build.MODEL;
}
sessionName = sessionEditText.getText().toString().toLowerCase().trim();
if (TextUtils.isEmpty(sessionName)) {
    Toast.makeText(this, "Session name is empty", Toast.LENGTH_LONG).show();
    return;
}
//Required
sessionContext.sessionName = sessionName;
sessionContext.userName = userName;
password = passwordEdit.getText().toString();
//Optional
sessionContext.sessionPassword = password;
/* ------------ GENERATE JWT ------------ */
JWTGenerator jwtGenerator = new JWTGenerator(this);
jwtGenerator.execute();
.
.
//after retrieving the token
sessionContext.token = token;
/* ------------ JOIN SESSION ------------ */
ZoomVideoSDKSession session=ZoomVideoSDK.getInstance().joinSession(sessionContext);
If the "session" is not null, you have successfully created a new videosdk session.
To leave a created session, use the following:
ZoomVideoSDK.getInstance().leaveSession(true);
Video, audio, & screen-share functionality
Let's begin to add the basic functionality. The UI screens shall be created as per your convenience. For receiving the session related events and user related events, we need to implement ZoomVideoSDKDelegate in our MeetingActivity.
I have designed three buttons in my meeting screen: "Video", "Audio" & "Screen share".
Video
I have written the following code to turn on/off the video of self during a session:
public void onClickVideo(View view) {
    ZoomVideoSDKUser zoomSDKUserInfo = session.getMySelf();
    if (null == zoomSDKUserInfo) return;
    if (zoomSDKUserInfo.getVideoStatus().isOn()) {
     ZoomVideoSDK.getInstance().getVideoHelper().stopVideo();
    } else {
     ZoomVideoSDK.getInstance().getVideoHelper().startVideo();
    }
}
In order to access the remote participant's video, we need to retrieve the user's canvas and then render the video in the ZoomVideoSDKVideoView:
zoomCanvas = new ZoomVideoSDKVideoView(this, false);
..
..
int ret = user.getVideoCanvas().subscribe(zoomCanvas, aspect);
To remove the remote participants video, we need to unsubscribe:
user.getVideoCanvas().unSubscribe(zoomCanvas);
When the users video state is changed, the corresponding delegate method shall be called and we shall update the UI accordingly:
public void onUserVideoStatusChanged(ZoomVideoSDKVideoHelper videoHelper, List<ZoomVideoSDKUser> userList)
Audio
Before trying to turn on/off the audio, we need to start the audio. Only after starting, we would be allowed to mute/unmute the audio of self. See the code sample below:
public void onClickAudio(View view) {
    ZoomVideoSDKUser zoomSDKUserInfo = session.getMySelf();
    if (zoomSDKUserInfo.getAudioStatus().getAudioType() == ZoomVideoSDKAudioStatus.ZoomVideoSDKAudioType.ZoomVideoSDKAudioType_None) {
        ZoomVideoSDK.getInstance().getAudioHelper().startAudio();
    } else {
        if (zoomSDKUserInfo.getAudioStatus().isMuted()) {
            ZoomVideoSDK.getInstance().getAudioHelper().unMuteAudio(zoomSDKUserInfo);
        } else {
            ZoomVideoSDK.getInstance().getAudioHelper().muteAudio(zoomSDKUserInfo);
        }
    }
}
When the remote users audio states are changed, the corresponding delegate methods shall be invoked:
public void onUserAudioStatusChanged(ZoomVideoSDKAudioHelper audioHelper, List<ZoomVideoSDKUser> userList)
Screen-share
In order to use screen-share, you need these prerequisites:
- Permissions to be accepted for using MediaProjectionManager
- Screen overlay permission for creating a "Stop share" button.
- A running foreground service
Once the above are achieved, then we can simply invoke the startScreenShare in the ShareHelper.
int ret = ZoomVideoSDK.getInstance().getShareHelper().startShareScreen(data);
if (ret == ZoomVideoSDKErrors.Errors_Success) {
    //do something
}
Screen sharing can be stopped using the following:
ZoomVideoSDK.getInstance().getShareHelper().stopShare();
Remote participants screen sharing can be subscribed and unsubscribed similar to their video using share canvas:
user.getShareCanvas().subscribe(zoomCanvas, ZoomVideoSDKVideoAspect.ZoomVideoSDKVideoAspect_Original);
And the following:
currentShareUser.getShareCanvas().unSubscribe(zoomCanvas);
When the remote users share status is changed, the corresponding delegate method shall be triggered:
public void onUserShareStatusChanged(ZoomVideoSDKShareHelper shareHelper, ZoomVideoSDKUser userInfo, ZoomVideoSDKShareStatus status)
Summary
Developing basic functionalities using video sdk is very simple and can be achieved with few lines of code. There are many more features in Zoom Video SDK like accessing raw data, cloud recording, live streaming, chat, transcriptions etc. The possibilities are exponential!
For more details on Video SDK, please refer to the official documentation here: /docs/video-sdk/android/
For video tutorial, refer: https://www.youtube.com/watch?v=NhRp4fCyeas
Complete source code for above tutorial can be found here: https://github.com/ajitha-zoom/video-sdk-android. For assistance with the Android version of Zoom Video SDK, check out the Zoom Developer Forum. Thanks for reading!