Get meeting transcripts using native WebSockets with RTMS
At Zoom, we love giving our developers choices, and RTMS was built with that philosophy in mind. So as a developer, you have the choice of using the SDK for speed and simplicity, or WebSockets for full control.
In our earlier blog, (Get Zoom transcripts in 5 lines of code), we demonstrated how to use the RTMS SDK to stream meeting transcripts. The SDK is still the fastest and simplest way to work with RTMS. It handles the complexity for you and gets you to useful data fast.
In this blog, we explore the native WebSockets approach. Most developers will not need this path, but if you want full control over connections, handshakes, buffering, or observability, WebSockets give you that flexibility, while staying simpler than running meeting bots or virtual clients. If you are new to RTMS, take a quick look at the documentation for Getting started with RTMS and Add RTMS features to your app before continuing. We will follow the same flow.
Video walkthrough
If you prefer to follow along visually, this step by step video shows how to stream live meeting transcripts using native WebSockets.
- Configure your Zoom Marketplace app, including scopes, events, and domain allow lists
- Handle the meeting.rtms_started webhook
- Generate HMAC SHA256 signatures for authentication
- Establish signaling and media WebSocket connections
- Exchange keep alive requests and acknowledgements
- Stream live transcript data in realtime using Node.js
When to use Websockets vs the SDK ?
Our RTMS SDKs are the fastest way to get started because they include helpers for authentication, handshakes, retries, and payload handling.
Choose the native WebSockets flow when you need:
- Portability and freedom to use any language or runtime that supports WebSockets such as Go, Rust, Python, or .NET
- Granular control over handshakes, buffering, back pressure, routing, and connection lifecycle
- Observability or compliance needs where you must log raw messages, collect metrics, and meet audit requirements without hidden layers.
What you'll build
You will build a service that:
- Handles the
meeting.rtms_startedandmeeting.rtms_stopped webhooks - Computes the RTMS handshake signature
- Opens the signaling WebSocket then the media WebSocket
- Sends CLIENT_READY_ACK after successful handshakes
- Prints transcript chunks as they arrive
Prefer to skip ahead? Jump to Full code.
RTMS connection process overview
- Zoom sends a webhook when an RTMS enabled meeting starts (
meeting.rtms_started). - Your service opens the signaling WebSocket using the URL from the webhook.
- Your service generates a signature and completes the signaling handshake.
- Zoom returns media server URLs after the handshake succeeds.
- Your service opens the media WebSocket for the transcript or other media type you want.
- Your service completes the media handshake using the same signature.
- Your service sends CLIENT_READY_ACK on the signaling socket to begin streaming.
- Zoom sends live media data on the media WebSocket.
- Both sides exchange keep alive messages to maintain the signaling and media connections.
Prerequisites
If you’re new to RTMS, start here: Getting started and then Add RTMS features to your app.
-
Create a Zoom Marketplace app and enable Realtime Media Streams.
-
Subscribe to webhooks:
meeting.rtms_startedandmeeting.rtms_stopped. -
Add the scope
meeting:read:meeting_transcripts. -
Expose a publicly reachable HTTPS webhook endpoint (for development,
ngrokis fine). -
App settings checklist (common gotchas):
- Provide your Home URL.
- Add
appssdk.zoom.usto the domain allow list. - Add your own domain to the allow list.
- Enable the Zoom Apps SDK (if you are embedding an app UI).
- Install the app to your account and enable Auto‑start in the Zoom Apps settings. For details, see Host and admin tools and controls.
Get started (Node.js)
RTMS works with any language that can open a WebSocket. We’ll use Node.js for brevity. For the handshake sequence, keep the WebSockets quickstart handy.
Install dependencies:
npm init -y
npm install express dotenv ws
Create .env:
.env sample
ZOOM_CLIENT_ID=your_client_id
ZOOM_CLIENT_SECRET=your_client_secret
PORT=3000
Create index.js (base server):
import express from "express";
import dotenv from "dotenv";
import WebSocket from "ws";
// Load environment variables from .env
dotenv.config();
const app = express();
// Enable JSON body parsing
app.use(express.json());
// Basic root route for testing
app.get("/", (req, res) => {
    res.send("Zoom RTMS Server is up and running.");
});
// Listen on localhost:3000
const PORT = process.env.PORT || 3000;
app.listen(PORT, () => {
    console.log(`Server is listening on http://localhost:${PORT}`);
});
Build the webhook receiver
Zoom posts events when RTMS starts or stops. Add a /webhook route and trigger the connect flow (the event shapes are documented in the WebSockets quickstart).
For complete details on RTMS webhook events, including event payloads and verification, see the RTMS webhook events API reference.
app.post("/webhook", (req, res) => {
    const { event, payload } = req.body;
    console.log("Webhook received:", event);
    console.log("Payload:", JSON.stringify(payload, null, 2));
    res.sendStatus(200);
    if (event === "meeting.rtms_started") {
        const { meeting_uuid, rtms_stream_id, server_urls } = payload;
        console.log(`Starting RTMS for meeting ${meeting_uuid}`);
        connectToSignalingWebSocket(meeting_uuid, rtms_stream_id, server_urls);
    } else if (event === "meeting.rtms_stopped") {
        const { meeting_uuid } = payload;
        console.log(`Stopping RTMS for meeting ${meeting_uuid}`);
        // Clean up any sockets you opened for this meeting_uuid
    }
});
Create the signature generator
Zoom requires an HMAC SHA256 signature during both the signaling and media handshakes. The signature combines your client ID, the meeting UUID, and the RTMS stream ID.
This is described in Add RTMS features to your app and used in the WebSockets quickstart.
import crypto from "crypto";
function generateSignature(meetingUuid, rtmsStreamId) {
    const message = `${process.env.ZOOM_CLIENT_ID},${meetingUuid},${rtmsStreamId}`;
    return crypto
        .createHmac("sha256", process.env.ZOOM_CLIENT_SECRET)
        .update(message)
        .digest("hex");
}
Connect to the signaling server
Your service opens the signaling WebSocket, sends the handshake request, and waits for Zoom to respond with available media server URLs.
function connectToSignalingWebSocket(meetingUuid, rtmsStreamId, serverUrls) {
    const signalingWs = new WebSocket(serverUrls);
    signalingWs.on("open", () => {
        const handshakeMsg = {
            msg_type: 1, // SIGNALING_HAND_SHAKE_REQ
            protocol_version: 1,
            sequence: 0,
            meeting_uuid: meetingUuid,
            rtms_stream_id: rtmsStreamId,
            signature: generateSignature(meetingUuid, rtmsStreamId),
        };
        signalingWs.send(JSON.stringify(handshakeMsg));
    });
    signalingWs.on("message", (data) => {
        const msg = JSON.parse(data.toString());
        // Successful handshake → pick media URL
        if (msg.msg_type === 2 && msg.status_code === 0) {
            const transcriptUrl = msg.media_server?.server_urls?.transcript;
            if (transcriptUrl) {
                connectToMediaWebSocket(
                    transcriptUrl,
                    meetingUuid,
                    rtmsStreamId,
                    signalingWs,
                );
            }
        }
        // Keep‑alive
        if (msg.msg_type === 12) {
            signalingWs.send(
                JSON.stringify({
                    msg_type: 13, // KEEP_ALIVE_RESP
                    timestamp: msg.timestamp,
                }),
            );
        }
    });
    signalingWs.on("error", (err) =>
        console.error("Signaling WebSocket error:", err),
    );
    signalingWs.on("close", (code, reason) =>
        console.log("Signaling WebSocket closed:", code, reason),
    );
}
Connect to the media server
Your service opens a second WebSocket for the transcript media stream. After the media handshake succeeds, you send CLIENT_READY_ACK on the signaling socket and Zoom begins sending transcript packets.
function connectToMediaWebSocket(
    mediaUrl,
    meetingUuid,
    rtmsStreamId,
    signalingSocket,
) {
    const mediaWs = new WebSocket(mediaUrl);
    mediaWs.on("open", () => {
        const handshakeMsg = {
            msg_type: 3, // DATA_HAND_SHAKE_REQ
            protocol_version: 1,
            sequence: 0,
            meeting_uuid: meetingUuid,
            rtms_stream_id: rtmsStreamId,
            signature: generateSignature(meetingUuid, rtmsStreamId),
            media_type: 8, // transcripts
        };
        mediaWs.send(JSON.stringify(handshakeMsg));
    });
    mediaWs.on("message", (data) => {
        const msg = JSON.parse(data.toString());
        // Handshake OK → tell signaling we’re ready
        if (msg.msg_type === 4 && msg.status_code === 0) {
            signalingSocket.send(
                JSON.stringify({
                    msg_type: 7, // CLIENT_READY_ACK
                    rtms_stream_id: rtmsStreamId,
                }),
            );
            return;
        }
        // Transcript packets
        if (msg.msg_type === 17) {
            // MEDIA_DATA_TRANSCRIPT
            const who = msg.content?.user_name ?? "Speaker";
            const text = msg.content?.data ?? "";
            if (text) console.log(`${who}: ${text}`);
            return;
        }
        // Keep‑alive
        if (msg.msg_type === 12) {
            mediaWs.send(
                JSON.stringify({
                    msg_type: 13, // KEEP_ALIVE_RESP
                    timestamp: msg.timestamp,
                }),
            );
        }
    });
    mediaWs.on("error", (err) => console.error("Media WebSocket error:", err));
    mediaWs.on("close", (code, reason) =>
        console.log("Media WebSocket closed:", code, reason),
    );
}
Understanding message types
RTMS uses a small set of message types for handshakes, keep alive exchanges, and media delivery. You will see these messages on both the signaling and media sockets.
| Message Type | Value | Description |
|---|---|---|
| SIGNALING_HAND_SHAKE_REQ | 1 | Initial handshake request to signaling server |
| SIGNALING_HAND_SHAKE_RESP | 2 | Response from signaling server with media URLs |
| DATA_HAND_SHAKE_REQ | 3 | Handshake request to media server |
| DATA_HAND_SHAKE_RESP | 4 | Response from media server confirming connection |
| CLIENT_READY_ACK | 7 | Sent to signaling server to start media stream |
| KEEP_ALIVE_REQ | 12 | Sent by server every 10 seconds to keep connection alive |
| KEEP_ALIVE_RESP | 13 | Your response to KEEP_ALIVE_REQ |
| MEDIA_DATA_TRANSCRIPT | 17 | Incoming transcript data packet |
For a complete reference of all RTMS message types, event types, status codes, and data structures, see the Event reference and Data type definitions documentation.
Media types
Each RTMS media stream uses a numeric flag that identifies the type of media you want to receive.
| Value | Media Type |
|---|---|
| 1 | Audio |
| 2 | Video |
| 4 | Screen share |
| 8 | Transcript |
| 16 | Chat |
| 32 | All media types in one WebSocket connection |
For detailed information about configuring media parameters (codecs, resolutions, sample rates, etc.), see the Media parameter definitions documentation.
Run it
Start your server:
npm run start
or:
node --env-file=.env index.js
Then expose your /webhook endpoint publicly over HTTPS. For development, an ngrok tunnel works well:
ngrok http 3000
Paste the generated URL into your Marketplace app's webhook settings.
Finally:
- Install your app.
- Enable Auto start in the Zoom Apps settings. For details, see Host and admin tools and controls.
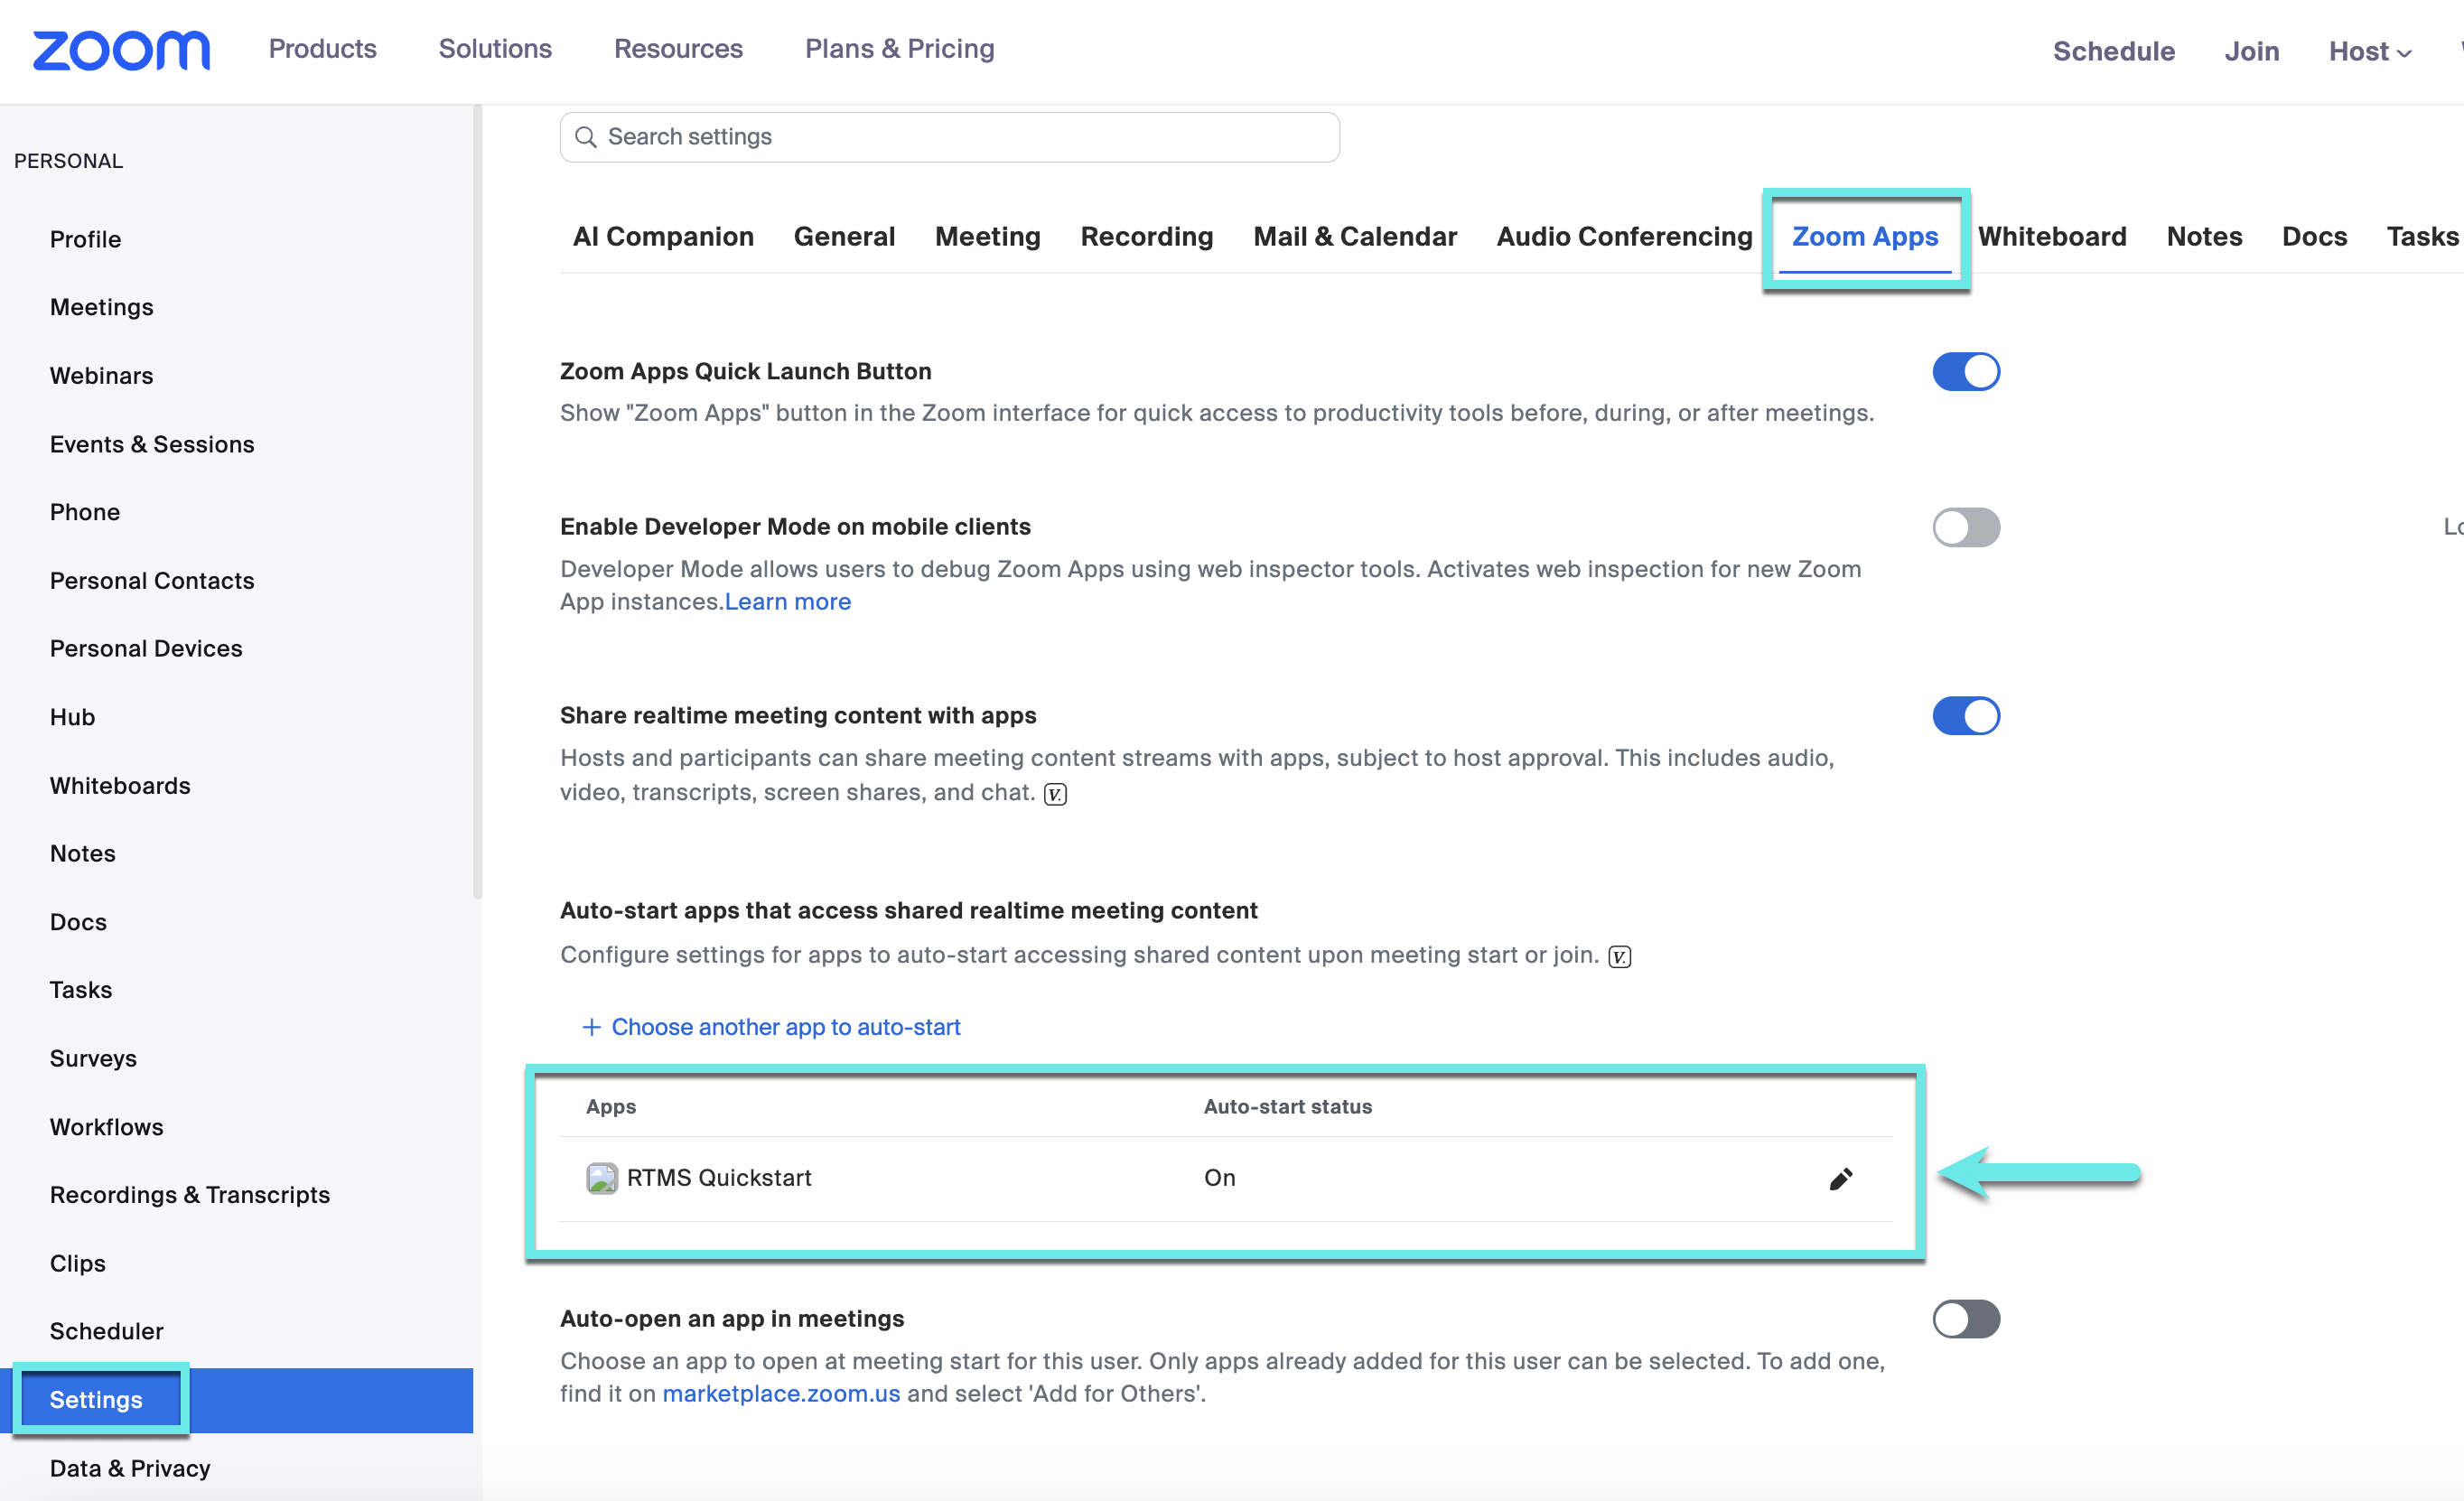
- Join a meeting that has RTMS enabled.
- Watch transcript lines appear in your console as Zoom sends live data.
If you do not see data, confirm that your webhook is reachable and that the app has the required scope and permissions.
For end‑to‑end handshake details, see the WebSockets quickstart. For first‑time setup, also consult Getting started and Add RTMS features to your app.
Full code
Get the complete runnable sample on GitHub: