Real time image to text translation with Zoom Video SDK
Accessing real-time raw media data is now easy with Zoom Video SDK media processors. Media processors run inside Web Workers, receiving raw audio, video and more recently share data frames directly from the SDK. Developers can modify the frame data before it's rendered and sent to other users in a session.
Let's implement an image to translated text processor using our new share (media) processor. We'll create this using the Tesseract.js library to image to text identification and Google Cloud Translation API for translating this text. This data will then be added to the canvas and sent as a processed data frame using our Share Processor
Prerequisites
- Node & NPM LTS
- Zoom Video SDK Account
- Google Cloud Translate API Key
We've explained how video processors work in a previous blog by building a simpler processor for video watermarks. You can read through it learn more. Like in the previous blog we'll build on top of the Zoom Video SDK quickstart guide. If you're new to the SDK, we recommend checking out the quickstart guide first. You can clone that repo and follow the steps to get started:
git clone https://github.com/zoom/videosdk-web-helloworld
The completed code for this app can be found on GitHub.
Configuring the share processor
To start, we need to create a javascript file that will implement our share processor. We'll call it image-to-text-translator-processor.js and store it in the dist folder. The processor will access and process the raw share data.
├── coi-serviceworker.js
├── createreactapp.sh
├── dist
│   ├── image-to-text-translator-processor.js
│   └── output.css
├── index.html
├── index.jsx
├── package-lock.json
├── package.json
├── readme.md
├── src
│   ├── App.jsx
│   ├── components
│   │   ├── context
│   │   │   ├── CurrentUserContext.jsx
│   │   │   └── ForceUpdate.jsx
│   │   ├── CustomUIpage.css
│   │   ├── main.ts
│   │   ├── features
│   │   │   ├── Controls.css
│   │   │   ├── Controls.jsx
│   │   │   ├── Share.css
│   │   │   ├── Share.jsx
│   │   │   ├── Video.css
│   │   │   └── Video.jsx
│   │   └── Startpage.jsx
│   ├── input.css
│   └── utils.ts
├── styles.css
├── tailwind.config.js
└── webpack.config.js
Next, we'll implement the skeleton for our video processor. I'll include the initialization and retrieval of the 2DCanvasRenderingContext which we'll use to write our processed frames to the Canvas:
class ImagetoTextTranslator extends ShareProcessor {
    context = null;
    constructor(port, options) {
        super(port, options);
        port.onmessage = (event) => {};
    }
    onInit() {
        console.log("processor init");
    }
    onUninit() {
        console.log("processor unInit");
    }
    async processFrame(input, output) {
        return true;
    }
    async initCanvasContext(canvas) {
        this.context = canvas.getContext("2d");
        console.log("CONTEXT", this.context);
    }
}
registerProcessor("image-to-text-translator-processor", ImagetoTextTranslator);
The ImagetoTextTranslator class extends the ShareProcessor class. The class comes equipped with onInit and onUninit methods that are lifecycle functions triggered when the processor initializes or shuts down. The processFrame function defines how to process each video frame. The SDK calls this method for every share frame, taking a ShareFrame as input and modifying the OffscreenCanvas output. The method returns true to tell the SDK to apply the effect to the frame sent remotely. We then register this processor by calling registerProcessor function.
In main.ts we can instantiate this processor with the following:
const shareProcessor = await stream.createProcessor({
    type: "share",
    name: "image-to-text-translator-processor",
    url: window.location.origin + "/dist/image-to-text-translator-processor.js",
    options: {
        translatekey: process.env.GOOGLE_TRANSLATE_KEY,
    },
});
await stream.addProcessor(shareProcessor);
Now that our processor has been added, we can implement the Optical Character Recognition (OCR) to detect and identify text within an Image.
Tesseract.js for image text recognition
Tesseract.js is an open-source JavaScript library that implements the Tesseract OCR engine. Given a supported image or frame data, it quickly recognizes the text and returns a payload containing information about the identified text including what words, how many words, and their exact coordinate in the canvas. We'll use this pre-trained AI model in our share processor.
In image-to-text-translator-processor.js import Tesseract.js using the importScripts function and implement the model within the body of the class:
importScripts(
    "https://cdn.jsdelivr.net/npm/tesseract.js@5/dist/tesseract.min.js",
);
class ImagetoTextTranslator extends ShareProcessor {
    tesseractWorker = null;
    context = null;
    processorReady = false;
    constructor(port, options) {
        super(port, options);
        //flag from main thread to tell processor to process frame data
        port.onmessage = (event) => {
            const { command, enable } = event.data;
            if (command === "processor-ready") this.processorReady = enable;
        };
    }
    onInit() {
        console.log("processor init");
    }
    onUninit() {
        console.log("processor unInit");
    }
    async processFrame(input, output) {
        if (this.processorReady) {
            await this.initCanvasContext(output);
            // Get image data from the canvas
            const imageDataBlob = await output.convertToBlob({
                type: "image/png",
            });
            const dataUrl = await new Promise((resolve, reject) => {
                const reader = new FileReader();
                reader.onload = () => resolve(reader.result);
                reader.onerror = reject;
                reader.readAsDataURL(imageDataBlob);
            });
            //Detect and Recognize words using Tesseract.js
            const { data } = await this.tesseractWorker.recognize(dataUrl);
            //Output the recognized text and their metadata
            console.log({ data });
            //teardown the Tesseract.js instance
            await this.tesseractWorker.terminate();
            input.close();
            this.port.postMessage(true);
            this.processorReady = false;
            return true;
        }
    }
    async initCanvasContext(canvas) {
        this.context = canvas.getContext("2d");
        this.tesseractWorker = await Tesseract.createWorker("eng"); //initialize Tesseract.js
    }
}
registerProcessor("image-to-text-translator-processor", ImagetoTextTranslator);
In main.ts, we configure logic to create and start our processor:
const startProcessor = async () => {
    setIsProcessing(true);
    //if processor already exists, just start it again
    if (processor) {
        await stream.addProcessor(processor);
        processor.port.postMessage({
            command: "processor-ready",
            enable: true,
        });
        return;
    }
    const shareProcessor = await stream.createProcessor({
        type: "share",
        name: "image-to-text-translator-processor",
        url:
            window.location.origin +
            "/dist/image-to-text-translator-processor.js",
        options: {
            translatekey: process.env.GOOGLE_TRANSLATE_KEY,
        },
    });
    await stream.addProcessor(shareProcessor);
    shareProcessor.port.onmessage = async (e) => {
        if (e) {
            setIsProcessing(false);
            setProcessorOn(true);
        }
    };
    shareProcessor.port.postMessage({
        command: "processor-ready",
        enable: true,
    });
    setProcessor(shareProcessor);
};
For this demo, we do not need the OnInit and OnUnInit functions. Instead we will use port messaging between the main thread and the web worker to tell the processor when it should process share data. To do this, we add a listener in the constructor via port.onmessage. When the flag is true, the processFrame function will take the current share data frame and convert it into a valid Tesseract.js input parameter. This is done using the output given to us by the processor. Since it is a OffscreenCanvas type, we can convert this data to a Blob, then create a dataUrl that Tesseract can use as image input.
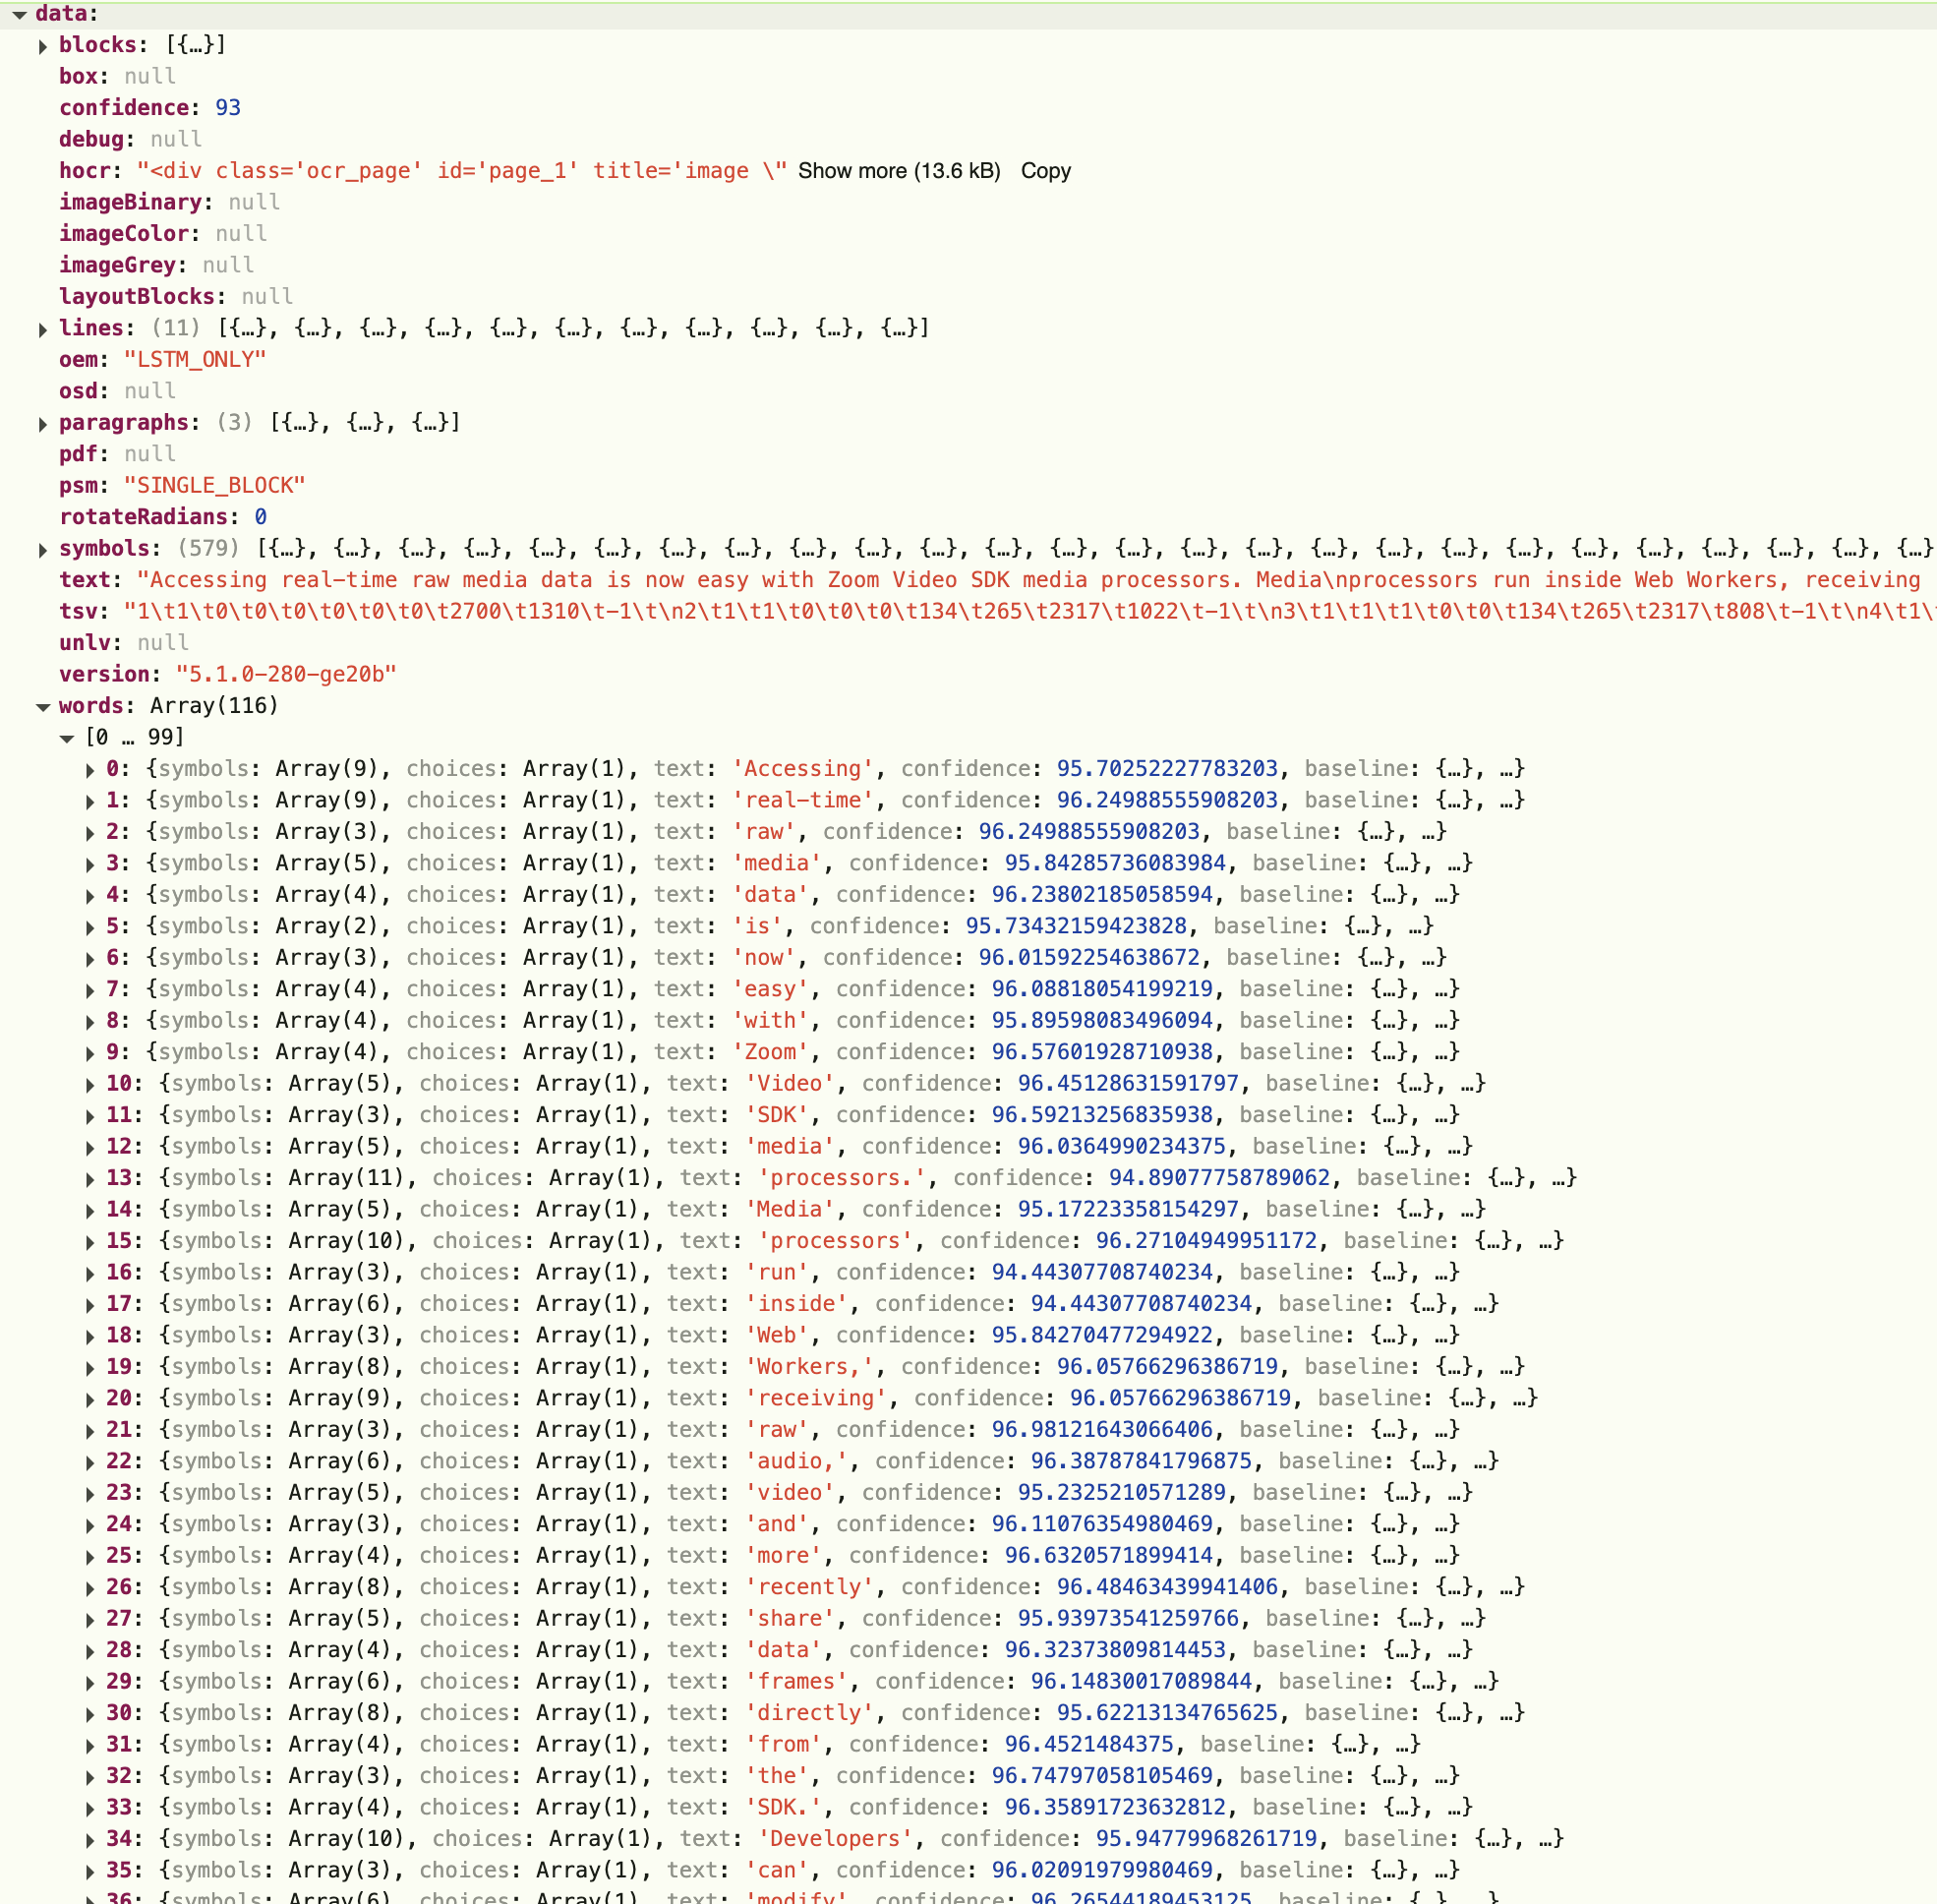
We can now call await this.tesseractWorker.recognize(dataUrl); to process our image and output a payload containing our results. Here is the sample image and the outputted results:
**Note that ShareProcessor only sends data frames if the previous data frame changes in anyway. This includes any movement on the screen share such as scrolling, mouse movement, etc. If there is no change to the previous data frame, the processFrame function is not called.
Translating the text with Google Translate API
Now that we have all the text data needed, we can now the Google Cloud Translate API to translate our text to the desired language. To use this API, you will need a Google Cloud account with translation enabled. Next, you will need to generate an API Key. To make a call to the Translate API we can use the https://translation.googleapis.com/language/translate/v2 endpoint like so:
//translate words using Google Translate Cloud API
const chunkSize = 127;
const apiEndpoint = `https://translation.googleapis.com/language/translate/v2?key=${this.translatekey}`; //your google translate key
for (let i = 0; i < wordArray.length; i += chunkSize) {
    const chunk = wordArray.slice(i, i + chunkSize);
    const response = await (
        await fetch(apiEndpoint, {
            method: "POST",
            headers: { "Content-Type": "application/json" },
            body: JSON.stringify({
                q: chunk,
                target: "ja",
            }),
        })
    ).json();
    const translations = response.data.translations;
    const arr = translations.map((obj) => obj.translatedText);
    translatedWordArray = [...translatedWordArray, ...arr];
    console.log("waiting before processing next word chunk...");
    setTimeout(() => {}, 2000);
}
In the above code, we have to slice our wordArray into smaller chunks of 127 index-sized Arrays. This is because the Translate API has limit of 128 words you can pass to translate in one API call. So we run a loop that slices our original word array and calls the Translate API for each slice. Then it adds the translated words to a new translatedWordArray to be displayed on the canvas.
Draw translated text to the canvas
Finally, we can use the canvas context to draw a filled box over the original word in the image, then write the corresponding translated word in the center of that box. The we can determine whether we draw a black box with white text or vice versa by getting the sum of averages of the RGB values of the four corner pixels around each word, then dividing by four and comparing it to our light/dark threshold value of 127.5. Here is the code for this:
//Write the translated words to the Canvas
data.words.forEach(({ text, bbox, confidence }, i) => {
    let height = bbox.y1 - bbox.y0;
    let width = bbox.x1 - bbox.x0;
    let text_x0 = bbox.x0 + width / 2;
    let text_y0 = bbox.y0 + height / 2;
    if (confidence > 60) {
        //detect if light or dark background
        let color1 = this.context.getImageData(bbox.x0, bbox.y0, 1, 1).data;
        let color2 = this.context.getImageData(bbox.x1, bbox.y0, 1, 1).data;
        let color3 = this.context.getImageData(bbox.x0, bbox.y1, 1, 1).data;
        let color4 = this.context.getImageData(bbox.x1, bbox.y1, 1, 1).data;
        let colorAvg = Math.floor(
            ((color1[0] + color1[1] + color1[2]) / 3 +
                (color2[0] + color2[1] + color2[2]) / 3 +
                (color3[0] + color3[1] + color3[2]) / 3 +
                (color4[0] + color4[1] + color4[2]) / 3) /
                4,
        );
        this.context.fillStyle = colorAvg > 127.5 ? "white" : "black";
        this.context.strokeStyle = colorAvg > 127.5 ? "black" : "white";
        this.context.fillRect(bbox.x0, bbox.y0, width, height);
        this.context.strokeText(translatedWordArray[i], text_x0, text_y0);
    }
});
The processed data frame will now output our translated text like so:
![]()
As you can see, building powerful, fully customizable media processors is easier than ever with Zoom Video SDK Processor. You can view the UI enhanced version of this application on our Github.
To dive deeper, check out our raw-data documentation and explore the sample processor repo for more inspiration.